When shooting tethered, it’s easy to get lost in files and make things more complicated than they should. However, with Capture One there is an easy way to stay on top of things and cut your image selection time drastically.
While we could debate on whether shooting tethered is wise or not, I believe plenty enough articles are praying the advantages of a tethered workflow. My software of choice when shooting with my camera connected to my computer is Capture One. I feel like it’s a lot more reliable than Lightroom in this department and it offers quite a few more features.
However, shooting tethered with Capture One can be overwhelming, especially if you don’t know the ins and outs of the Phase One photo editing app. When using a session based workflow, you’ll end up with all your files going to the default Capture folder which is good, but far from ideal. There are different ways to stay organized and make things easier for you and get your session streamlined right from the beginning.
Let’s start by creating your session. When opening Capture One, press Cmd/ctrl+n and then a new window will pop up. Getting organized begins by giving a distinctive name to your session. I personally always start by the date in a YYYYMMDD format to get my folders listed in chronological order in my file explorer. After the time, I add either the name of my client, or a short description of the session’s goal, or a combination of both. Be careful not to make the title too long, because we may use it to name our files and we don’t want to make our files’ name overly long.

Leave the rest to the default settings and press ok. With our brand new session, let’s reflect on our shooting. Let’s stay it’s a beauty editorial with prelighting and four looks in total. What we can do is create five different Capture folders so that each look is in its own place instead of being mixed up with the prelight tests and the other looks. It will make the selection process much more manageable.
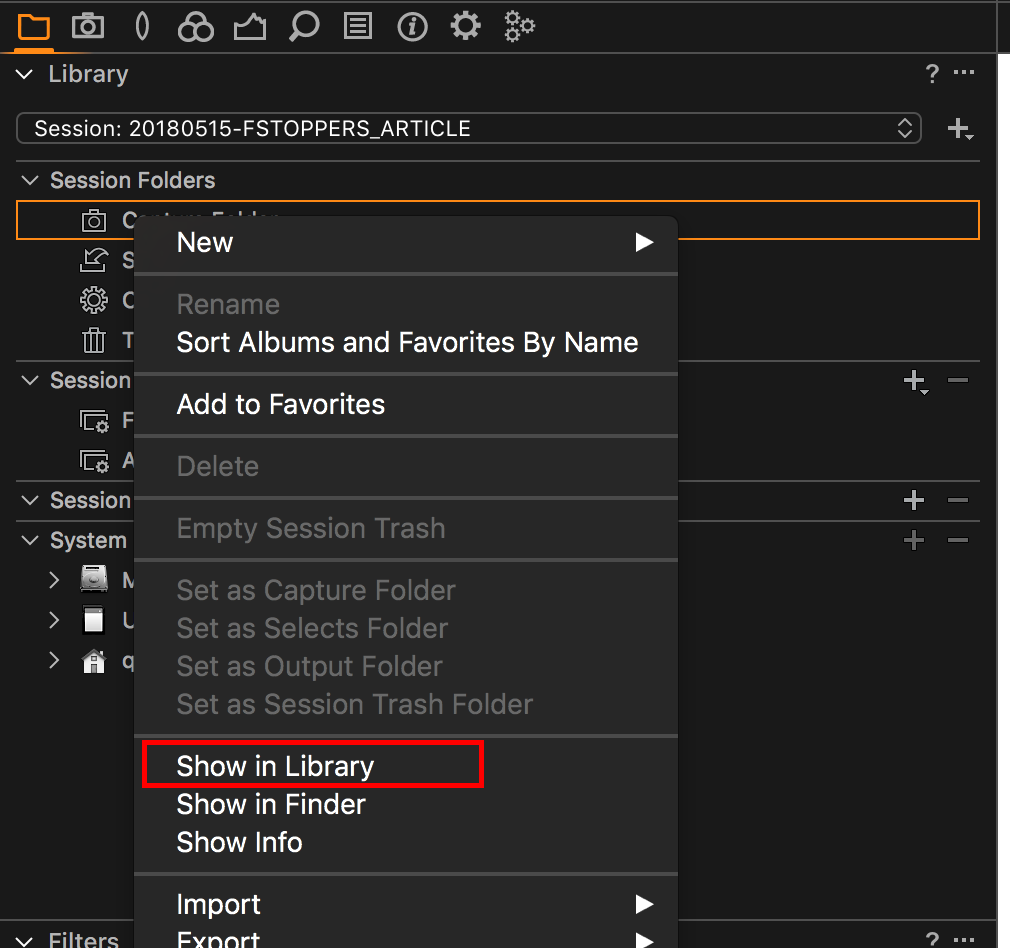
In the Library tool, right click on the Capture folder and select Show in Library.

It will move our selection right to the Capture folder in our Library tool. From there, right click on the Capture folder Capture One selected for us and press New Inside "Capture" > Folder. Give this folder a name, for example, 00-Prelight, and click ok.

I add the numbers before the name just so that, again, when I go in the Finder or Windows Explorer, my folders are listed in the chronological order. Then repeat the folder creation process for each look.

For this example, I’ve given very common folder names for two reasons. One because it’s a fictional example and I believe it’s more clear this way for you to follow, and second because at the end of the example we’ll see how we can create a session template that recreates this structure for any future session that has four looks and prelight.
At this stage, if a camera was connected and an image was shot, the file would go to the default Capture folder. To change the Capture folder, right click on the folder you need to use – which would be the prelight one first, look 1 second, etc. – and press Set as Capture Folder. The camera icon that was shown at the end of the Capture line in the library will move to the 00-Prelight folder, and a heart replaces the camera icon for the default Capture folder. The heart indicates that you’ll find the folder in your session favorites.

If you shoot often, you’ll probably have to set folders as session favorite and capture folder quite regularly. So be sure to edit your keyboard shortcuts and define one to set your capture folder and one for your favorite folder. I’ve personally alt+c set to determine the capture folder and alt+f to add a folder to the session favorites.
Once you’ve set your shortcuts, add all the folders you’ve created as session favorite, including the 00-Prelight. This way, you won’t have to navigate through the whole folder structure each time you want to set a new Capture folder. All your favorites are found at the top of the Library tool, right below the Session folders and Session Albums.

With the structure in place, the organization is getting better, but we can go one step further. Let’s move to the Capture tab, which should be the second one when using the default workspace. By default, Capture One will name your file with the session name and the camera counter. It’s okay, but with our structure, we can make it better, or at least make it so that our files are easily recognizable.
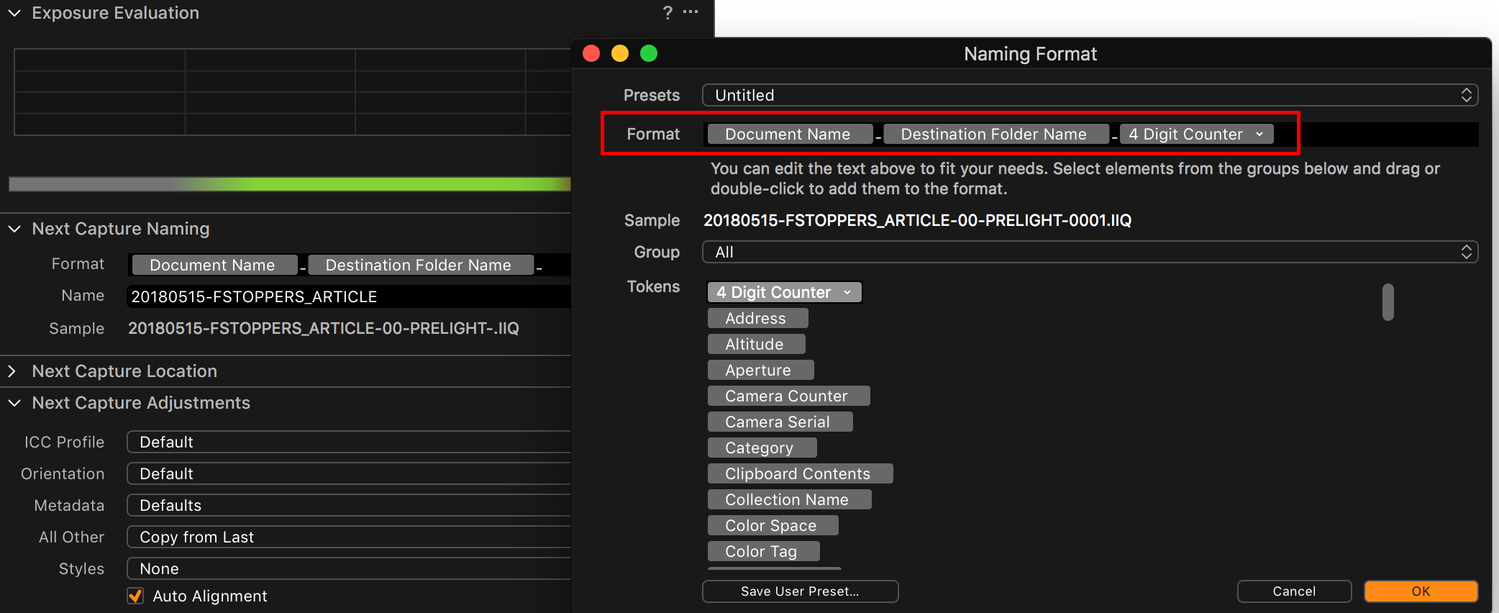
Instead of the Name element which uses the Name written in the field below the Format field, let’s click on the three dots next to the field, and put Document name in the new window. The latter is the name of the session. So if we were to change our session name and shoot more files, it would change automatically. Then, let’s add the Destination Folder Name. It may sound stupid, but at least, whenever we export our files, even if they are mixed up, we’ll know what look or part of the shoot it was. Just make sure to add a dash in between the two elements to make the name more readable. Finally, let’s put a unique number at the end with the four-digit counter element. If you want, you can save this naming as a user preset at the bottom left of the window.

Now if we summarize, we have a folder for prelighting, one for each of our four looks, and our files will be automatically named after the session and the folder in which they’ll be placed. When shooting, you’ll want to switch the Capture folder each time you change the look or go back to prelight. To do this, you can either use the Next Capture Location tool or the Library tool. Both will yield the same result. Also, when changing the Capture folder, it’s good practice to reset the capture naming counter, which can be done by clicking on the three dots top right of the Next Capture Naming tool and then selecting Reset Capture Increment. Just make sure not to reset it if you go back to a folder, for example, the pre-light folder.
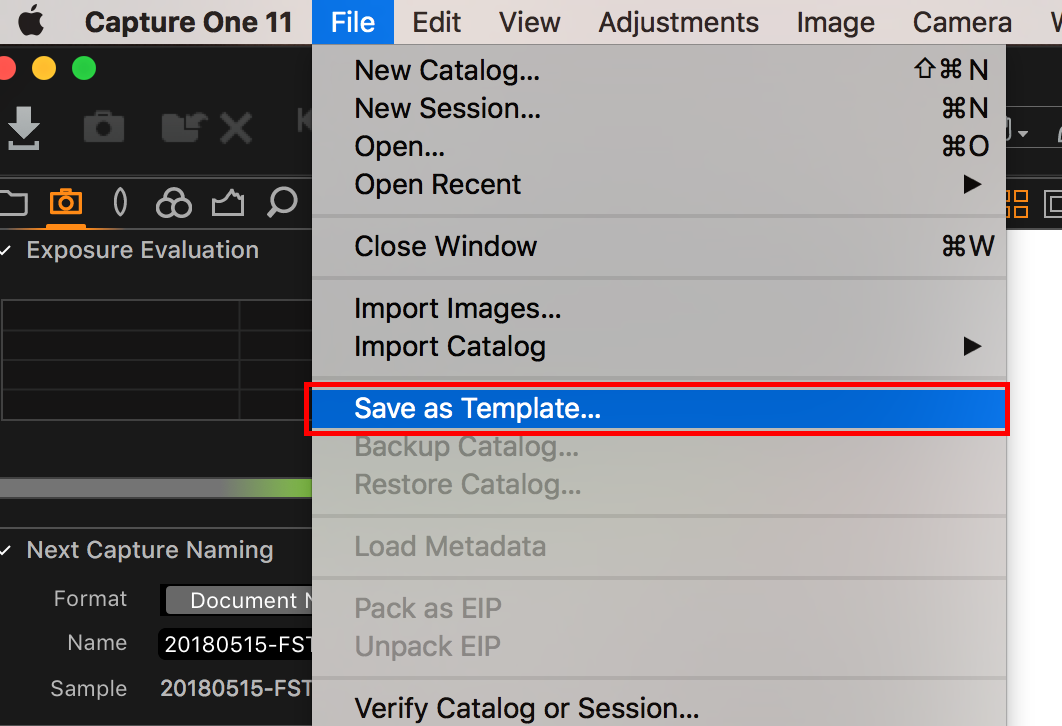
Like I said before, you can create a template out of this. Just head over to the File menu and click on Save as Template, give it a name, and you’re done!

Next time that you’ll create a new session make sure to select the adequate template and Capture One will recreate everything we’ve done here for you!

I’d advise any commercial or editorial photographer, no matter if you shoot beauty, fashion, sport, corporate, or any other genre, to create a bunch of templates with what they encounter the most. It’ll save you a lot of time!
Finally, if you are wondering if there’s any way to show all pictures found in the session, no matter in which folder they are, the answer is yes. Just go to the Library tool and select the pre-defined Session Album named all images.
Very recently I shot beauty images for a makeup artist workshop, and instead of creating a new session for each new look or makeup artist who attended, I relied on the folder structure method shown above. I had a total of 24 folders, and it worked great. I could show each makeup artist her images or all images shot during the day to the educator without having to open multiple sessions that would crash my laptop.
And one last tip, when exporting your files you can also make use of the Image Folder Name element to keep the structure you created in the Output Folder.


Insightful tips here. I use capture one religiously for shooting tethered, but havn't put in the time to learn the software like I have with thier competition. You're right "Shooting tethered with Capture One can be overwhelming" so little tips like this go a long way in helping me stay on top of things.Thanks.
I'm glad it helps! The fundamentals of Capture One are easy to grasp in my opinion. The interface is a bit different than LR, but once you've customized it, it's as easy to use. However, more advanced features are way too often left alone because people use it like they'd use LR even though it has other features that can make one's workflow much more efficient :)
Quick question: if shooting tethered with C1, and the camera and/or laptop goes sleep, do the connection remains live or not? In LR I always have to restart everything, if I let the camera go sleep :(
I believe it depends on the camera. But to avoid any issue, I always have my laptop plugged to an outlet to prevent it from going to sleep or run out of power, and I disable the auto-sleep or auto switch off of my camera.
Excellent article! this provided me with the exact information I was looking for to create my own session templates in CaptureOne. I shoot a lot! So I'm always looking for workflow optimisation and efficiency opportunities. I'd be curious to know about your "editing" (not retouching) workflow, to discover if you have any suggestions there.
Thanks and cheers from London.
The only downside a our sessions, is you can "clear sessions" with a single click (literally) and loose all your session edits. You can reimport the photos as it doesnt delete the original image, but will need to re render the previews. If you have a fix, id love to know. I recently accidentally did this and the images were not in the session trash or the "all images" tab. It was about 800 images *poof*
Amazing Post! It's really great and informative article I have seen today, I appreciate your hard work and skills. Thanks for sharing! https://filmstarjackets.com/7-tv-series-jackets
hallo, thanks for this tutorial.
I come from lightroom and i need to improve my workflow on C1 when i shoot fashion catalogues.
I usually shoot around 70 different looks in a day. I need to tether images inside different folder called with a code assigned to dresses. So i have to create a new folder with a given code name every time model changes dresses. In lightroom i used to click ctrl+shift+t; it opened a window "new folder input name", i wrote the code of the dress, than a new folder was created and all photo were thetered inside that one.
is there in c1 something like that? instead of create a new folder, rename it, set as a caption folder?
Another usefull think in LR was that if i needed to add a couple of photos of a dress i just had to rewrite the name of that folder.