
Capture One doesn’t need to be introduced anymore. It’s Phase One's professional raw converter, and it has grown into a very compelling Lightroom alternative over the past few years. The software is meant to develop raw files, but it can do much more. Its usage doesn’t have to stop at simple exposure and contrast tweaks. Let’s see how we can unleash its full potential and, as Phase One likes to phrase it, experience the ultimate image quality.
Capture With the End Result in Mind
If the seven reasons to shoot tethered listed by Michael are not enough to convince you, there are actually more reasons. Capture One is designed to make professional workflows as convenient as possible. If you are a commercial or fashion photographer, you most likely have to shoot pictures that will have text added later on by a graphic artist. In the real world, that means you must think about the negative space you leave when framing.
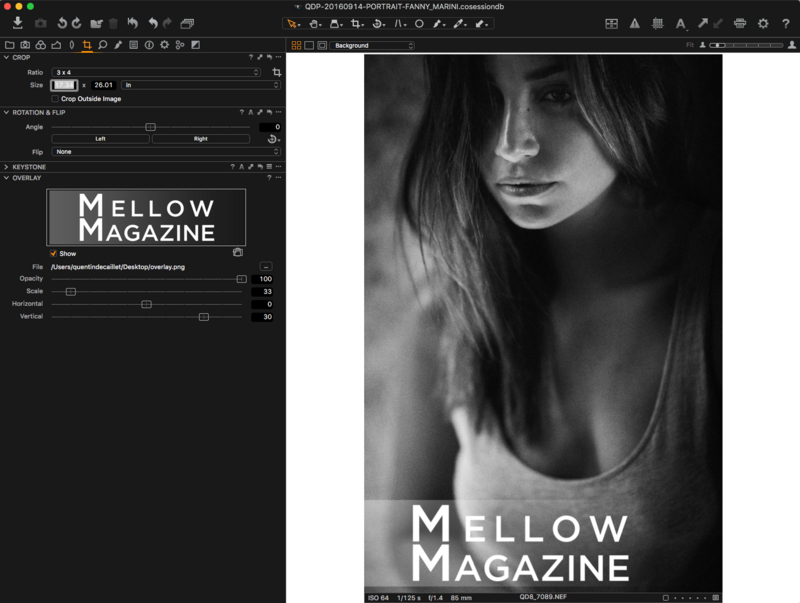
Using the overlay feature found in Capture One, you can superpose a file — preferably a PNG to have transparency — over your image and see exactly if your capture could fit your client needs. You can use this feature anytime you wish. Meaning, it can be while capturing your image using Capture One live view mode or when the files have been created and you must decide which picture to go with. You can also use it for more creative processes such as multi-exposure images, for compositing, or simply to make sure your framing is exactly the same as a previous shot you took.
Easy Selection
No one likes to spend time selecting files, especially not when a client sends a long list of images, and one has to go through all the session to find the ones to retouch. Capture One has a few very handy features to make the whole process much more efficient.
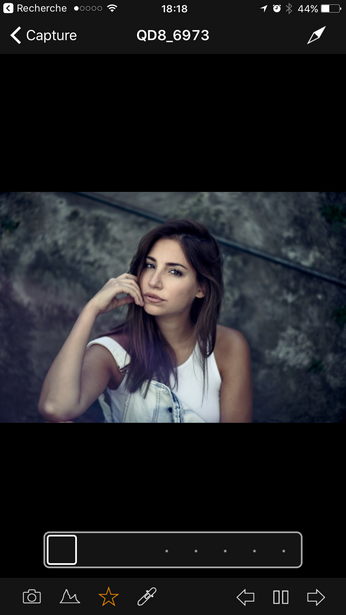
The first functionality is called "Capture Pilot" and makes sense when you shoot tethered. It will essentially run a web server that your clients can access from their smartphones or tablets through a web browser or the Capture Pilot app. The setup is quite easy. You only need to make sure the client device is connected to the same network as the computer you use for tethered capture. Once connected, the user interface is very intuitive and doesn’t require much explaining.

Your client will be able to rate and flag images as you shoot. Once you are done shooting, the files have already been reviewed, and you are left with just having to move the selected files to your session selection folder.
The second feature offers the ability to select files from a text list. Let’s say you rely on a gallery system such as Photodeck to have your clients select the pictures after a shoot. They will most likely send you back a list of the files they want to obtain or the system will give you an order with a list of images. With most raw converters and cataloging systems, you have to use the search feature or browse manually. Since Capture One 9.2, it’s a thing of the past. Go to Edit > Select By, and you will find the fantastic "Filename list” feature. Just copy/paste the list your client sent you, and the software will do the rest for you. Also, note that you can ask Capture One to ignore files extensions. This is very useful as some photographers shoot different systems and also because some clients will not give you the extension in their list.

Pre-Retouching
Pre-retouching is probably not an official term, but to me, it’s whatever can be done after a raw conversion to diminish my job in Photoshop. Local adjustments are part of it. They are not really part of the raw conversion per se, even though we are working on the raw file. I see it more as a pre-retouching or a finishing touch if Photoshop is not part of the workflow.
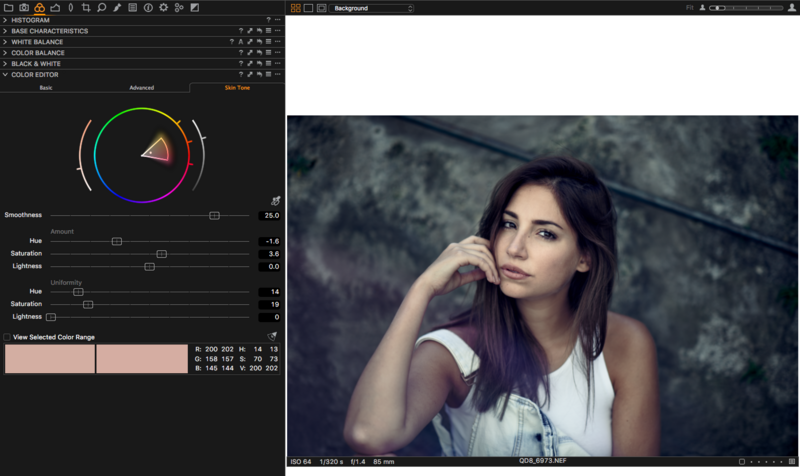
In Capture One, there are multiple ways to polish a file. There are local adjustments, just like in Lightroom, but there also is the Skin Tone Color Editor tool and the possibility to create color-based masks for local adjustments layers. Why are these two tools years ahead of what Lightroom offers? Well, because you will be much more precise and cut your work in Photoshop almost in half for anything color-related. The Skin Tone tool will uniformize the skin tone for you in terms of luminosity, saturation, and hue. You chose the degree of adjustment for each and let Capture One do the work. I described the whole process in a previous article, but it’s due for an update as the tool has slightly evolved since then. Until I find the time to write a followup, you can probably get a grasp of how everything works by following this previous article.
Creating a mask based on a color selection for local adjustments is incredibly powerful and useful. It can be used in conjunction with the Skin Tone tool for close to perfect results, but it can do so much more! Photographers that need very precise adjustment of colors will love this tool. Going into the details of how it’s working would be too long, but be sure to read the article regarding color based adjustment layers I wrote a while back. It’s still up to date and will cover everything you need to know to use it fully. In short, you will be able to adjust one color with all the tools Capture One has to offer, and then you can even refine the mask manually to restrict the area affected by the adjustment.
Luminosity and Color Matching
When you develop your raw files and then retouch your images, sometimes, the pictures don’t look quite similar in terms of luminosity or colors. Photoshop has a few tools and tricks that can help solve the issue, but so does Capture One. I personally rely on the latter most of the time as I use it to create my final JPEG or TIFF files.
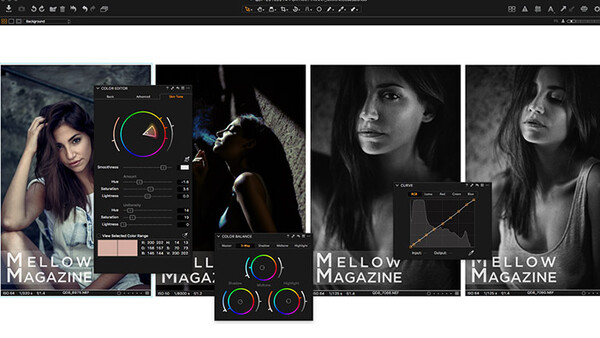
You won’t have all the fancy visual help layers you could have in Photoshop. However, you will have the curve tool, including the luma curve and better yet, the color balance tool. It’s probably one of the features I love the most for color editing. It’s very visual in the way it works. It separates the three main zones of an image in terms of luminosity, and it’s incredibly easy to adjust. With curves, you either have to know your colors perfectly or have to guess it. With the color balance tool, it’s much easier! Too much yellow in the highlights? Push the highlight balance the opposite way. Want more cyan and blue in the shadows but not sure how much blue and cyan? Instead of going back and forth between the two curves, you simply use the color balance shadow slider and adjust it until it looks right. Color correction and toning have never been easier!
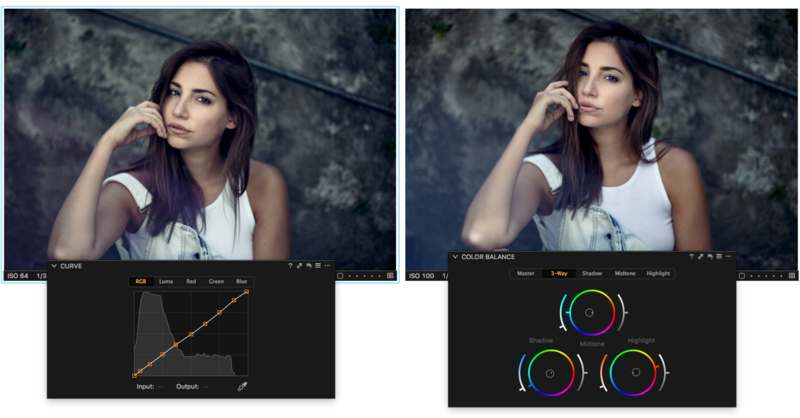
So, once your TIFF files have been edited in Photoshop, bring them back into Capture One, put them side by side, and use the luma curve and color balance tools; you will have matching looks in a matter of seconds.
Phase One’s raw converter has a lot more to offer than just the above, but listing all of the features in one single article would be too long! So, if you haven’t tried Capture One yet, be sure to download the free trial version. If you then decide to go ahead and buy the software, be sure to use the code AMBQUENTIN to get 10% off your license. I’ll be back with more content related to Capture One in the coming weeks, so be sure to stay tuned! Also, feel free to let me know in the comments below if there is any topic in particular you would like to see explained or discussed in future articles regarding Capture One.


Join the Fstoppers community for free
-
Post comments and join in the discussions
-
Browse the site ad-free
-
Share your work and get featured in the community
-
Compete in the photo contests for fun and prizes
19 Comments
Well done Quentin! I've been interested in trying out Capture 1 for sometime now but afraid to stray from my all Adobe workflow. Also the price tag keeps me at bay, how much is the software now??
I made the jump 3 years ago, and have never, ever looked back man. C1 beats the living hell out of Lightroom, and working with Photoshop isn't difficult at all. Just do it dude, you won't be disappointed.
C1 seems to be a lot faster than LR too in recent experience.
100 times faster. You wouldn't believe how much snappier C1 is.
Many years ago I tried C1 and the learning curve and I did not get along. Last year I bought into the Sony world and C1 for Sony is $50 but for everything else (except maybe Phase1) I think it is $300. Either they made it more intuitive or my brain changed but I really like it now.
C1 workflow has improved a lot! The guys at Phase One did an outstanding job to make things easier with each new release. I personally can't wait to see what future releases will bring to the table :)
Its around $305US. There are a couple deals/coupons available where you can get 10/15% off.
You can try the 30 Day trial for free (which is what I did) plus for every update, you are entitled to re-try the trial for free again.
It's currently available on Phase One store for €279 which is roughly $US 305. Using AMQUENTIN code you'll get 10% off. If you prefer a monthly fee, then it's €12 (around $US 13), but the 10% off won't apply. All the details are available here: https://www.phaseone.com/en/Online-Store/PurchaseDetailsPage.aspx
They have the subscription model also. 12 EUR for 2 seats. Works really nice. I've been Aperture use for a long time. But after Apple discontinued it& i've moved to Lightroom.
And i didn't like it. I tried hard but for my workflow it didn't worked out.
Tried C1 a year ago and doesn't look back. It's a really nice software. Works much faster then Lightroom and workflow is really neat.
Give it a try. They haver 30 days trial period.
Same for me. I was on Aperture for about 5 years. Once I heard it was discontinued, I gave Lightroom a try. Just couldn't wrap my head around it!
Tried C1, within a day I was hooked!!
Nice! That "select by filename" feature just changed my life. Thanks!
It's unfortunate that none of these features is a history palette or the ability to stack series of images in the browser.
I really hope Phase One adds this feature to the next update. However, in the meantime, I create variants if I wish to have multiple edits or if I want to be able to get back to a certain point of my edit. Not extremely practical, but it kind of works…
I used to love capture one. It had the best color of any raw converter, by far. However when I upgraded to the D800 the color was terrible. I even sent them side by side samples of their conversion of the D800 next to the D3 compared to Nikon's CaptureNX. The D800 had a terrible green cast on flesh tones that ruined it. They did update the D800 profile but it was only marginally better. I eventually went back to Lightroom, which I really dislike.
Note that you can customize your ICC profiles in Capture One. This way, when importing your files, you can get the colors that you like for a certain camera. Let's say, you love how C1 handles your pro bodies files (D4s and D5) but not the D810 or D750, well then in the color editor, you tweak one file of the D810 or D750 and make C1 take these changes into account for future files (there is something called "Save as ICC profile" or something similar allowing that). Hope that helps! :) I may touch on that feature in a future article, because it's actually extremely useful to save time.
I am a recent convert to Capture One after using Lightroom for years and I am very happy with it. I am a wedding photographer and would love to know of a way to change the capture time for my second photographer's camera. I initially use PhotoMechanic, however whatever PhotoMechanic uses to change the capture time does not correlate to Capture One which is slightly frustrating. If I could get this figured out I would be so happy and it would save a lot of time. Also, is there a way to add adjustment layers to a style preset? I often use three adjustment layers, a doge layer, a burn layer, and a skin smooth layer. I often use those on several images through the wedding and it wold be nice to have them already there. Now I have to make them and sync them to the other images which isn't terrible, but anything to save time is huge for me.
There isn't a feature in Capture One that allows to edit the capture time. But if you edit it in PM it should work. I know older versions of PM didn't edit the same EXIF/IPTC info as those that Capture One read… But if PhotoMechanic and C1 are up to date, it should work.
Great reassuring article.
I've switch to Capture one about 6 months now and I love it. I was intimidated at first to switch from Lightroom and my Adobe flow, but I have not regretted it since. The work flow and controls in Capture One is easy. Zero Disappointment.
I have 2 wishes for C1 - geotagging and PSD support