
Sell the fake or add to the surrealism. As a creative retoucher and composite photographer, these are two aspects that in my opinion are very important: you either learn techniques to help blend realism into the piece or to make it stand out and add surrealism.
For example, you can have a model float in the air with giant swords, fighting a very angry octopus, but if the shadows are in the wrong direction to the sun, then I am sorry, but that is a big fat fail! And it is the little details that help solidify the realism or increase the surrealism. Today, I am going to teach you a technique that I came up with all on my own (yes, I am claiming this technique as my own), and it will add that final touch of either realism or surrealism to your images.
It is fair to say I spend a lot of hours scouring the internet for new photo manipulation techniques, and that is not including the hours where I get sidetracked watching videos of playful kittens or giggling babies in the deep, dark depths of YouTube. This can happen to most seasoned web browsers among us, so don't feel bad about it. So, to save you some time, today, I am going to reveal a simple technique to add bullet and fire haze in Photoshop. You are probably scratching your head, wondering what bullet and fire haze are. Well, my friend, they are two completely different entities: one (fire haze) is to sell the fake and the other (bullet haze) is to add to the surrealism. To make it easier, let me give you a little description of each one.
Bullet Haze
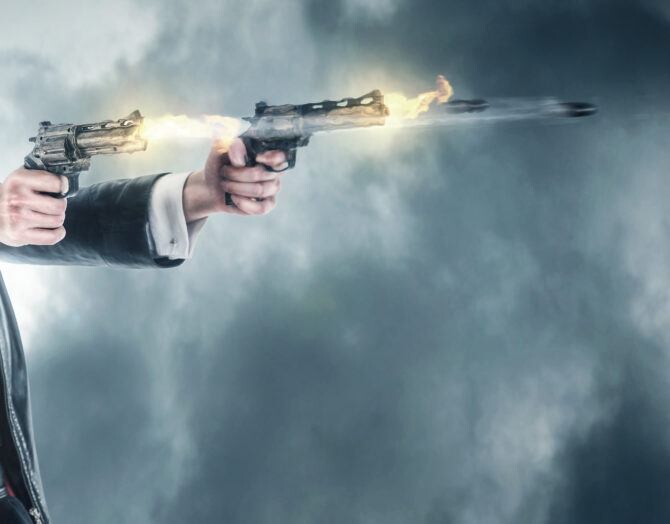
Have you ever seen the movie "The Matrix?" If not, then shame on you! Go and educate yourself on one of the defining action movies of the nineties. If you have, then you will remember the scene where Neo is fighting the agent, and they are both locked into a gun duel. In slow motion, the dive into the air, shooting bullet after bullet towards each other. As the bullets soar slowly through the air, they leave a trail behind them, which is bullet haze. Here is a portion of an image that I retouched for a UK photographer Johnny Kaos. I added in the bullets being shot from the gun and the bullet haze, which is the distortion of the air around the end of the gun and following the bullets. This effect adds to the surrealism of the image and stylizes it.
Fire Haze
Fire haze, on the other hand, is a cool way to add realism to an image. Have you ever been stood by a fire and watched the air above it? The heat rises and creates a wavy distortion. Sometimes, the same distortion can be seen on hot sunny days rising from pavement.
So, now that we are up to speed on what bullet haze and fire haze are, let us get into how to create the effects. The good news is you can create both using the same simple technique. First, open your image in Photoshop and make sure your file is set to 8 bits, as you will need to use the Photoshop filter gallery, and you will not be able to use it if your file is set to 16 bits.
Next, go to the Filter section on your top bar, and choose Filter gallery from your drop-down menu. Once the filter gallery opens, click on the Distort folder, and then, click on the Glass filter. This is what your options should like in the Glass filter section. Make sure the Texture option is set to blocks.
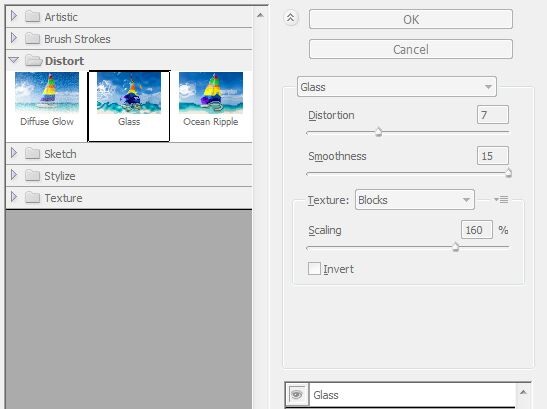
You have three sliders: distortion, which controls the strength of the dstortion effect (the ripples); smoothness, which softens out the blocks of the filter effect; and scaling, which is to control the size and amount of blocks in the filter.
You can play around with the sliders if you like, as every image is different, but for my images, I found the settings about to be what gave the most pleasing effect. I would recommend that you leave the smoothness slider at 15 for every image.
So, once you have the settings nailed, go to the top and click ok. This will then take you back to your image.
Your image now looks like it is been murdered with the forward warp tool in Liquify, but do not worry! Go down to your adjustment layers, and add a layer mask. Then hold down Ctrl, and press I to invert the layer. This will hide the filter effect on your image.
Then Press B or select your brush icon. Turn the flow down to around 30%, and then, slowly brush in the effect wherever you want it. And it is that easy! The same technique can be used for both the bullet haze and the fire haze, so you only have to memorize one sequence.
The possibilities with this effect are endless, and I am sure there are many other ways to use it. So, go create some images and give it a whirl; be sure to share the final pieces with me, so I can have a good look. I hope that this technique was helpful in some way or another; I would love to hear your comments or any little Photoshop techniques that you have invented yourselves. We can all learn some new tricks from each other. Let's share the love.

Join the Fstoppers community for free
-
Post comments and join in the discussions
-
Browse the site ad-free
-
Share your work and get featured in the community
-
Compete in the photo contests for fun and prizes
4 Comments
Vapor trail and mirage are the terms used in gun sports not haze.
Since I am not as talented as some using photoshop, I prefer to just capture the real muzzle blast in camera.
That’s awesome. But I’m betting that’s not a self defense load. You know flash reduced. By the powder mix. What chambering was the gun.? Revolver?
I guess that depends on what you are defending against! custom five hot revolver built by Dustin Linebaugh, chambered in 500 Linebaugh. The load is a 450 grain hardhast bullet driven by 28 grains of H110, yielding about 1,200 fps from a 4-3/4" barrel.
The photo is a self portrait shot with a 5DIII with a 3 second exposure. All of the exposure is provided by the muzzle blast. It literally acted exactly as a flash/strobe would.