
From the outside looking in, the creative industry can be daunting. We think we need thousands of dollars of equipment to take images on par with our peers – but that’s not strictly true. Here’s a breakdown of how I photographed one of British pop’s biggest acts using cheap lights from eBay.
British electronic musicians Clean Bandit are one of the country's biggest breakout groups of recent years. Since their debut in 2014, they have sold over 15 million records. Naturally, I jumped at the chance to shoot an editorial with them when the opportunity arose through FAULT Magazine. Hiring a studio is often an affordable way to gain access to lighting equipment you yourself can’t afford. For this shoot, however, I wanted to shoot at an upmarket member’s club I had access to, meaning that I’d be required to supply my own form of lighting.
Inspiration and Planning
I began by researching recent shoots the band had undertaken. I think it’s important to be aware of the images any musician has been putting out – both so that you can ensure your shoot will be different, but also so that your photo will be line with their brand and public image.
Having become obsessed, and largely shooting with, flash for the majority of this year, I had been itching to try continuous, spotlight lights for a while by the time I got to planning this shoot. When I began the creative brainstorm, I also happened to be watching the new season of Stranger Things and was enjoying the nostalgic 80s theme. The concept that came to me for Clean Bandit’s shoot was loosely inspired by that aesthetic: I wanted a vintage setting, illuminated with a soft and warm low light, rounded off with a bit of varying color. As always, I was open to it changing on the day, but it’s important to have a foundation to work from.
Having previously ordered a continuous lighting set from eBay which had successfully served their purpose for a number of years, I decided to see what was on offer. I ended up purchasing this set, which seemed fit for purpose. Conveniently, they also come with a few basic color gels – perfectly in line with what I needed to shoot my concept.
Set-up One
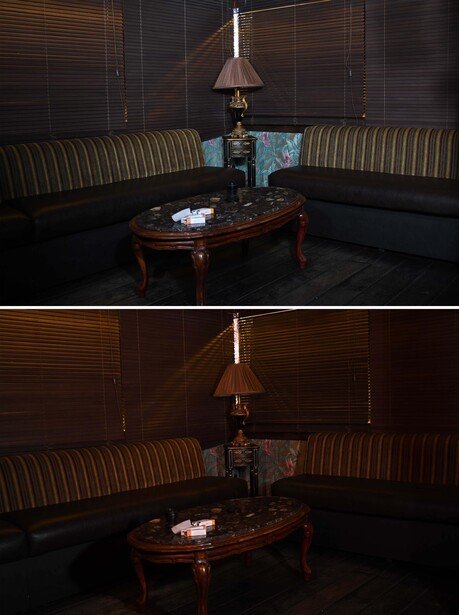
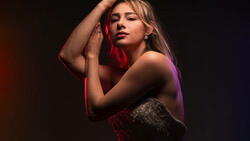
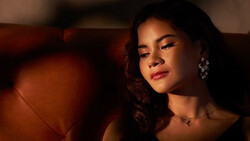
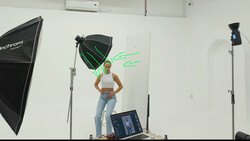
Every set-up was lit using all three of the lights included in the package. The great thing about colour gels is there’s so many different combinations and experiments you can play with for different results. For this first group shot, I used a combination of different shades of oranges and reds to set the scene. An initial test shot of the set felt bland (see a comparison below), so I decided to utilize the color gels right from the off. Each light had a color gel attached to it, but for the light in the center, I moved the gel a few centimetres off, so that the white light could illuminate Grace (center) a little more.
The colors from the gels are quite intense in this shot, which at first made me question it. As photographers we are creatures of habit, and seeing a photo that didn’t resemble my usual style initially made me second guess myself somewhat. It’s important to let go though; experiment, be open-minded, try different things. I like this image and it reflects what I envisioned in the planning stages.
These lights only cost £105 (approx $140) at the time of purchase. Great as it may be for those who can afford to splash thousands on the latest tech, for the rest of us it’s more important to familiarize yourself with the equipment you’re using. If you know it well, you know how to utilize it. To be certain the vision you have in your head can actually be brought to fruition is invaluable, and you can plan how exactly how you’ll execute your idea on the day.
Set-Up Two
Positioned to the left was one light with a cyan-colored gel; the right, another light of equal brightness, with a red gel. I placed one light in the middle, without any color gel. I focused this light on Grace (center) but dimmed it slightly so as not to lose the low light ambience of the shot that was being created by the two lights already pointing at the group. Whilst I wanted to draw attention to Grace as the central figure, I didn’t want to create too much of a contrast between her and the boys, or I’d risk having to balance the three of them by illuminating them in post-production.
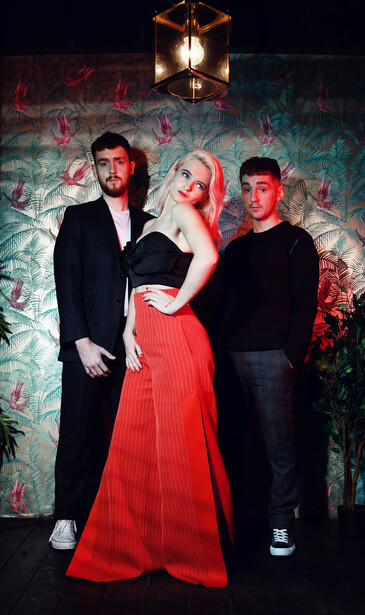
In front of the white light in the center, I had my assistant hold bedroom blinds which I’d purchased for £7($9) at a home improvement store to create a shutter effect. It’s subtle, mostly present at the top and bottom of the image, but I feel it helps add another layer of character to the photo. It’s fun to trial different effects, and although small, and this certainly made taking the image a more interesting experience. After all, I’m a photographer – light and shadow excite me!
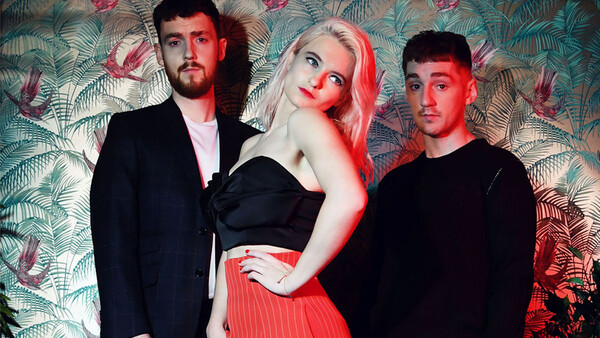
Set-Up Three
For the final group shot, and with the band spread out equally in terms of composition, I had a better opportunity to fuse the colors. I had one light to the left, with a red gel attached to it. On the right were two more lights — the first with a purple gel covering half the light (so the white bulb was half exposed), and a green gel on the third light. This is the red-purple-white-green palette you see in the final result. The light and color surrounding Jack (left) was also topped up with the light from the venue’s vintage fan lightbulb, with its orange hues really complementing the color already generated by the red gel. The great thing about these lights (and one of the main attractions to me for purchasing them) was the ability to dim them to your preference of intensity. It meant this set-up was really fun to shoot, as I played around with a few different layouts before settling on the final shots you see here. The venue had lots of character, and the colors and body positions only accentuate that.
When we’re admiring another photographer’s work, it’s easy to think that they have better cameras, lenses, and lights than us. We all do it — particularly because we only ever see the very best photos that an individual has produced. When established musicians are involved, that expectation only intensifies. Hopefully, the story of how these images were shot may be a welcome reminder that it’s not what you have, but instead how you use it. These lights are by no means top-of-the-range, and unless looked after may not last for years. But armed with my idea for the shoot, I sought them out and knew they’d be perfect for the purpose of this editorial shoot, and it’s great to have the option of using these for any shoots that require a spotlight effect in future. At such an affordable price, they easily pay for themselves.
I’m always open to constructive criticism – feel free to let me know your thoughts, or if you have any questions as to how these images were executed that I’ve not already touched on.
This is not a sponsored post and is in no way in conjunction with eBay or any of the mentioned sellers.
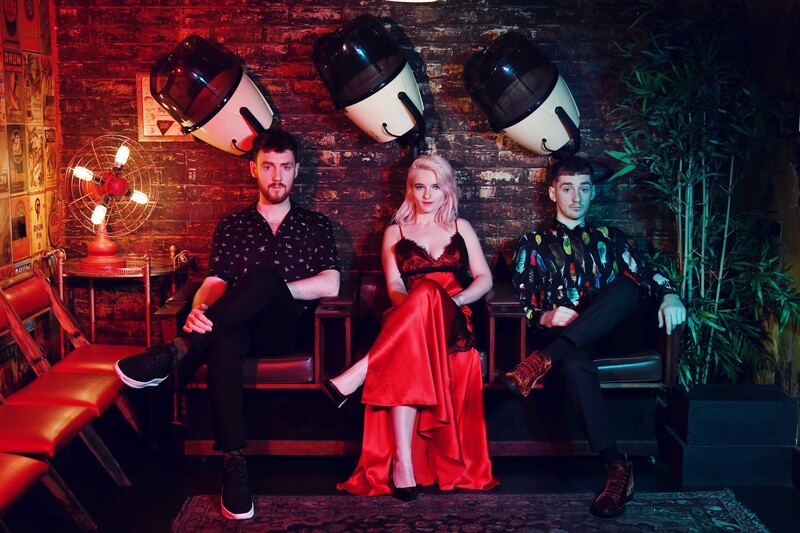
This shoot features Clean Bandit in an online spread for Fault Magazine.
Join the Fstoppers community for free
-
Post comments and join in the discussions
-
Browse the site ad-free
-
Share your work and get featured in the community
-
Compete in the photo contests for fun and prizes
10 Comments
Nice work. I've been looking at LED options for a portable set of continuous lights to use on location, but the price and control w/ the barn doors of these might be a better ticket.
Thanks! I don't expect them to last forever, but I needed a quick fix for what I had in mind for this shoot, and they seemed ideal. I've had a set similar in price before, and when looked after, they lasted longer than I expected.
Nice read! In the right time for me, just when I'm trying to experiment with gels for the first time and about to buy some. PS. I love Clean Bandit and Fault.
Gels definitely take a little experimentation to get to grips with, but they're fun and can really make an otherwise bland picture exciting!
Great article, proves the point that its how you use it, not how much you paid for it. And great shots BTW!
Thanks Jonathan!
The quality of the equipment really does not matter as long as you're in a controlled environment. The quality of the photographer and the editing/retouching are what really matter. If you had used Profoto lights with this same setup, the photos would look the same.
I agree, control is most important. Being acquainted with the equipment you're using is invaluable. It's also true, you can't tell from the final image what was used here - be it lighting, camera, lens etc!
How did the results from using the eBay continuous light differ from the strobes that you had been using?
I love strobes (have got really into them this year) but I feel they would just be too bright and intense for this concept. The lights I used for this shoot could be dimmed to my preference, and when you're using 3 lights, that meant you could play around quite a lot with different effects. Also meant I could see right in front of me how it looked, which is something I've missed from shooting continuous lighting!