
As someone who prefers to shoot using natural light, I have realized that sometimes, a photo begs for artificial lighting. For years, I struggled with how many strobes to use and where to place them. I lost patience and focused instead on natural light. By spending the time to learn how lighting actually works, I eventually gained a better understanding of how to use strobes. In this article, I hope to share with you how to use just one strobe to create jaw-dropping results.
The following article will not be very complex or dense. Personally, reading intricate details on how and when to use strobes generally causes my eyes to glaze over. This is an attempt to show you when and where to take a portrait using the sun and one single strobe.
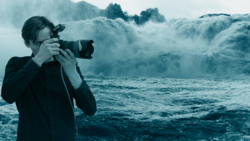
My go to light source is the sun, there's no dragging gear, it's simple and it’s free. (For more information, look into this article where I discuss finding and using good natural light.) Even though using the sun as a light source is the most pleasurable, there are times when the sun just doesn’t cut it. In the set of photos featured in this article, the midday sun was simply too harsh to shoot outside. And when trying to filter the sunlight inside the barn, I found that there was no light source besides a few small windows.
When I first started photography, I was under the impression that if you want to use strobes you need multiple strobes. Over the years I learnt how wrong I was. YOU ONLY NEED ONE STROBE. Still to this day I bring along 5 strobes thinking I may need them and only end up using one. The same way I only have one light source when using natural light, you only need one strobe when using artificial light.

This brings us to the next point. So what exact gear do you need? I've used a dozen modifiers before landing on an octa box. It's a modifier that never goes wrong. Any octa box will do. I have an Elinchrome Rotalux 53 inch. I pair it with my Einstein flash head and a vagabond battery pack that doubles as a weight. KEEP THE GEAR SIMPLE. I have a 1k$ setup which is not too expensive but if I can go back I'd get the same thing my friend Rey uses: a 66$ Yonguo speedlight and simple octa. This guy produces results I hope to achieve sometime before I leave planet Earth.

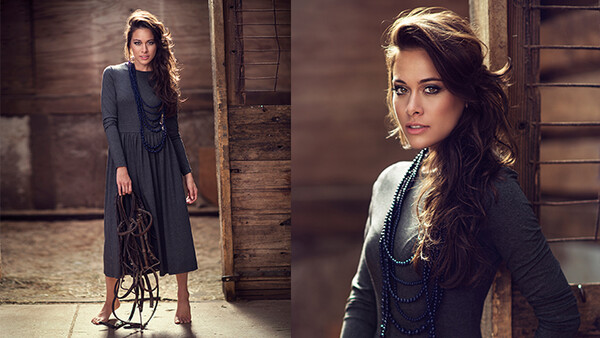
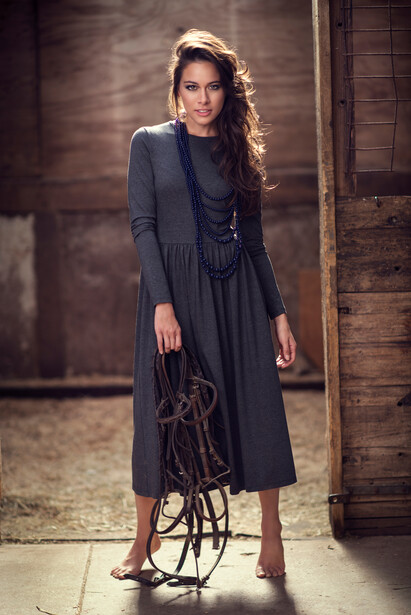
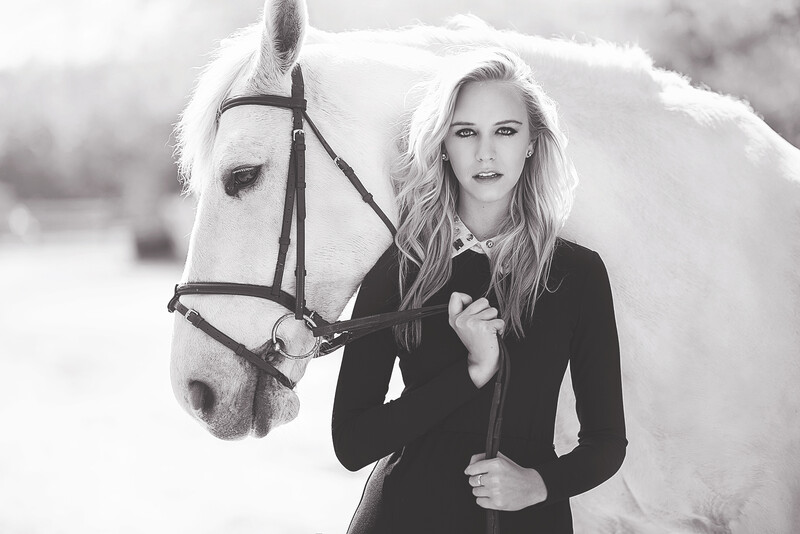
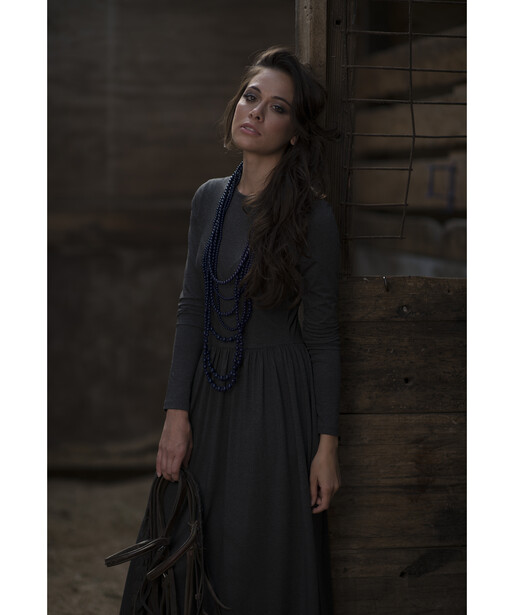
Once you have your gear in your trunk, it’s important to prepare your mind for the shoot. This may sound like a yogi thing to say but it’s the truth. Photographers tend to get excited on a shoot and they channel the excitement towards fiddling with strobes and setting them up. Often, they completely neglect the fact that no one cares about the lights, all the client wants is good result. That is why it is crucial to set the gear aside and walk around the location to find a good spot to shoot. For each photographer what constitutes as a “good location” will vary. For this shoot, I was feeling a rustic look. The image below is a result of walking around the farm and eventually stumbling across this room that had the sun directly beaming through a window in the ceiling. I instantly fell in love with it and I had my model stand at the door way of the room. Part of the rustic vibe I was going for meant including the wood beam and the fence, so I made sure to include it. I took a few quick portraits of her getting backlit from the sun knowing her face would come out dark. Then and only then did I go get my strobe and set it up right next to me. I lifted it a drop above eye level and angled it down.
I won’t discuss the technical flash setting because for every environment, these will change. What is important is everything else that is happening on the shoot. The purpose of the flash, is to simply give some soft light to the skin. What matters most is that your backgrounds and bokeh are perfect. For more information on bokeh and complimenting colors, check out this article.
Next, the key to making your light look natural is to take the portrait exactly how you'd take it using ambient light only. Don’t even turn on your flash. Ignore the dark or uneven light on your model’s face. Make sure the background and ambient light is perfectly exposed. Once you've achieved this, you can turn on your flash and set it accordingly. Don't touch your camera settings, rather, fool with the flash. It’s okay to move the flash closer and further as well. Moving it even one foot farther from your subject can make the biggest difference.
WHAT YOU SHOOT IS MORE IMPORTANT THAN HOW YOU SHOOT IT. If the subject is boring, a photographer can use all the gear in the world but the results will not turn any heads. Concentrate on poses, expressions and wardrobe. This will make a huge difference.
Lastly, retouching will seal the deal. Here's how a portrait looked before I retouched it. I teach all my techniques for shooting and retouching in my tutorial with RGGEDU.

Join the Fstoppers community for free
-
Post comments and join in the discussions
-
Browse the site ad-free
-
Share your work and get featured in the community
-
Compete in the photo contests for fun and prizes
31 Comments
Great photos and tips! I love your shooting style, it's awesome.
Great article Dani! And your friend Rey is one amazing photographer, never did I see his shots before but I instantly fell in love with hist shots and style. Reminds me how beginner and far away I am from true talents like you two and so many others. And man, do I want to get myself some kind of octabox after this article, I have already a 60 dollar flash.
Love it! Have you experimented with color gels on the flash to match the ambient light? A flash is generally super blue and may not always match that "golden hour" look. What do you think?
Awesome!
Great article!
But I think it really depends on the type of look you're going for and what the location all at the time you're shooting at depends if you should go full natural lighting, just a single strobe as the article is going for, or more then one light even if the sun is still up.
Thank you! Was anyone else intimidated by OCF on location?
Great article. Thanks for sharing.
Nice stuff! For you to get that shallow depth with strobes I assume you use an ND filter? what ND filter do you use?
Either he uses an ND filter, or he uses HSS speedlites. I am about to buy the Yongnuo YN-568 with HSS to do this kind of stuff. I have the Yongnuo YN-622c and YN-622c-TX triggers that allow me to use HSS off camera. Both speedlite and triggers will cost about 200 bucks, a good octabox will cost you about 100 bucks. Not cheap, but cheaper than the 1000$ setup of Dani.
I also use a Giraffe Boom, i usualy photograph alone, so it comes handy.
Based on the fact that his article states that he uses an Einstein, which is not HSS capable and not very good at HyperSync, he must be using ND filters for his signature shallow DOF look.
I personally prefer HSS because it allows me to shoot exactly how I would for natural light and ignore camera settings for the most part, then just bring the strobe/speedlight in for a bump in light on the subject. Pretty simple stuff, but I would find it very difficult to manage a mobile shoot on my own using lighting on location. Much easier if you have someone to hold/carry the light for you, even with a simple speedlight-based setup.
I have a friend who works with me, he's not available all the time due to work, sooo...i have to make it on myself. :)
Awesome article, as always! I'm also curious about the use of ND filters, which seem to be almost a dirty little secret that nobody talks about when discussing strobes. Thanks much for the awesome inspiration, and wonderful work!
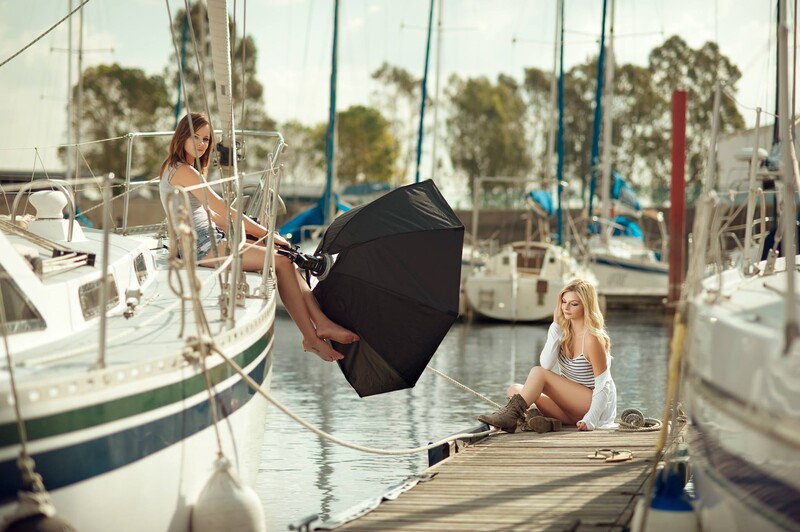
Yes, on the boat dock photo, there had to have been an ND filter in play. Nothing blown out and bokeh was great. Awesome photo. Going to experiment with that!
High Speed Sync, if he's using speedlights...my money is on that. Yes, NDs are a more efficient way of delivering power from any light, but HSS is very convenient when you're working at very close range as in his dock example.
Yes, yes, yes, Chris! I forgot about that! I'm doing some fall photos for a friend of mine this weekend and I might throw that into the mix. I have PocketWizards to achieve that. The issue with NDs is the camera finding focus with the filter on. That's been an issue for me at times (although I haven't used my NDs a ton for portraits) but the HSS should be an easier option. Thanks for the tip!
Easy done. If all you want is a kiss of fill or just some clean light to pop on your subject, then the power of a speedlight is usually fine. Of course the size of the modifier and distance to subject can become an issue. But if you're working only a bit over sync speed you should be fine. And yes, focus issues with heavy ND filters is a pain in the neck when you're working on the fly. It's less of an issue when you're working on a controlled set, shooting experienced (patient) models, and generally have time to really fine tune things. For everyone else, HSS (and not using ND filters) is a God-sent. Good luck with your shoot.
Thank you, Chris. I'll have my VAL with me on Sunday (Voice Activated Lightstand...aka my wife. Ha!) holding a 24" Rapid Box and SB-910. I have the PocketWizard AC3 controller as well so I can either move her or adjust flash power on the fly. I was messing around with HSS tonight and...wow it's awesome. I've "graduated" from TTL shooting and prefer manual power anyway so this should be fun this weekend. :)
Hi, Chris! I tried the high speed sync this past weekend and...wow. Had tons of fun with it and was able to dial things in pretty quickly on the fly with a quick test shot or two. Loved the results and most of these shots were with one SB-910. I only added a 2nd SB-910 where I had lots of sun. Worked great! Thanks for the tip! Heading out for another family fall shoot tomorrow and I'm doing the same thing again!
http://www.jschmitt.photography/Family/Savannahs-Fall-Photo-Shoot/
Nice work Joe. Some really solid shots in that set and I'm sure the client will love them. If you're open to C&C, I'd remind you that the camera can shoot vertical too. There lots of shots in there that would be stronger with tighter crops in vertical orientation. I'm off to a fairly traditional family portrait in an hour or so, and will definitely be taking my speedlight(s). I won't have an assistant, so weights it is.
Always open to C&C...so thank you! Looking back, I guess I didn't go vertical at all. Ha! Heading out today so I'll be sure to work in some vertical shots where appropriate. Thanks again and good luck today!
1 flash is all you need sometimes.
Rey also use ND filter what i know in that shoot to have that short DOF :)
So, a good setup for the folks who want to try this would be, the Yongnuo YN-568ex II, the YN-622c-TX triggers, an octabox and like me, a giraffe boom.
The YN-568ex II has High Speed Sync, that comes in handy to avoid using ND Filters to balance the ambient light.
Knowing that, camera shutter speed controls ambient light and apperture the flash output, you are good to go. :)
True only in part.... When you start using HSS you soon learn that shutter speed is also going to effect your flash exposure. While you're in normal sync shutter speeds, the aperture and ISO affect flash exposure, while shutter speed, aperture and ISO affect ambient exposure. At the end of the day, if you're shooting everything (camera and light) in manual, you can play with each variable at a time and really test to your hearts content.
Great article!
Your friend that uses the 66$ Yonguo speedlight and simple octa - do you know which octa?
Thanks.
Good stuff Dani. This is my kind of shooting. Predominantly ambient, with a kiss of strobe to put some pop and clean light in there, but keeping it super subtle and maintaining the shallow DOF look. It pleased me to see you write this article, as a photographer who prides yourself on the use of natural light. Sue Bryce is another portrait photographer who is largely a natural light shooter but has recently begun teaching on the way to replicate her natural light 'look' using strobes. Having this ability obviously frees you up to shoot in a wider range of times and locations, and not be limited by purely available light. A great thing to learn. Thank you for sharing.
Yeah, so the finished product is great... but I don't understand how this is an article on making the most of a single flash. Headline should read, "shoot what you got and fix it in post". I'm not being critical, and I am basing my opinion on the "before and after" at the end of the article. There is very little light contrast in that portrait. It is dark and uninteresting. The post production took a meh image and made it pop. I guess I am just frustrated with all these "amazing" images that are basically artistic interpretations of life, which to me is not photography. I am not trying to take anything away from the photographer, just don't like how this is a little bait and switch.
nice article and impressive shots! i recently shot with some horses and it is quite difficult with them. good work!
Great article!! Just a follow on Sam's statement about the post production, and please don't flame me if I get this wrong I've not just started in photography (4 months). Was the last photo under exposed over all intentionally? I can see that if a second light source wasn't used the right side of her face would be way under exposed even in post, as the only other light is from left rear (acting as a hair / key light along with background). And with photos that have lots of detail like all the wood and the various shadows, it best to under expose and keep the detail available for post correction vs over expose and possibly lose it. It appears like you wanted the flash to not over power the natural light but to just compliment it.
Also I love that last photo with the slider to see the difference between the two, any info on how that is done or what that technique is called?
Dani, happy to see you've finally discovered strobes, and that you're embracing them. Looking forward to seeing some OCF work from ya!
Great shots. Thanks for posting!
I tend to go for more and more with anything. I've gotten to where i use 2 off camera flash units when i can, but it seems to me this guy is right about making things simple. I somethings have some assistance and other times i don't. 90% of using off camera flash is really about the key light. The rest is just accents.