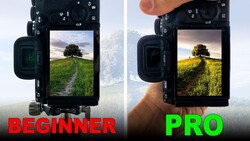
Your landscape can look incredible in person and still turn into a flat photo once you open it in Lightroom. The video breaks down why that mismatch happens and what to do about it when a scene feels “big” to your eyes but small on the screen.
Coming to you from Photography Explained, this practical video starts with a simple point: you see depth all day long because you have two eyes, but your camera records the world with one sensor. That gap is why a wide vista can read as “meh” in a single frame, even when the place felt massive. One of the first fixes is about relative size, and it is more useful than it sounds. If you build a frame where similar shapes repeat from near to far, the brain starts stacking distance again instead of reading everything as one layer. You will also hear a clear warning about making scenes too “even,” where nothing feels close enough to anchor the shot.
The most actionable section is the editing example, because it turns a vague idea like “make it feel deeper” into a specific move you can test in minutes. The video shows how selective haze can push background elements away by lowering contrast and softening edges in just part of the frame. In Lightroom, that means masking a distant area and pulling the Dehaze control to the left, not cranking it right the way many people do by habit. The result is not about making the file look foggy everywhere, it is about creating separation between planes so the foreground and midground stop competing with the horizon. There is also a quick note on using a vignette with restraint so the brightest, hazier areas keep attention without making the corners look artificially heavy.
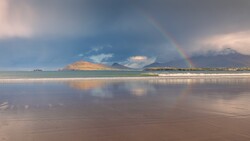
Then the video pivots away from the computer and into choices you make before you press the shutter, starting with light direction. Side light gives you texture because it creates both highlight and shadow on the same surface, which makes rocks, walls, and ridges look shaped instead of pasted on. If you shoot with the sun directly behind your subject or directly behind you, you often lose that sculpted feel, even if the exposure is “correct.” The video uses a lighthouse example to show how a scene can be memorable and still photograph as flat when the light wipes out surface detail. There is more nuance in the comparison than “always shoot golden hour,” and it gets into what to look for when the light is not cooperating.
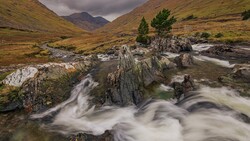
The gear section is where the video gets a little uncomfortable in a good way, because it points at a common mistake: not getting close enough. A wide angle lens exaggerates distance relationships when you push a foreground object large in the frame while keeping the background in place, and that can create a strong sense of space without any special location. The video describes the difference between standing back and making everything feel politely scaled versus moving in until the foreground starts to feel bold and unavoidable. It also hints at another depth cue involving overlapping elements, especially in busy scenes like woods, and that is one of the parts worth watching closely because it is easy to do clumsily. Expect a few practical “try this, then adjust” moments that will change where you stand, not just what you edit. Check out the video above for the full rundown.
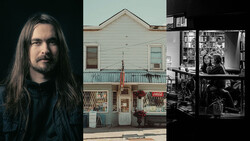
And if you really want to dive into landscape photography, check out our latest tutorial, "Photographing the World: Japan II - Discovering Hidden Gems with Elia Locardi!”

Join the Fstoppers community for free
-
Post comments and join in the discussions
-
Browse the site ad-free
-
Share your work and get featured in the community
-
Compete in the photo contests for fun and prizes
1 Comment
Ok, Not a Pro just a hobbyist for some 50 years or s0 from film to digital. First I have told my eye doctors each I see that my left eye has a tan shade and my right as a blueish both not so long but marry well and I am far sighted, Example one year i was working for hospital as a Geek and some new monitors came in well did not know about but back in the late 90 and I turned on the computer it was like i could see around to the back of earth icon well also i just got some new glasses with the Crizal coating and the biggest thing was the Glasses were the progressive meaning that you hat to look at a certain point with both eyes or had to look center of your nose!! First time ever using these and studying for a big test and high lighting with a yellow marker the letters seamed to float up from the page. It took awhile to even ask about it. you see it also can be glasses that play tricks. Some have never seen the prints with color over numbers unless you are taking color test for a driving license color test, well if you have ever went to a shop of weird things they have posters with a combo of letters and a object behind but you have to kind of work your brain to see the object and for some reason when young i could see without much trouble but it did hurt your brain if done to much!
Photography of things lights and different objects can be also confusing. One thing to try is bracketing 5 at +/- 2EV even the old DSLR cameras could not do on my Canon T2i.
Bracketing does two things (or more if you just look at a single image and a combined one of 5 images) colors and light brightness mainly. My point even with a very high dynamic range camera with just one image but when your programing editor combines the images you will get some depth of field and colors will give 3D look. I do bracketing most all captures except the moving kind, A cool thing like On1 and Nik Collection HDR lets you pic the center image where you will see many deferent things with color and exposure with each center. i see more depth in most.
Now the new test if focus bracketing combined with normal bracketing, a lot of work and expatiating but that is what photographers do with slider movements.
Bottom line if you think you can put your finger through and image then you got a great one.
Do not work hard just have fun
1. Only one on the night tour and guide went looking things left behind leaving his Lateran on like a view you know will be 3D.
2 A7SM1 and 10mm lens back in 2015 but my eye saw the colors and depth
3. Real pano started at right because the fog was coming from the right also but a red white blue colors
4. Yes a camera set to Aperture and that is just one image it is like way does everyone het to the desert and step over the rattle snakes when one can do it at the beach!