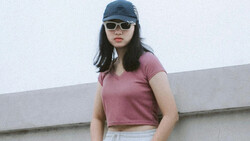
Rim lights can be some of the most underappreciated yet important parts of a setup. They can add definition and drama to an image and are the main source of subject-background separation in many scenarios. This helpful tutorial will show you how to add a lovely rim light effect using Photoshop.
Coming to you from Unmesh Dinda of PiXimperfect, this video shows you how to add a convincing backlight and its associated rim light to a subject. As Dinda discusses, successfully employing the technique relies on understanding the way light and shadows behave and making precise selections, so be sure to pay careful attention to where you've decided to place the fake source of light and then be faithful to the highlights and shadows it casts. Just on its own, however, the effect is rather incomplete; it will likely take a bit of color grading and adjustments to complete the look. While adding it is a bit more technical and requires some precision with regards to the physics, the finishing touches are far more personal artistic choices, and while the Color Lookup adjustment layer works perfectly well, feel free to explore other methods of grading as well.


Join the Fstoppers community for free
-
Post comments and join in the discussions
-
Browse the site ad-free
-
Share your work and get featured in the community
-
Compete in the photo contests for fun and prizes
No comments yet