Lightroom's Adjustment Brush and Spot Removal Tool have improved in leaps and bounds over the past few updates, opening the door to quicker, easier portrait retouching for photographers of all editing skill levels. Here are five steps to quick and easy portrait retouching in Lightroom.
Step 1: Presets and Basic Adjustments

Start by opening your raw image in Lightroom and applying any desired presets to get the basic look and feel you're going for. For this image, I chose something with a flatter, lower contrast look. Next, make any tweaks in the various panels (adjusting white balance, exposure, contrast, sharpness, adding a vignette, etc). Focusing on just the sliders, bring the image to the look and style you want. I address the overall look before retouching, because certain presets will amplify blemishes, wrinkles, skin textures, etc., and I want to get all the things to fix out in the open now.
Do pay careful attention to sharpening. Lightroom automatically applies some sharpening on import, and sharpening will amplify those blemishes and wrinkles I just mentioned. I generally take sharpening down to somewhere between 10 and 20 on the slider to avoid making more work for myself.
Step 2: Healing

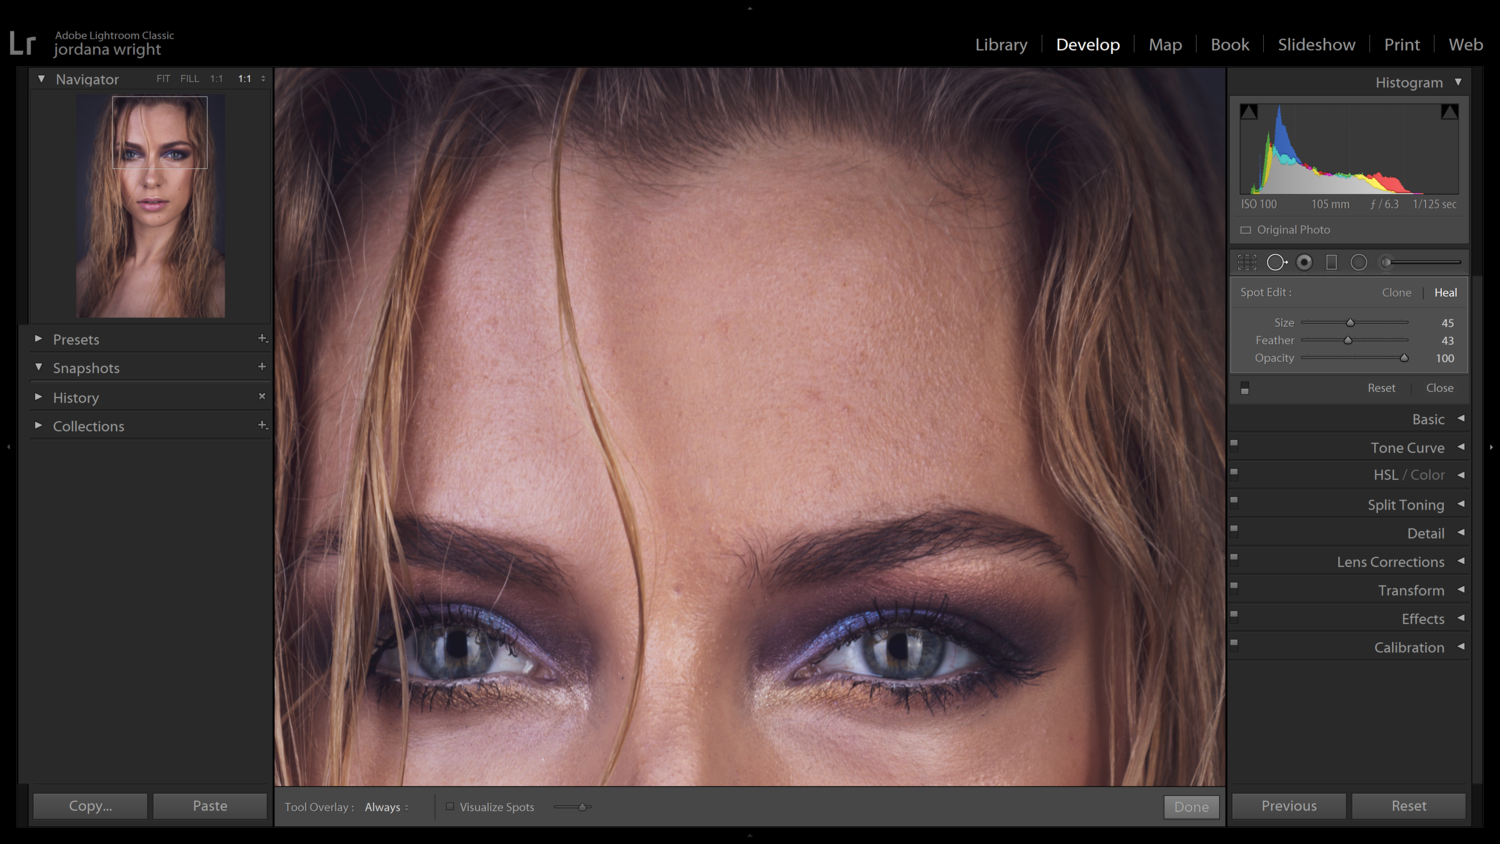
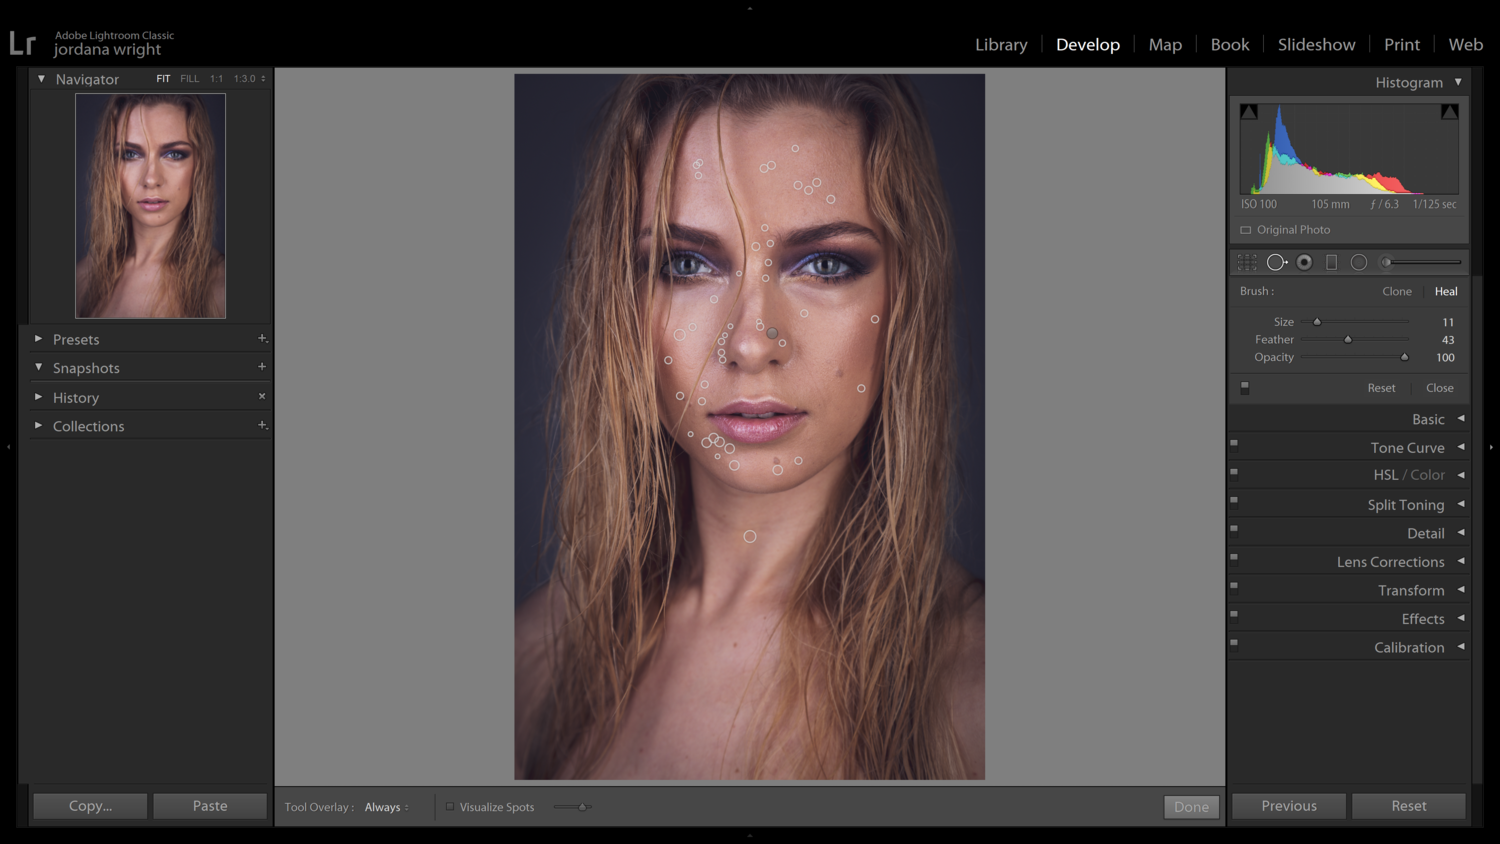
Open the Spot Removal Tool and set it to Heal. The tool size should be dictated by the size of the blemish you're healing. Adjust the size as you go. Ideally, the tool overlay will be just a few pixels larger on each side than the blemish itself. Make sure you're set to 100% opacity with a decent feather border (something in the 30-50 range will be fine). Zoom in to 1:1 or larger, so you can see what you're doing.

For healing, pay attention to blemishes, enlarged pores, blackheads, bumps, etc. If it's temporary, it's fair game. If the model is also the client, leave anything permanent such as scars, moles, or birthmarks, unless you've been specifically asked to fix or remove them. If the image you're editing is for you or a third party, use your best judgment. The goal here is to avoid applying your own sense of beauty over the preference of the model. For instance, Tina Fey famously wrote about her displeasure with retouchers who have removed her scar in images in the past.

With the Spot Removal Tool, I keep the tool overlay set to always while I'm working, so I can see where I've been. Once I think I've healed everything I need to, I'll turn the tool overlay off, so I can make sure I don't have any weird clone sources making things look wonky.
Step 3: Skin Smoothing
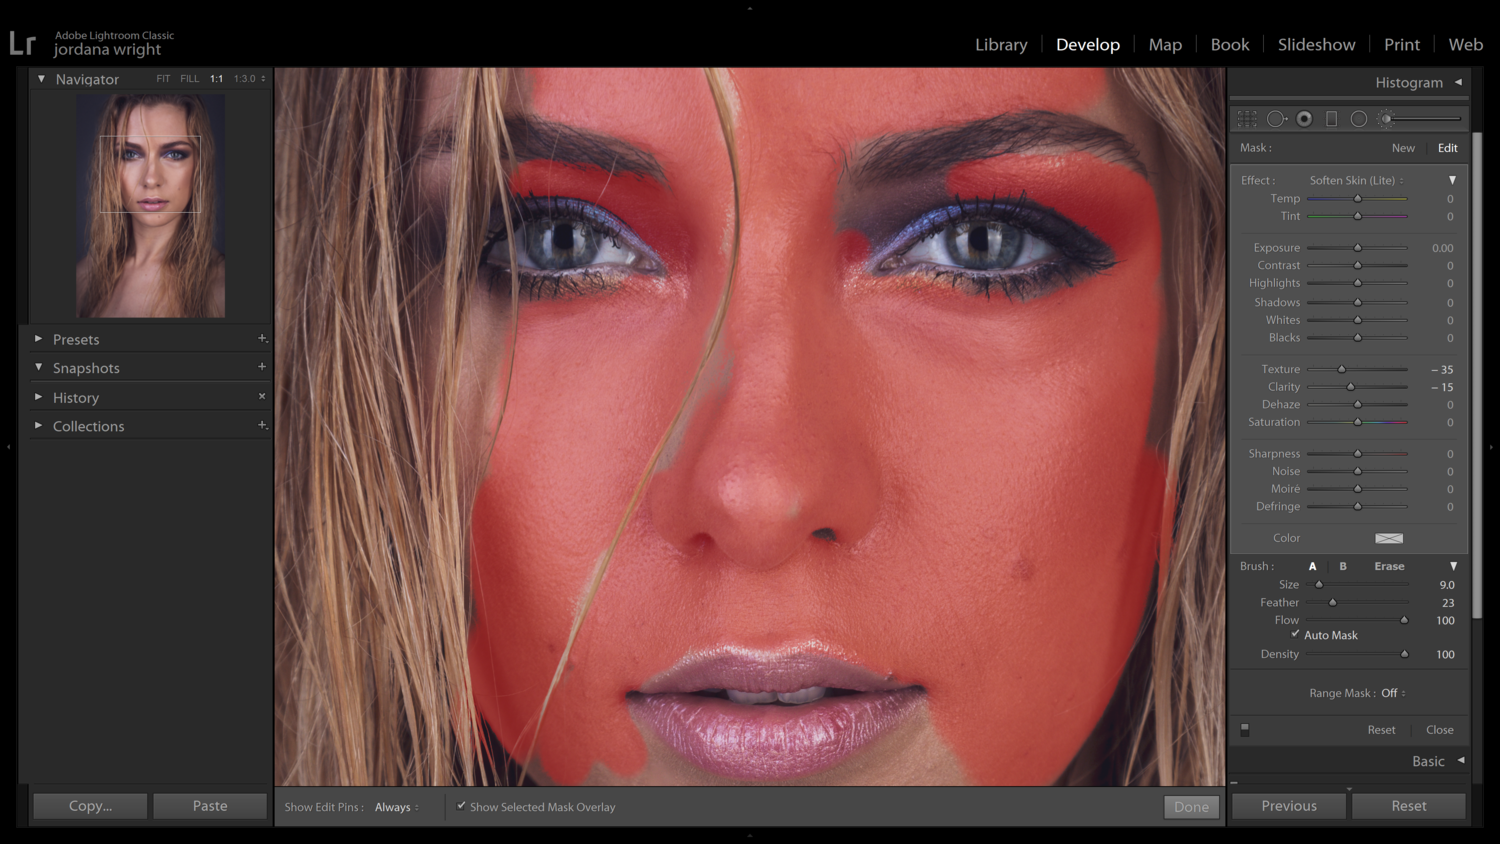
Open the adjustment brush and click on the dropdown menu. Depending on your version of Lightroom, you should find brush presets called Soften Skin and/or Soften Skin (Lite). I use Soften Skin (Lite), but if you're missing the brush for some reason, you can create your own. Just make sure all sliders are set to "0," then bring Texture to -35 and Clarity to -15 as a starting point. For skin smoothing, I prefer to adjust the brush size for different parts of the face. I set Feather to somewhere between 20 and 30 and set Flow and Density to 100. In most cases, I keep Auto Mask checked; this will help navigate the borders while brushing and make sure you don't accidentally smooth the hair, eyes, or clothing. If you paint a portion of the image by accident, you can always select Erase and fix your mistakes.
Now, you start painting. Paint over any visible skin, including the neck, decolletage, arms, and hands. Avoid the lips, eyes, and any hair (eyebrows, beards, sideburns, etc). Check your progress and borders by clicking Show Selected Mask Overlay.

Once you've painted all the skin, turn off the mask overlay, and take a look at your work zoomed in to 1:1. For some models, the skin will be sufficiently smooth at this point. For others, you may want to pull the Texture slider to the left a little more. The goal is to maintain some natural texture on the face but reduce the texture enough that it's not the first thing you notice. In many cases, most of the face will be perfectly smooth while other portions around the nose and lips still need a little extra smoothing. Click Add in your Adjustment Brush palette and paint over those specific spots with your Soften Skin (Lite) brush.

Once you've completed skin smoothing, check your work by turning the adjustment on and off with the toggle switch in the bottom left corner of the palette. In many cases, men prefer images of themselves with more texture in their skin. Make sure you haven't overly smoothed their skin. If you have, simply pull the Texture and Clarity sliders back toward 0 until the image looks more natural.
Step 4: Remove Skin Redness and Orange Cast

There are lots of reasons for a model to have areas of redness: sensitive skin, rosacea, cold weather, etc. I tend to see redness more frequently in photographs of men than of women. In either case, we want to reduce that color to create a more pleasing overall image. The same goes for the color orange. If a model's foundation isn't perfectly matched to their skin tone, you may see color streaks or an overall tint of orange. You can remove it in the same way.
Create a new adjustment. Many versions of Lightroom have a Red Out brush. If not, create one by zeroing all of the sliders, then pulling Saturation to -9 (some redness may require a slightly stronger brush). Paint over the full face, avoiding the eyes, lips, and hair just like before. Check your progress. If you feel that you're losing too much of the natural color of the face, take your Saturation slider a bit more toward 0. If you think you need to reduce the redness/orange cast further, then try something like -15. If you want a little more control, you can reduce the Flow from 100 to 75 or even lower. This technique is also a great way to tone down blush or eyeshadow that has been applied too heavily.
Flag the changes by turning the layer on and off.
Step 5: Final Touches
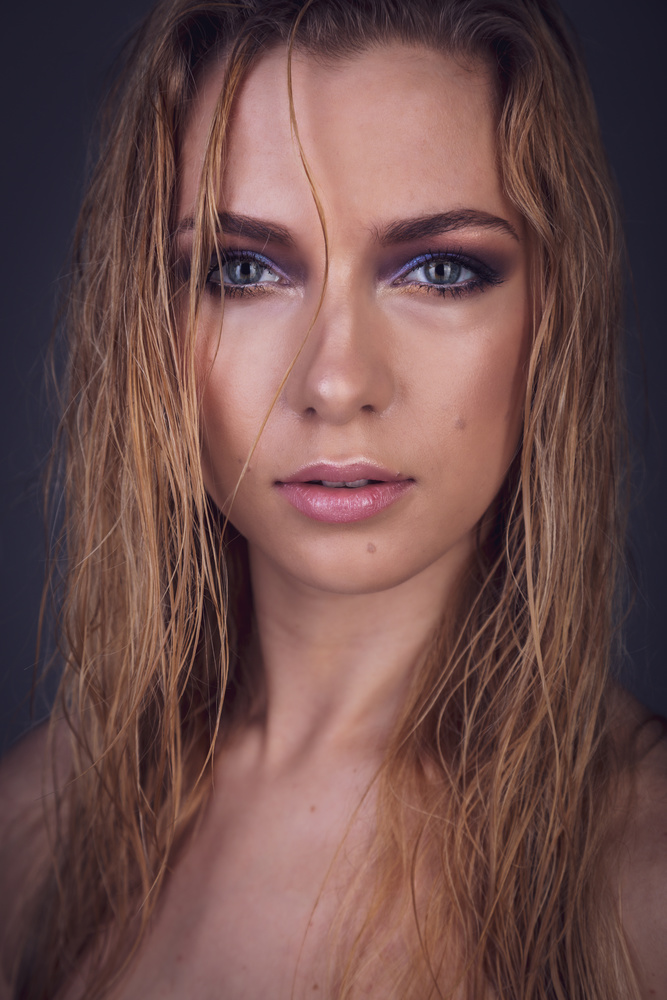
The final and possibly most important step is to look at the overall image carefully and make additional adjustments as needed. Look at the photo both zoomed all the way out and at 1:1. Sometimes, smoothing and color correction will cause you to see blemishes you might have missed before or in the case of this photo, draw your attention to a shadow or two that you now find distracting.

Go back in and make any additional adjustments as needed. Do some more spot removing, add to your skin smoothing layers. Look at all of the components of the image and make sure they flow well together. Does the model still look like his/herself? Is there some texture to the face? Does anything jump out or draw your focus that should blend more effectively? Once you feel happy with the overall look, export your file and move on to the next image!
Final Thoughts
In Lightroom and Photoshop, there are infinite ways to achieve the same goal. The best option for you is the option that you can understand and replicate quickly and easily. These steps might feel clunky at first, but after practicing them on a few different photos, you'll start to feel more confident and get a sense of the nuances of each step. As with anything, practice makes perfect. Try to practice with images taken both in studio and with natural light. Practice on models of all complexions, ages, and genders.
Good luck and happy retouching!
Photo provided by Houssam Eddine under Creative Commons.


Great article, however I find this way of skin smoothening a bit too aggressive, bringing that "good" old plastification to the table. Really hope that one day there will be a frequency separation tab of sort ;)
I totally agree with the skin smoothing is too aggressive. At first, I thought the photo to the left was the finished product. I use to make my photos plastic to make a client happy. My rule is to fix as much as you can in-camera and subject. Photoshopping should only be used to fix just little things quickly.
I guess we have all been there. Sometimes I look at my early work and it looks horrible from my current point of view. And the funniest thing is that back then I thought I was the best :)))
IMHO, "Step 3 Skin Smoothing" should be replaced with "Step 3 Skin Smoothing via Dodge & Burn". She actually had nice textured skin before the skin smoothing. After the skin smoothing, her face looks out of focus.
Don’t you mean plastic?
Better ways. Irene Rudnyk dodge and burn as well as others much better. And the latest trend to add colored gells and color toning in post is a little over the top - especially when the skin is blue. Cold outside?