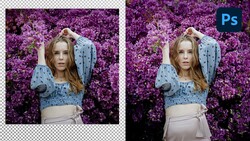
Color casts are one of the most common issues you'll have to tackle when editing photos. Unfortunately, the fix isn't always as simple as adjusting the white balance and/or tint, as casts may appear at varying intensities in different areas and luminosity ranges of your image. This helpful video shows you a more advanced way to tackle them.
Coming to you from PiXimperfect, this tutorial will show you how to precisely and effectively remove color casts in Photoshop using a combination of Curves adjustment layers and layer masks. Curves are probably the most powerful adjustment in Photoshop, and they're incredibly flexible in the range of situations they can be applied to. When you use them, you're simply remapping existing luminosity values in your image to a new set of values, but because you can control exactly which subsets of the overall range get remapped and where they're sent to, you have complete command of the tonal behavior in an image. When you break that down to individual RGB curves, you get control of color, which is why this method is so powerful. One extra tip: when you're sampling an area to adjust, make sure your sample size is set to something other than "point." Typically, an 11x11 or 31x31 average is a bit more effective.


Join the Fstoppers community for free
-
Post comments and join in the discussions
-
Browse the site ad-free
-
Share your work and get featured in the community
-
Compete in the photo contests for fun and prizes
3 Comments
For anyone looking to learn about Photoshop, Unmesh's channel is fantastic. He does an excellent job teaching different techniques without overdoing it. Definitely worth a look for beginner to professionals looking to improve.
Thanks for posting this tutorial. I had not seen it yet.
I agree that there are other ways to do the same thing, but I was very struck by the simple and non-judgmental delivery of this information. Thanks for posting.
Another easy way to remove color casts globally is to make a new levels or curves adjustment layer, go to each color channel in turn and drag the sliders to the beginning and end of the histogram for each color. You can also do this in Lightroom in the curves adjustment window, changing the type to Point and again clicking on each channel in turn and dragging the top and bottom of the curve to the beginning and end of each color histogram.