
Adobe Lightroom was a pretty slick piece of software to begin with, but over the past several updates it has become an incredibly powerful tool for photographers. Of all the different controls and tools available within the software, the Detail panel has become one of my favorites. If you use Adobe Camera Raw or Adobe Photoshop, you can find the same set of controls that we're talking about today which of course is within Lightroom. Adobe has been streamlining their systems for a long enough time now that handling raw files, although from a cataloging perspective is quite different, is almost identical between Lightroom, Camera Raw, and Photoshop.
What I mean by that is that you have the same sets of controls for the image, even if they're called different things between the programs. Even though all of these examples for today are specifically talking about tools in Lightroom, the functions of the control panels should be similar enough that you can follow along in either Camera Raw or in Photoshop.
One of the things that Lightroom so brilliantly does upon file import is using the metadata to offer automated lens corrections and a default adjustment for noise reduction. When you import an image, unless you alter your import settings, Lightroom will automatically apply a basic setting for sharpening and noise reduction. This is what the software will automatically apply to your image, unless you adjust your preferences in the program to change what happens upon import.
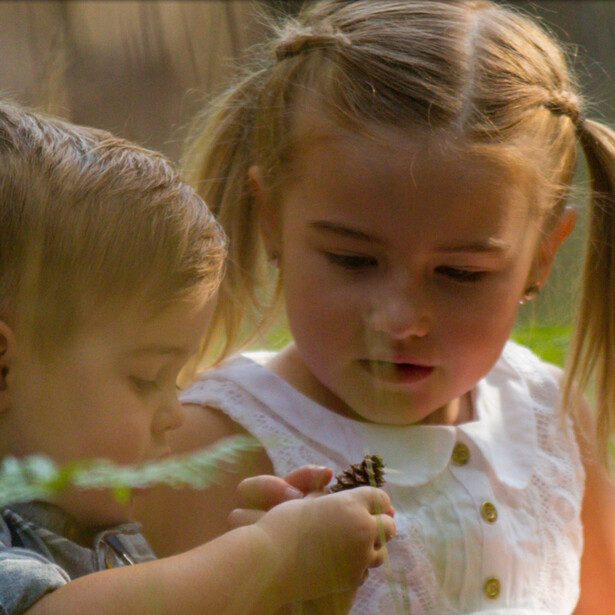
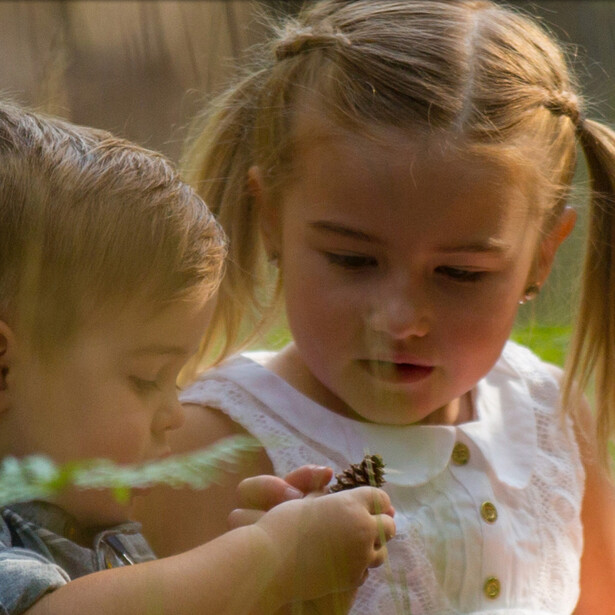
Below we are simply comparing what the raw image looks like straight out of camera with no adjustments and what that image looks like with the Lightroom default adjustments in the Detail panel. You can see that there is some basic color noise reduction, some sharpening, and no noise reduction for luminance.
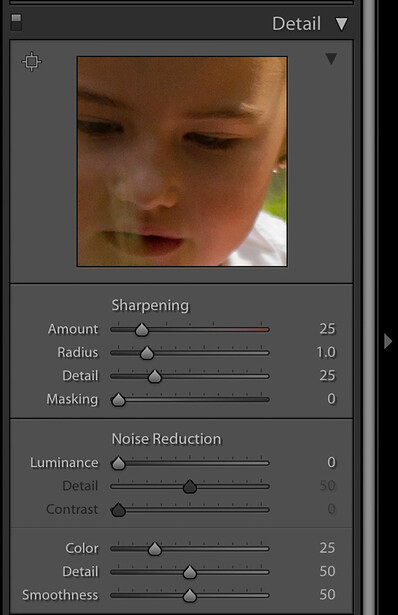
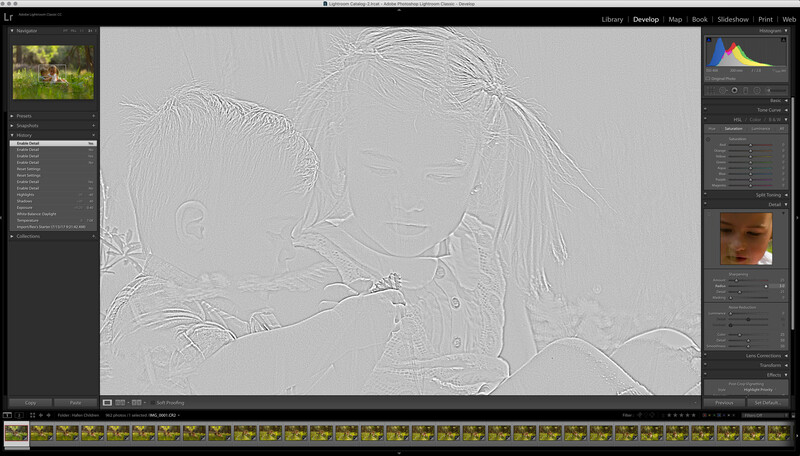
In order to harness the potential of what the Detail panel truly offers we need to understand what each of the controls is actually doing. Honestly, it took me longer than I'd like to admit to wrap my mind around what each slider is controlling, but once I bridged that gap I was able to really make the most out of every single shot. Before we delve into what the individual controls are doing, one thing that I have found to be incredibly helpful is the Alt/Option key on your keyboard. If you hold the Alt key while manipulating any of the sliders, it will display a gray image that shows which pixels are actually being modified and how much they are being manipulated as you adjust the slider. Below is a screenshot of the Alt key being held while adjusting the radius control for sharpening.
So, here is a quick breakdown of what each control in the Detail panel does.
1. Sharpening - Amount
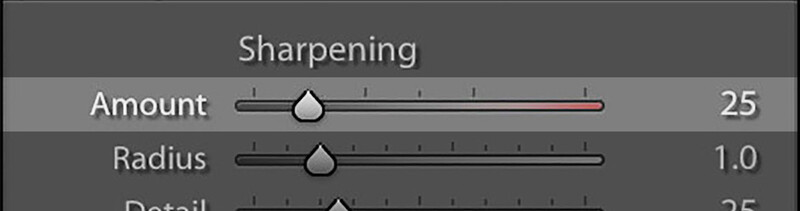
This is exactly what it sounds like. This slider controls how intense the sharpener enacts on the image. The sharpener looks for variance between pixels and heightens the difference between them. Basically it's altering the contrast on a pixel-by-pixel basis instead of on a grouped packet of pixels, which is what the Contrast control in the Basic panel does.
2. Sharpening - Radius

The Radius controls how far from each pixel the Amount setting is allowed to affect neighboring pixels. Since the amount of sharpening is applied to standalone pixels, the radius allows that sharpening control to start to affect other pixels that are next to the pixels affected. You could think of it as a compounding effect, where the sharpening effect is allowed to expand beyond its original pixel boundaries.
3. Sharpening - Detail
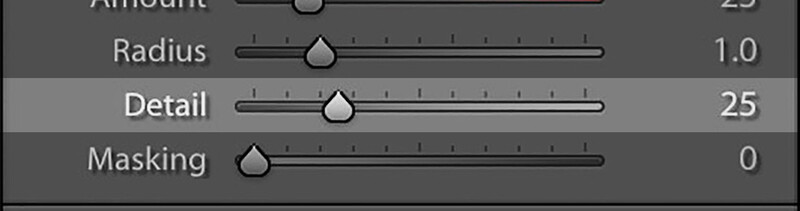
The Detail slider works to preserve the details retained in the high frequency parts of the image. Instead of working on individual pixels on a standalone basis, this slider works on emphasizing the edges identified within the image. This can help you preserve the shapes and forms of grouped pixels that the software sees as an edge. You will see this effect smaller sets of shapes like strands of hair, tree bark, striations in rocks, or pretty much anything that could be seen as a connected string of similar pixels that define an edge in the image.
4. Sharpening - Masking
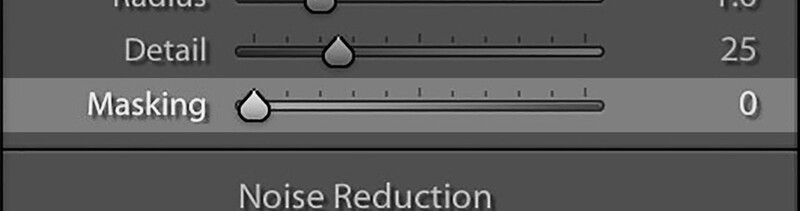
This slider controls how much of the image overall will be affected by the sharpening controls. If this is set to 0, then the sharpening controls will affect each and every single pixel evenly. When you start to increase the number, the masking control will start to eliminate the larger bodies of similar pixels to focus in on the smaller contrasting sets of pixels. This is where I tend to put the Alt key to use, in order to visualize which pixels are actually being affected by the sharpen settings.
5. Noise Reduction - Luminance
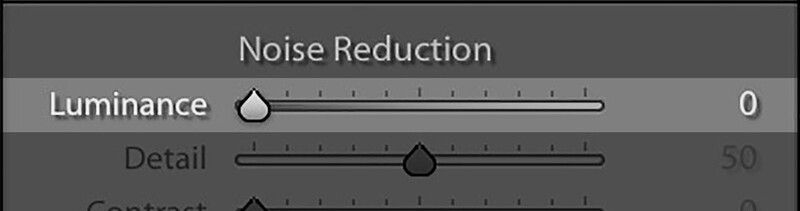
This slider is looking for stark luminance contrast variations between individual pixels. The higher you set the number, the more this control will start to reduce the amount of variance between the pixels, this will smooth the pixels out and reduce the amount of noise. However, the more that you reduce the luminance noise, the more you will start to lose details in the image as a whole. Finding a balance here can be tricky which is also the reason why the two subsequent sliders exist.
6. Noise Reduction - Luminance Detail
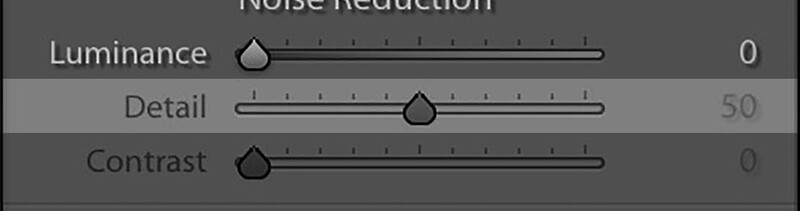
This control is to help you regain pixel contrast within the small subsets of pixels. It is looking for the smaller grouped pixels that have been smoothed over and by increasing this control it will try to increase the contrast within those small pixel packets.
7. Noise Reduction - Luminance Contrast
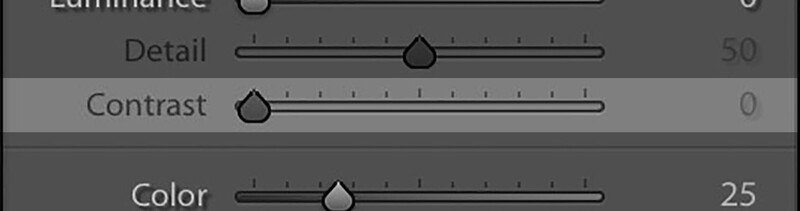
The Contrast slider works very similarly to the Detail slider, but instead of targeting the smaller sets of pixels, this looks to retain contrast in the larger groups of contrasting pixels. You will see the larger shapes and color sets become more defined as you increase this slider.
8. Noise Reduction - Color

This control is here to help reduce the color noise and variance between the color in the pixels. It's similar to modifying the hue and saturation controls, but on a grouped pixel-by-pixel basis. It can identify the color differences between pixels and it will look for a color in between the two to essentially even them out to become closer in color to each other. The higher you push this control, the more pixels will start to take on color similar to surrounding pixels. If you overdo it, then the pixels start to edge towards neutral hues, becoming more gray in color.
9. Noise Reduction - Color Detail

This slider will look to retain the color differences between the small sets of pixels. The higher you move the control, the more color variance will be retained. The lower you keep the control, the pixels packets will continue to look similar to surrounding pixels. I recommend sliding the control all the way to 100, just to see how intense the control really does affect your image and then scale it back to find a nice middle ground for your image.
10. Noise Reduction - Color Smoothness
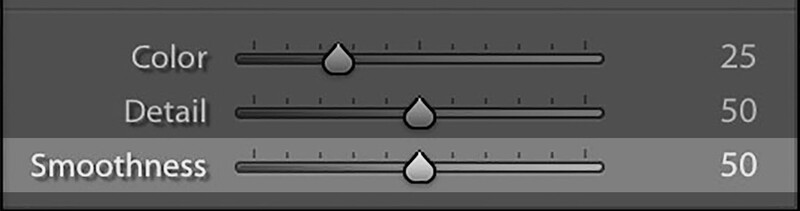
This will probably not surprise you, but the Smoothness slider works very similar to the Detail slider. Instead of solely targeting the small groups of pixel sets, this control will even out the colors in a widening range when you increase the control. Setting the control at 0 means that the pixel packets will stay as they are. I like to think of this as a control for reducing splotchy areas in the image. When starting to adjust this control, you will see small groups of pixels that have similar colors. These small groups are what we see in splotchy color patterns within the image. The more you increase the control then you will start to see splotchy groups of pixels start to even out and the areas of mass within the image will attain a more uniform color. It is like expanding the radius of color similarities between grouped pixels to become larger groups of similar pixels. If done too much, then you will see patches of color disappear as they take on enough of the surrounding pixels and end up in a neutral zone.
Conclusion
Striking a balance between each of these controls is how you can simultaneously sharpen your image while reducing the amount of noise. It's fairly easy to spot when an image has been sharpened too much, or when it has had the noise reduced to a point where the image as a whole becomes muddled and loses too much contrast. Below is a simple before and after between what Lightroom applies to the image by default and what I have set for my images as a default preset which is applied upon import.


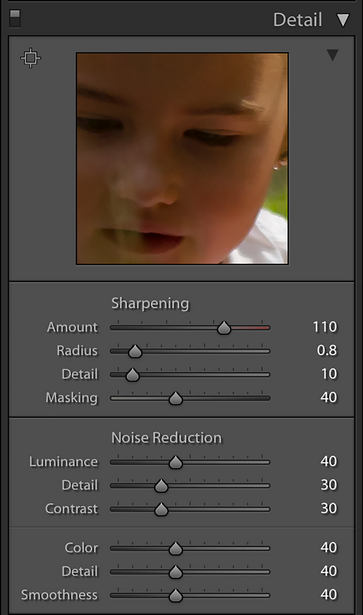
Above is a screenshot of the settings that I have found to work well for my files, in general. This is a Lightroom preset that I use to jumpstart my sharpening process. It's nothing fancy, but the controls that have been set up in it are exactly what you see in the screenshot, it is simply a default setup that tend to work well for my files as a blanket application for sharpening and noise reduction. I purposely set the controls for the preset to start higher than is likely necessary, by doing that I am able to gain a good grasp as to what the image is capable of and I scale back the controls as needed. Again, take the time to test the limits of the controls, find what works for your own files and your own preference, and roll with that.


Join the Fstoppers community for free
-
Post comments and join in the discussions
-
Browse the site ad-free
-
Share your work and get featured in the community
-
Compete in the photo contests for fun and prizes
19 Comments
I pre-sharpen all of my RAW photos before I start retouching them in Photoshop. I've done tests between Lightroom, Capture One, OnOne Photo RAW, and ACDSEE....maybe I'm just so used to it, but for me personally, I still prefer the way the sharpening looks in LR than any other RAW editor. I really like the masking slider too
That's good to know! I haven't tested the other software like you have, but at this point I don't think I will. I'm used to how LR works and I like how it treats image sharpening.
Good breakdown, thanks!
Is the description of the detail slider accurate? My understanding was that the slider essentially applies a pixel-level weighted average between unsharp mask (the 0 setting) and a Richardson-Lucy deconvolution sharpening method (the 100 setting). That's certainly what it was when the feature was added in Lightroom 3 / Adobe Camera Raw 6. Has that changed? I also recall reading that when Smart Sharpen was introduced in Photoshop CS2, the More Accurate box switched the sharpening to a deconvolution method, though I'm not 100% on that.
I'm curious - what's the source for the article's description of the detail slider?
You have hit upon one of the areas that is least understood about the program. Even Adobe's own documentation doesn't make it explicitly clear how that particular slider works, at least as far as the precise mechanics behind the tool. You did make a good point, I could have done a better job at clarifying what the tool does. I have updated that section. :) Sources for identifying the descriptions of each control come first from Adobe, as well as cross referencing other articles about Lightroom from a spectrum of other photography websites.
It can't be a Richardson-Lucy deconvolution, first because it's a computation heavy iterative process, second because it needs a blur kernel input, and I don't see any. Performing a RL-deconvolution with a wrong blur kernel leads to ringing and weird artifacts, so I don't think they would guess it inside.
It seems to me like a laplacian filter.
I have played a lot lately with image filters, programming some stuff to add to the opensource equivalent of LR, Darktable : https://github.com/aurelienpierre/Image-Cases-Studies
Very interesting! I wish I could find the source for the info I had. I believe it was a Jeff Schewe book on Camera Raw and some forum postings at Adobe a number of years ago. Naturally, those aren't official sources. Good point re. the computational requirements of RL-deconvolution. I'd understood that the kernel was a fairly simple, generic point spread function, rather than something derived from the image itself or from data about the lens, etc. Yup, a laplacian filter would certainly be quicker. For that matter, I do see weird artifacts when I bump the detail slider up to 100. Tend to leave it at about 30. I wish I knew as much as you must about image processing. Really interesting project, there!
I also wish there were some actual answers from Adobe re. what this slider is actually doing. Great article, regardless of Adobe's (lack of) help!
There is no such thing as a generic point spread function, it's different for each lens and varies with the wavelength and even along the picture. You can take a gaussian kernel as a fair guess, but if you have motion blur it's going to be weird after a few iterations.
Of course Adobe will never reveal its secrets, but you will find extensive doc into IEEE proceedings ;-) I had the idea of trying blind deconvolution after seeing Piccure : http://relaunch.piccureplus.com/
Quite right - a point spread function that would reasonably accurately deconvolve motion blur or even simply defocused lens blur would necessarily be image-specifc. It would be nice to see something like that implemented in smartphones, considering their motion sensors and fixed lenses. Maybe it already has! I'm sure someone must be looking into that.
Thanks for the link, too! I'd used Focus Magic awhile back, but I didn't think that had been updated for some time. Anybody have thoughts about how Piccure (or even Focus Magic) compares to Shake Reduction in Photoshop CC?
Wow! Just had a closer look at Piccure features. It corrects coma aberration? Any of the astrophotographers here - got any experience with how effective Piccure is at this?
Smartphones don't have the computing power to perform deconvolution yet, as far as I know. It would make them freeze for a couple of minutes.
This is a good description of the Detail panel in LR/ACR.
One thing I'd caution is not going too far with this aspect of sharpening. An amount of 110 is quite high. Going too high can lead to unpleasant artifacting.
The true role of the Detail panel is deconvolution. That is to work to reverse the softening effects of the specific lens and the demosaicing process. The impact of the AA filter as well, for cameras that have one.
It really should be both camera and lens specific (lens is less impactful). Cameras without an AA filter can be sharpened less, for example.
The Detail panel really isn't intended as a 'one stop shop' for sharpening. It's intended as the first step in the 3 step sharpening workflow.
Exactly.
I recommend start the detail in 100 and go down if its need.
It´s recover a lot of details in less sharper lens or small apertures.
Second is the mask slide, very useful in noise images and avoid artifacts.
But should be used with careful because almost negates the detail slide.
You’re absolutely right. :) I use that basic preset as a starter. By overdoing it, I get a very quick grasp as to what the image can handle and I scale back accordingly. Maybe there’s a better way of doing that, I don’t know, but it’s worked for me so far. If you recommend a different approach, I’d love to hear it!
Personally, I think 100 is far too high.
Looking at what this tool is intended to do, and targeting it to the camera/(lens), I've never gone above 45 with the Amount. And that's for an 'old' D700. With a D800, it's in the 35-40 range. With my Non-AA filtered Fuji cameras, it's in the 30-35 range.
Radius is in the 1 to 1.4 range (camera dependent).
Detail I rarely do much with, sometimes reducing it to zero. The Detail control is designed to affect finer textures in the picture (as opposed to edges). Consider it a microadjustment, if you will. This, I feel, is better addressed at the Creative stage of sharpening rather than the Capture stage.
Masking is used, as it is designed, to reduce the impact of the Amount and Radius sliders, to just edges so as not to exacerbate noise in areas of smoother, (more) continuous tone.
My goal, at this stage of sharpening is to restrict the impact to edges and other high frequency areas, leaving lower frequency and microdetails alone.
Honestly Robert, this is my favorite thing about having an Fstoppers account. The possibility to learn from so many people, to expand my own knowledge, is just awesome! Thank you for your insight! I can tell you this, I’ll be going back to at my default settings and preset options to figure out what can be improved, based on your insight. Thank you so much!
Good read. Also generous of you to offer up your presets. Thank you.
Thanks for your article. It’s always interesting to get different takes on sharpening and noise reduction. One thing to note is that sharpening settings can vary a lot between different camera maker’s RAW files. I shoot NIkon and Fuji and have to sharpen them differently (compared to the conventional wisdom regarding Fuji’s RAF files, I go easier on the Detail slider, even less than with NEF files, on which I’m already conservative).
I would never sharpen anything close to 110, or go above 15 of 16 on the luminance. That kind of sharpening will create artifacts like halos around edges and that kind of luminance will smooth out a ton of detail. It’s easy to see this playing around with images. In general I also prefer to produce more moderate sharpening effects but different people can have different opinions about this. Thanks again.