Beauty photography is something that I have become drawn to over time. Setting a mood, imagining a makeup style, and finding or even creating props to fill the frame with my model’s face is something I came to love more than anything else. In any genre of photography, I feel like it is important to develop a style that is recognizable. May that be retouching, posing, lighting, or something else, if people can tell you took the picture it means you have developed a signature style. For my beauty work I wanted to create a signature lighting setup that would be easy to recreate wherever I would go, no matter the condition or the place the shoot would take place in. Here is how I created it and how you can recreate it as well to make it your own.
Pure White Background for Beauty Photography
When I started photography, I remember watching Philippe Echaroux's YouTube videos. He had a very simple, yet effective setup he would take with him anywhere. It worked great for his portraits and I thought it would be a good starting point for my signature beauty lighting setup. Echaroux works with Elinchrom and so do I, which made it even easier to understand and recreate his signature style. However, any brand will do the trick. The most important thing is to understand how it works. Here is a sample picture from a recent shoot I did using my signature setup:

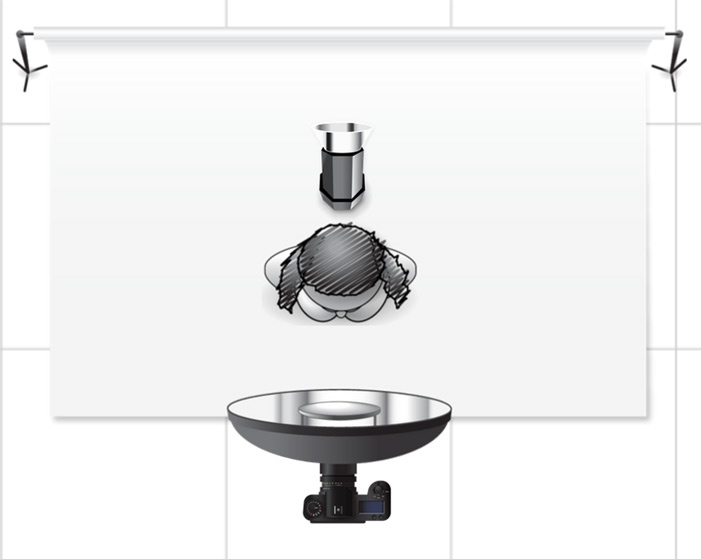
The setup consists of pure white background with a beauty dish or an octa as the main light. To create it I use two lights, nothing more. The setup is very basic and even a beginner can get it right the first time.
I usually mount a 27" beauty dish with white interior and no sock on it on my main light. However if I take this setup outside, a 39" Elinchrom Deep Octa with only the interior diffuser or a parabolic umbrella will replace the beauty dish. They are much easier to travel and walk with. I place my main light above my camera and angled down 45-degrees toward my subject.
The background is made of the second light. I mount a 59" Elinchrom Indirect Deep Octa on it. Why an indirect softbox? Because it offers an almost consistent light output from the center to the border of the box. That way I can get a pure white background and not just “very close to white” or some kind of vignetting.

If you do not have a big enough softbox or umbrella for the background, a simple strobe at full power on a wall usually also does the trick. By blasting the wall with your light, you get a pure white background and should still manage to get a slight rim light effect. Be careful though if the wall is colored, as it might reflect the color and your rim light will become colored.

Customizing the Setup
What makes this setup so awesome is that it is really easy to setup, requires minimum gear, and can be done anywhere. It can also be tweaked only very slightly to change the result.
For a clean beauty look you can add in a reflector at your model’s waist height to lighten the shadows and get a more of commercial look, like I did in the first example shown above. On the contrary, you can have a harsher look using a hard light as your main light. I personally also like to use a bigger softbox as my main light to get a softer look. You can also play with the angle of the background light/rim light to get more or less flare, depending on the look you are after.
Is this a setup that you also often use on your shoots? What kind of modifiers do you use to tweak it?


Too easy!
To be honest - i prefer back background for beauty. It helps to get that pop-up effect for makeup.