
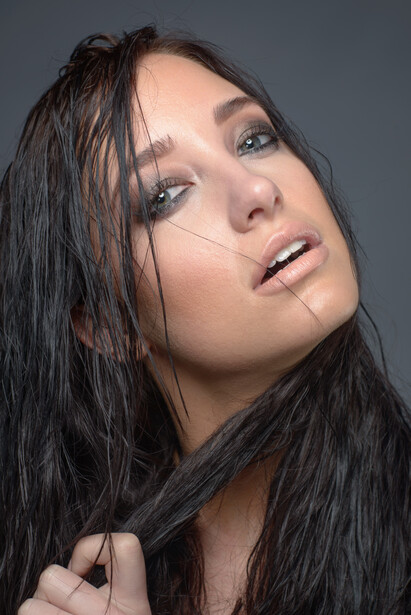
In my opinion, mastering negative dodge and burn is the key to any beauty retouch. There are many steps and many hours that go into a great retouch, but negative dodge and burn is as essential, if not more so, than any of them. The term "negative dodge and burn" is one that I first heard from fellow retoucher Pratik Naik. It was the concept of having a specific process of removing distractions and smoothing tonal transitions through dodge and burn that was responsible for one of the biggest jumps in my own personal retouching game. In this tutorial we will look at what negative dodge and burn is, the theory behind what you should be altering, and the tools and techniques in Photoshop that you need to know to get started with Step 4 in our Beauty Portrait Tutorial.
What is Negative Dodge and Burn?
Dodging and burning is the process of selectively lighting and darkening areas of your image. It is a process that is used in all genres of photography and has been around way before Photoshop. In portrait photography, many of us learn to use dodge and burn to add contrast and emphasize the contours and shape of our subject. If you push that process far, you can intentionally, or often unintentionally, create a very surreal, illustrative type look.
So when we say negative, we are inferring that we are not adding or emphasizing highlights and shadows, but actually removing highlights and shadows. Negative dodge and burn is the process of minimizing distracting highlights and shadows and also smoothing out the transitional values in our image.
When many of us first learn frequency separation, we learn to use the middle layer to paint and smooth out the transitions in value and tone in our portrait image. The overuse of this is possibly the biggest culprit of poor quality over-retouched images. By using dodge and burn instead of frequency separation, we have a far less chance of destroying our image and of creating a professional quality retouch.
What Should You Fix and What Should You Leave
Other than knowing how to actually dodge and burn the correct way in Photoshop, knowing what you should be correcting, and what you should be leaving is the key to this whole step. Small inconsistencies, distracting highlights and shadows, and signs of age are all things that you should be trying to correct in a beauty portrait. The shadows and highlights that define the shape and form of your subject are, for the most part, the things you want to leave.
However, really knowing what to edit and what not to edit, is not as simple as just reading one sentence. So, how do you really know? The short answer is study. Study the images of great retouchers, study the beauty images in the ads of the biggest beauty lines, and most importantly study faces in real life. Watch as people move through light in real world conditions, how the shadows begin to shift and change, or how the information that tells you how big their nose is or how high their cheek bones are changes. Study what lines and shadows are necessary to define their form. With a trained eye you may also start to see small shadows that are created by a slight divot in the skin or an old scar. Training your eye is not an overnight process, it takes time and dedication.
How to Dodge and Burn in Photoshop, the Right Way
Their are two methods of dodging and burning that I think are really solid ways of going. I'm going to focus on one of those methods in this post and in my tutorial video above. The method I use probably 95 percent of the time is centered around curve adjustment layers. I highly recommend watching the video so you can see exactly how I set this up.
I start with two curve layers. The first curve is set to lighten the image slightly, that's my dodge, and the second is set to darken the image slightly, that's my burn. I also recommend naming your layers. Even if you are trying to work quickly, taking the time to name your layers will save you the time of continually needing to check which is which. You want to make sure that the mask attached to the adjustment is completely black. If it's white, then just simply select it and hit Command-i.
You can then use a white brush with a very low flow and a soft edge to paint in the areas you would like to dodge and burn. I usually set my flow to 2 or 3 percent with my opacity at 100 percent. I also will usually have my brush hardness somewhere between 0 and 10 percent. Take your time while working through your negative dodge and burn. Especially if you are new to this, I might even recommend turning your flow and opacity even lower so you don't over do it.
Another tip that you can use is as you work: continually undo and redo to verify that what you are doing is in fact removing a highlight or shadow instead of creating one. If done correctly it will look like the unwanted shadows and highlights are simply disappearing. I also recommend not trying to do all of your work on one dodge or burn layer. After making some progress, create a new adjustment layer and then continue to work.
Be Sure to Check Out the Other Steps in this Beauty Portrait Tutorial:
Part 1: Behind the Scenes and Breakdown of the Shoot
Part 2: Pre-Editing Using Adobe Camera Raw and Lightroom
Part 3: Basic Skin Retouching Techniques
Part 4: Negative Dodge and Burn
Remember to subscribe to my YouTube Channel to get updated as soon as Part 5 comes out. In the next part of this tutorial, we will look at how I go about my black and white conversion. I'll also be posting screenshots of the retouching process on Instagram.


Join the Fstoppers community for free
-
Post comments and join in the discussions
-
Browse the site ad-free
-
Share your work and get featured in the community
-
Compete in the photo contests for fun and prizes
9 Comments
Thanks for the tutorial, Lance.
Just curious, what is your workflow / layer order typically like in a retouch like this? Specifically, the order in which you would do healing, d&b and frequency separation. I start off with a nice non-destructive file, but typically eventually end up with multiple merged visible layers, with further sets of healing, d&b etc on top. Is that to be expected or is there a better way of doing it?
from your background layer duplicated it to liquify on then above that should be a black layer to do more retouching and about that should either be two curves(dodge + Burn) and or a black layer with a 50% grey layer with a blending mode set on soft light<--the dodge and burn layers should always be on top of your Retouching layers and anything color goes above that. frequency sep is a least used technique.
Thanks Kevin.
Hi Nick - I generally start off with healing - then dodge and burn - then if needed Frequency. I also will go back to dodge and burn if needed after. I use merge visible layers, but try to minimize how many I need. - Check out the other videos in this series as well
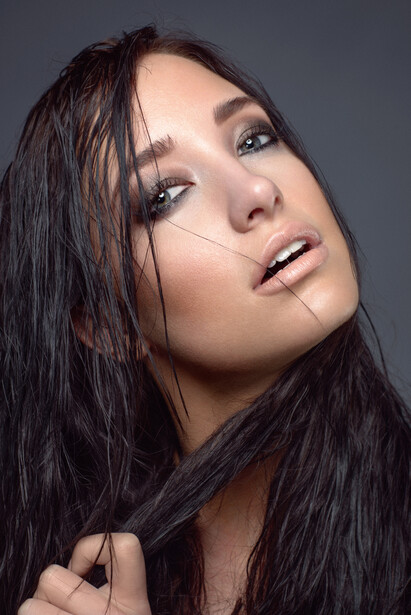
In the second example, the bridge shape of the model's nose has changed. Careful!
Yes Connor you are correct. I think the change in this instance is for the better it turns the line of her nose into a straighter line - for beauty its ok to idealize in a sense - if it were a portrait image then I may consider not doing that. I also wouldn't want to push this any further then it is.
thank you very much. Look forward to see the new part!
Thanks Giovanni - the black and white conversion step should post Sunday or Monday!
Nice natural looking retouch. One area that does stand out for me though is the shadow between her nose and eye that was dodged. I would suggest either bringing back some of the shadow or color-correcting the area as it seems to have a muddy grey look which happens when something is drastically changed.
Great work nonetheless.