The way you edit photographs significantly shapes their visual impact. Using Lightroom's tools strategically helps turn ordinary shots into distinctive images worth sharing.
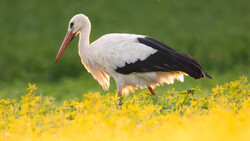
Coming to you from Christian Möhrle - The Phlog Photography, this practical video guides you step-by-step on how to transform a raw image of a bird into a compelling photograph using only Lightroom. Möhrle kicks things off by addressing noise, applying Lightroom's built-in denoise feature without complicating the settings. He then crops the photo to portrait orientation to emphasize the subject, making the bird stand out clearly against a tighter background. His straightforward approach to white balance adjustments subtly shifts the mood to a cooler tone, setting the stage for detailed local edits. These initial steps alone show how simplicity can be incredibly effective in emphasizing your subject.
Moving deeper into the edit, Möhrle demonstrates precise masking techniques—especially useful if you’ve struggled with messy backgrounds or tricky lighting conditions. He uses gradients strategically to darken certain areas, making the bird pop even more clearly from its environment. This process includes careful, painstaking removal of distracting tree branches with Lightroom's masking tools, acknowledging openly the hassle but also the necessity of such detailed work. What stands out here isn't the complexity but rather the practicality and realism—this is editing as you'll actually use it, patiently and methodically. Watching these edits in real-time helps clarify why investing extra effort in precise masks is essential for producing professional-quality results.
An especially valuable segment covers the targeted use of brushes to enhance specific details, like brightening the bird’s eye or adjusting feather highlights. Möhrle emphasizes subtlety here, encouraging incremental changes to maintain naturalness while still noticeably improving sharpness and texture. His advice on using Lightroom's generative AI Remove Tool is refreshingly candid; sometimes it works perfectly, other times you’ll need Photoshop. The honesty here helps manage your expectations, reinforcing that editing is often about choosing the right tool rather than expecting perfection from any single approach.
The video moves beyond editing to thoughtful color grading, showing you how to achieve rich, moody blue tones without oversaturating your image. Möhrle uses the calibration panel effectively—a lesser-known but powerful feature—to subtly alter colors in a controlled way. He also addresses sharpening with precision, carefully using the masking slider to ensure only the subject gets sharpened, thus avoiding unwanted graininess or noise elsewhere. Check out the video above for the full rundown from Möhrle.


Join the Fstoppers community for free
-
Post comments and join in the discussions
-
Browse the site ad-free
-
Share your work and get featured in the community
-
Compete in the photo contests for fun and prizes
No comments yet