Image editing isn't just about adjusting contrast and saturation. The true power of photo editing lies in understanding how to work with layers in your composition. When you approach your landscape photos as distinct zones that need individual attention, you can transform ordinary scenes into extraordinary images.
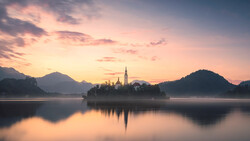
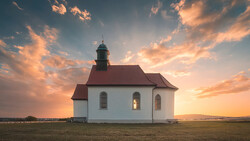
Coming to you from Christian Möhrle - The Phlog Photography, this methodical video breaks down a powerful editing approach by dividing a landscape photo into three distinct layers: foreground, mountains, and sky. Möhrle demonstrates how using Lightroom's masking tools allows you to make targeted adjustments to each area independently. His workflow begins with basic adjustments to create a foundation, changing the color profile from Adobe Color to Adobe Standard to reduce contrast and gain more control. He then strategically darkens the shadows while maintaining detail in the histogram, immediately creating separation between the mountain backdrop and the church in the foreground. What's particularly effective is how he uses the masking panel with linear gradients combined with AI selection tools to isolate specific areas without affecting others. This technique allows for precise control that would have required Photoshop not long ago.
The layered approach becomes even more impressive when Möhrle demonstrates how to create depth through targeted exposure adjustments. By darkening the mountains in the background while brightening the foreground, he enhances the natural dimensionality of the scene. His careful attention to the gradient of light in the sky—making the top darker while preserving brightness near the horizon—creates a natural look that draws your eye to the subject. The color grading step shows how adjusting specific color channels can further enhance the separation between layers. By increasing the luminance and saturation of yellows, he brightens the foreground grasses without affecting the mountains or sky, creating a natural spotlight effect that makes the scene more dynamic and engaging.
What stands out about this technique is how accessible it makes advanced editing concepts. Instead of complex Photoshop layers or luminosity masks, Möhrle achieves professional results using only Lightroom's built-in tools. His approach to noise reduction and sharpening is equally practical, applying just enough processing to enhance details without creating artifacts. The only time he switches to Photoshop is for the final cleanup work, removing distracting elements like poles and cars using the spot healing brush and generative fill. Check out the video above for the full rundown from Möhrle.
And if you really want to dive into landscape photography, check out our latest tutorial, "Photographing the World: Japan II - Discovering Hidden Gems with Elia Locardi!”

Join the Fstoppers community for free
-
Post comments and join in the discussions
-
Browse the site ad-free
-
Share your work and get featured in the community
-
Compete in the photo contests for fun and prizes
No comments yet