

We always want more time, but where do we find it? Many of us could start by analyzing and adjusting our editing workflows. By doing so, we will see the time we are looking for. Here are five tips I’ve used to gain more time and allow me to shoot more.
Utilize Keyboard Shortcuts
It seems straightforward. Many photographers do not utilize keyboard shortcuts in their workflow. I know a few who use them so much that it seems that is the only way they edit! Utilizing the keyboard shortcuts are going to save a lot of time. You don’t have to find what you need in a menu; it is all in the press of a few keyboard keys. You can toggle through different modules, open preferences, and use them to flag photos for editing. There is an extensive list of available shortcuts, and you can find them here on Adobe’s website.
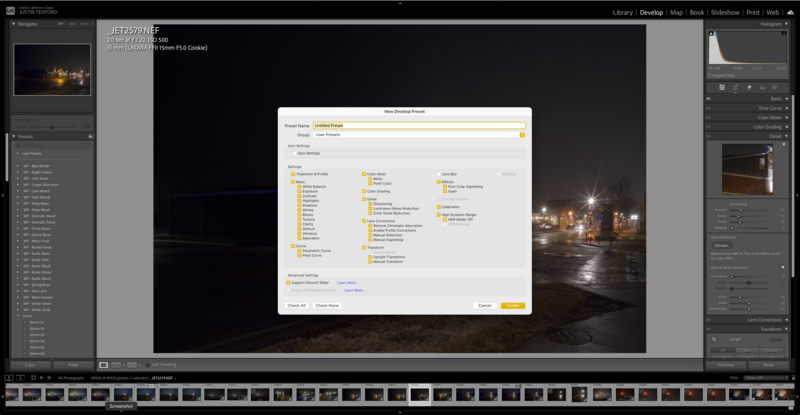
Create and Use Presets
Presets are often looked down upon but can save you time! I am not talking about giving some random stranger $100 to download presets to use on your photos and call it a day. You more than likely are applying the same adjustments in Lightroom to your photos day in and day out when you make basic photo adjustments, add a +7 Contrast, -5 Highlights, +10 saturation. It takes time to add those individually. Create a preset in Lightroom, and these adjustments are made simultaneously versus individually with a click of the mouse. To save time, you can apply this preset while importing your files! You can even create a preset for your specific style. If you are one that still applies watermarks to your images, you can create a preset that applies the watermark on export to your images, saving you time and not having to add it manually! I helped a client set up several of these, as she used varying logo colors depending on the image.
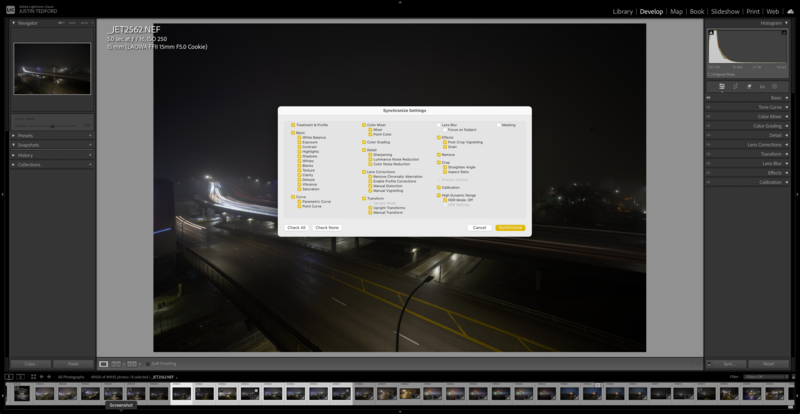
Batch Editing
The first thing I thought of when I found this ages ago was, "Where have you been?" I use batch editing regularly, especially images from a commercial shoot for food and even landscape photos. I may add a bunch of adjustments to a photo, but I have several in the sequence, and I want to see these adjustments on the following fifteen images. I will not use all these photos, but I want to see the adjustments added to them, as it helps me narrow them down. Lightroom allows a batch edit; I can sync these settings across multiple images. I am saving time because I am not applying five adjustments fifteen times.
Customizing the Workspace
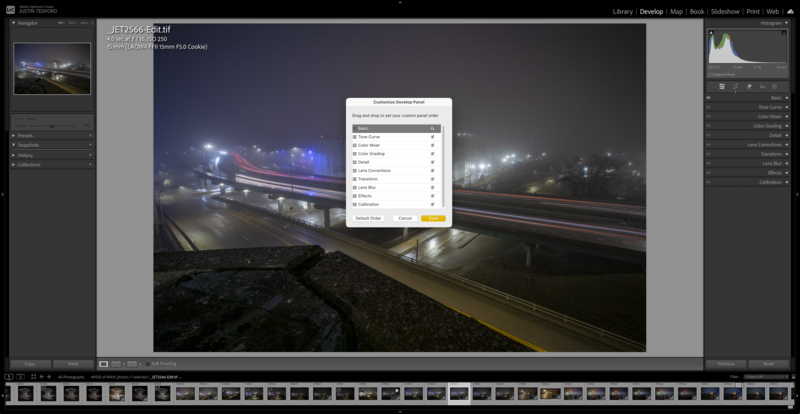
Did you know you can customize Lightroom’s develop panel? You sure can! On the right side of Lightroom are the histogram, basic, tone curve, color mixer, detail, and more panels. You may not be using them all in your workflow process. I do not use color grading or color mixing panels. Scrolling past these can be a real pain when I never use them. Why have them if you never use them? You can select and customize the develop panel by right-clicking on any panel. A window will appear with all the panels, each with a checkmark next to it. Uncheck the panels you don’t want, and presto! Those panels have now been removed from the development panel. Another great customization is that you can follow those same steps and rearrange your panels into the order of your workflow!
Use Lightroom’s AI-Powered Tools
Love it or hate it, AI is here to stay. We could learn to embrace it! AI is best kept in the editing workflow! Lightroom has released several features using AI: masking, people and object detection, and noise reduction, to name just a few! These do a fantastic job and speed up the workflow.
Masking: I love the masking feature as it saves significant time, so I am not manually masking areas with a brush (occasionally, it still needs to be done). It can automatically identify and select your photo's main subject, sky, or background.
People and Object Detection: If you're into shooting portraits, this will help in extraordinary ways! Lightroom can select parts of a person, such as eyes, lips, hair, and skin. This allows you to adjust those specific areas without having to mask these areas manually.
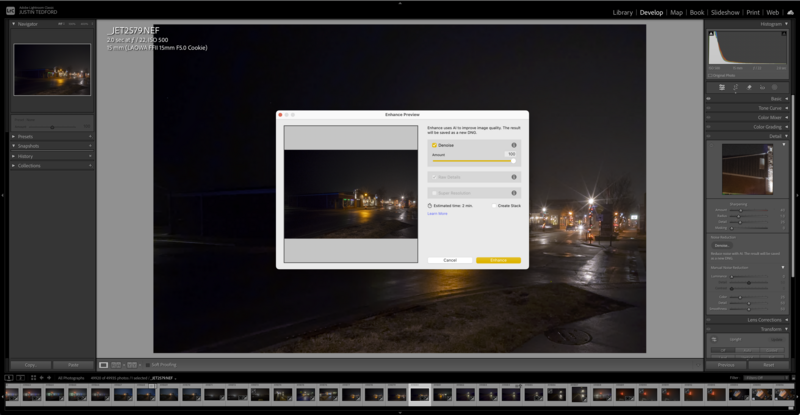
Noise Reduction: I am still a fan of Topaz Denoise AI, but Lightroom does a fantastic job, so you don't need to purchase another piece of software. I use Topaz Denoise AI as a plugin in Lightroom. AI was recently introduced to remove noise from images while retaining fine detail. It will also be helpful in low-light and high-noise images. On a few occasions, it does make the image look funky, so be aware and look over your images after applying the Denoise!
Content-Aware (Advanced Spot Removal): Adobe has made leaps and bounds in this area for Lightroom users. I once had to remove blemishes, distractions, or unwanted items in Photoshop. Going between two software programs is a pain and wastes a lot of time. Now, you can do all this in Lightroom, and it's successful roughly 90% of the time. There are still things that Photoshop does better, and Lightroom will likely never do.
There are many more tips we can explore to speed up your Lightroom workflow, and these are a few to get you started. If you're looking for more time to go out and shoot while sitting less frequently in front of another screen, take a look at your workflow as you edit and see if there are things you can make more efficient. That could be removing unused panels in the develop module so you are scrolling less, or you could even rearrange those panels for better access by adding them to the top. Find adjustments you regularly apply to your images and create presets that could be used. Make export presets to apply your watermarks on your images, reducing another manual process. All these and more can save you time, so take a look at analyzing every step in your process and find if there are ways to make these steps more automated and save you time!
Join the Fstoppers community for free
-
Post comments and join in the discussions
-
Browse the site ad-free
-
Share your work and get featured in the community
-
Compete in the photo contests for fun and prizes
4 Comments
All good things to know and use! Personally I am never in a rush or hurry as a hobbyist for the slider work is my eye opener! As far as "Presets" kind of a slower type thing as I see most YouTubers videos where there are a lot of presets on the left side. First you have to play with all to know the looks they give to know before using one or the other on an image, time and more time.
Batch Editing works best when doing HDR images so all have the lens profiles and the camera Profile Browser which is the in camera "jpeg" selection, for when you do RAW you do not get that in the RAW image. Again YouTubers never seem to use any, I have Sony cameras and I like using "Portrait" for my astro Milky Way's for it rid of the dark area blues as well as the colors in Pegasus Yin and Yang colors of magenta and a light blue opposite each other.
Another is using the color picker again few if any ever are seen using maybe for not knowing how, Again Astro Milky Way's the bight white "Galactic Center" (suppose to be bright white) and a color pick on it brings out all the sky and ground colors, yes the sky at night is some form of blue not black or grey.
Another is one of the sunsets/rises is the VV and VV2 selections one is bright and the other dimmer but both bring out colors of crayon box full of colors just different brightness's.
If just do all of these at first look time is saved faster and better than I would believe any preset. When it comes to the HDR and matching all the images to the center image just do the Lens Correction and Sharpening in the detail section the doing the Noise Reduction that will be done to all images and all before doing the blending HDR faction for color picking, spot removal, or masking are not applied to the blending but you do get a DNG file to play with all things.
From the start of capturing a landscape you should do bracketing either 3 or 5 at +/- 2EV why you may ask. well if the sun is above the horizon you will get a smaller size sun and not a blaring white/orange taking away a lot of clouds. You also get 3 or 5 images you can play with or use all blended together. Like in ON1 Photo RAW and Dxo Nik Collection Nik HDR Efex You can select the center image as well the image that you may want the colors from. This is just a little extra play to make for a final image to start with Before slider play or even a need for a preset and yes some extra time but you get a better starting image.
1. Using Promote Control on Canon T2i many exposers combined
2. Bracketed 3 at +/- 2EV when other were doing long exposures
3. Bracketed to make a small sun getting the kiss in the sky
4. Even in Blue Hour mainly to get the dark side of objects bright verses silhouettes
Thanks, and you have some great points!
Justin, all good points to speed up workflow. There are two things I would have included. First, before all your readers print out and tape the shortcuts to their monitors there is a shortcut for the shortcuts. Holding down the Control or Command key while pressing the forward slash key ( / ) will reveal a list of shortcuts for whichever module you are working in. Second, your suggestion for customizing the side panels to hide those you do not use is a good start. Utilizing the "Solo" mode for the panels can save a lot of scrolling and make it quicker to locate the panels. Solo mode automatically closes the panels when you open a new panel. To activate solo mode, right click on any of the dark bars in the panel to reveal a pull down menu. Select "solo mode" and you are set to go.
Thanks for the comment! Those are great suggestions!