Subscribing to the Adobe Creative Cloud is a big financial step for most beginning photographers. In this article, I’ll figure out if the free and open software RawTherapee is a real competitor when it comes to developing an image.
In my last week’s article, I have taken a look at the limited capabilities of the “File Browser” in RawTherapee. It wasn’t a fair fight, because RawTherapee isn’t really meant to manage your files. It only leaves little space for organization. Developing a photograph in the “Editor” is what the program is meant to do. Let’s give it a try, then.
Round One: Interface And Usability
It takes me only a few seconds to get RawTherapee started. That’s great because I'm generally an impatient person. What isn’t great, however, is the time it takes to load a photograph into the editor. Lightroom really has done a great job during the last years. I remember how long the full preview took a few years ago, especially when you didn’t build smart previews. RawTherapee reminds me of that time. Whenever I switch to another photograph, it’ll take a few seconds. Funnily, these seconds seem to last way longer than the few seconds to start the program.
Once a photograph is properly loaded, you can start working on it. RawTherapee offers you a useful histogram, a navigator with a detailed review about every pixel, your editing history, and snapshots on the left side. Everything works properly and appears very useful.
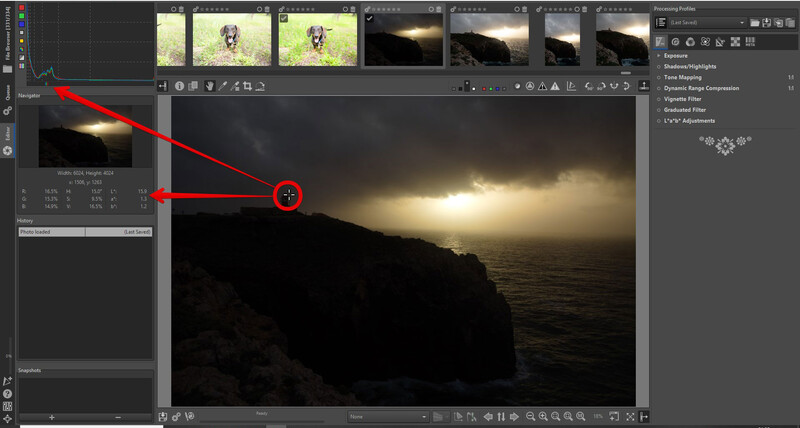
The editing panels on the right consist of “Exposure”, “Detail”, “Color”, “Advanced” “Transform”, “Raw”, and “Metadata”. A proper and understandable system, even though I didn’t really need “Advanced”, “Raw” and “Metadata”, yet.
The navigation works well and you’ve got a few shortcuts that help you navigate quicker. The panels are easily understandable, too. What I really liked is the option of one or more small “detail windows”, where you can keep an eye at parts of your image in 100 percent preview. That’s very helpful because unluckily a 100 percent full preview takes a little time.
Round one is undecided. While it takes a little more time to get a photograph ready in RawTherapee, I like features like the “Detail Window” and also prefer the organization of the panels. If I rated design too, probably Lightroom would make this round.
Round Two: Crop
Cropping and straightening an image usually is the first step when I develop a photograph. The “Crop” panel in RawTherapee is quite lucid, albeit not perfect. You can lock your ratio or crop freely and apply different crop guides.
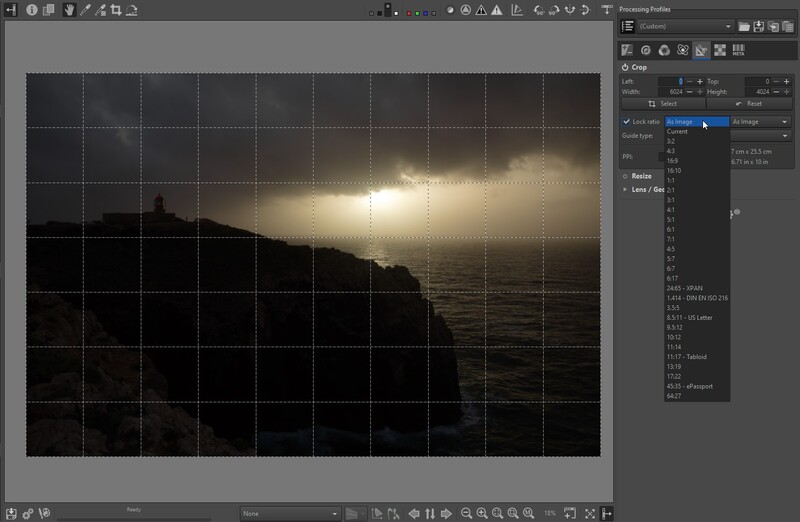
There are a few parts which I really don’t like. While you crop your image in the “Crop” panel, you straighten it in “Lens/Geometry”. The “Crop” in RawTherapee seems to be designed to also define the export size. I really think that the final resolution of an image should be only defined when you export it and not already in the process of editing.
Another issue is the crop grid. When you use a certain grid-like the rule of thirds – for cropping your image, it stays on top of the image. Even when you leave the “Crop” or the whole “Transform” panel. You’ve got to switch off the overlay to get your clear image back. That’s one step too many.
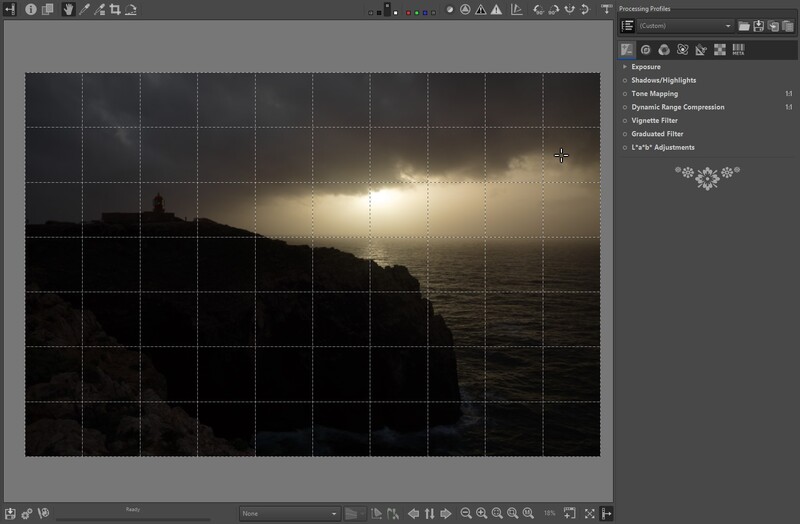
Even though I'm a bit disappointed about the user-unfriendly crop function, there is something positive: The perspective correction (horizontally and vertically) is nearby. I think transform and crop really belong together.
However, this round definitely goes to Lightroom.
Round Three: Exposure And Contrast
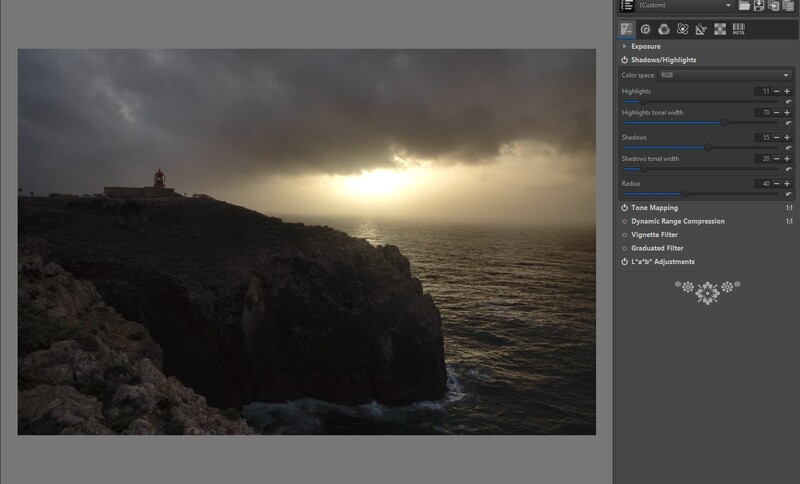
So much about the “soft” editing of a photograph. When we are talking about developing a photograph, we mostly think about the overall exposure and contrast. I am really happy with RawTherapee when it comes to the setup and function of each and every editing panel. “Exposure”, “Shadows/Highlights”, and “Tone Mapping” team up to a powerful basis in the “Exposure” panel. Even the L*a*b* Adjustments can add a little pop.
While the functions work a little bit differently than the “Basic” adjustments in Lightroom, you can create the same effects with a little practice. To me, it feel like the sliders of the Shadows and Highlights work slower and softer in RawTherapee, while other sliders really need to be treated with caution. That’s not worse but only different.
Instead of the basic “Contrast” “Clarity” and “Texture” sliders, RawTherapee offers you a giant “Contrast” panel, where you can adjust a lot of values like “Sharpening”, “Local Contrast”, or “Microcontrast”. You can even use the “Haze Removal” just like you’d apply a “Dehazer” in Lightroom.
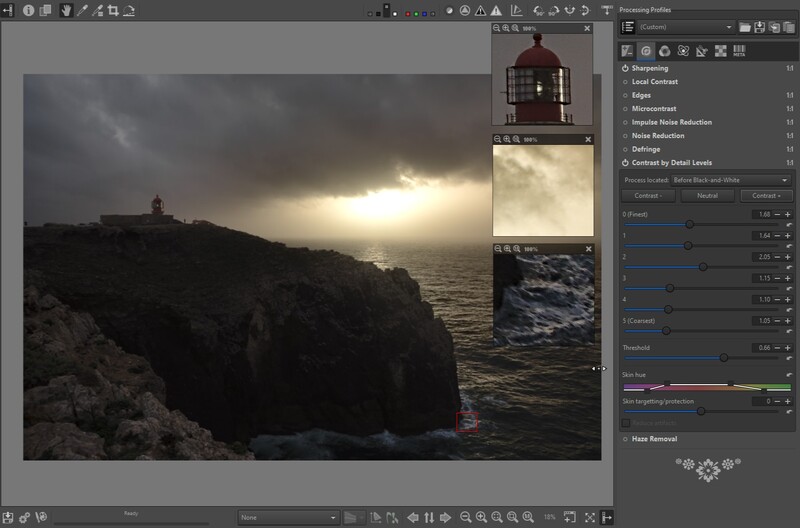
But RawTherapee isn’t just a reorganized Lightroom. Functions like the “Contrast by Detail Levels” really give you control over your photograph in a structured and understandable way. The tool lets you adjust contrast only in finer or coarser contrast areas. I have only tried it a few times, but I think especially when dealing with details in people’s faces, this is a handy tool. Whenever you want some detail to stay visible, you can reduce the contrast only on the level of blemishes.
I really love the functions of RawTherapee, here. The different sliders are very intuitive and easy to use, while the results are great. Unfortunately, there is a big “but”: It takes its time. Some sliders won’t be applied in real-time. It seems the more tools you switched on, the longer it takes RawTherapee to build a new preview. Again, a few seconds more for each step.
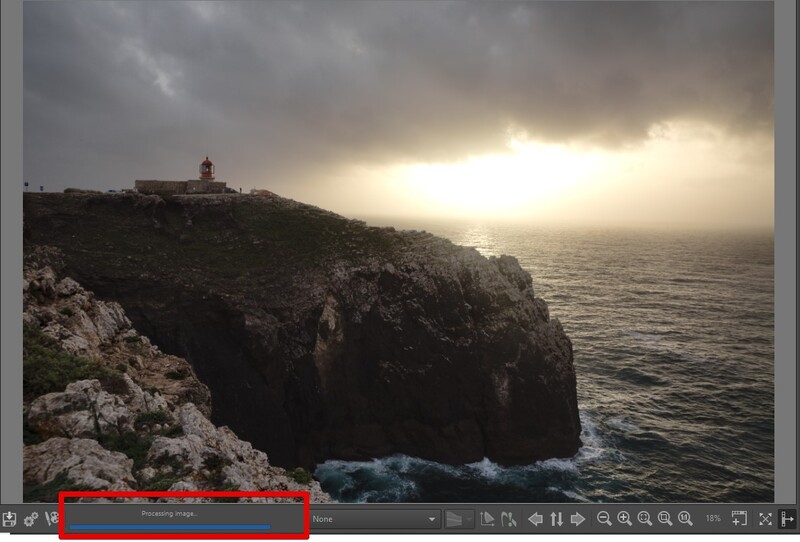
I’d really love to grant this round to RawTherapee, but it’s hard to oversee the lacking speed. It’s not bad enough to claim that I can’t work with the program. but it’s not as little to not be a little upset with it, either.
Let’s call it a draw. Others might judge differently.
Round Four: Local Adjustments
Local adjustments really make your photograph pop. You can draw attention to your subject by adding contrast or dodging some areas. Spot removal tools help you to get rid of the spots created by dust on your camera’s sensor. Clone tools help you to remove unwanted trash in the landscape or whatever you want to remove. Unfortunately, that’s not possible in RawTherapee, yet.
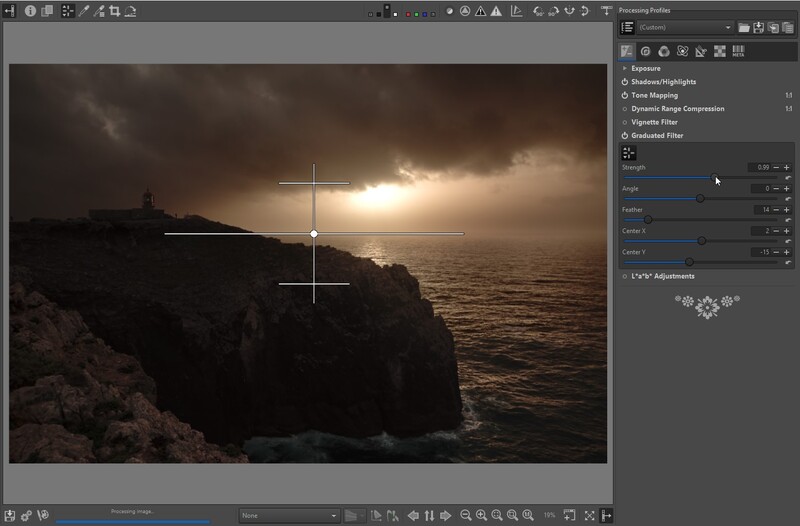
It’s really sad, but the only local adjustment that you can make using the current free and open software is applying a very, very basic graduated filter. It’s ugly, it can only gradually or suddenly lower the exposure of your photograph. That’s it. No sharpening, no white balance, no contrast. Only a digital graduated ND-filter in the “Exposure” panel.
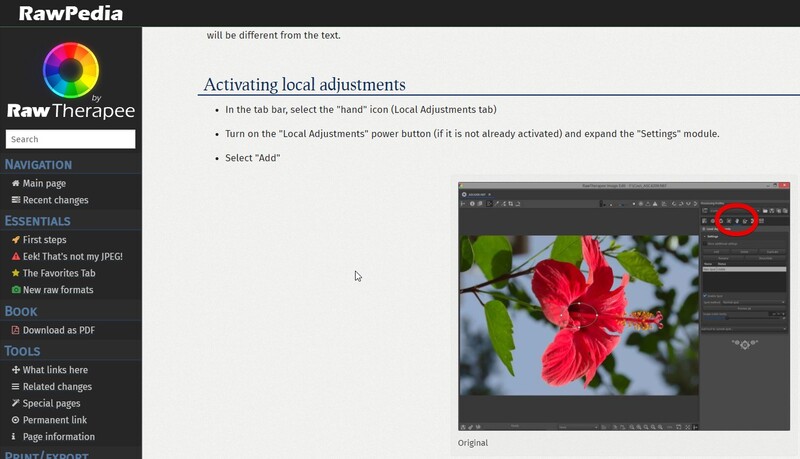
Lightroom almost knocked RawTherapee out, here. But wait! A look into the "Rawpedia" gives us a hint that local adjustments might be coming soon. The manual refers to a hand symbol amongst the other panels. In the current version 5.8, it doesn't exist, but the screenshot from September 2020 keeps us excited. Apparently, local adjustments already work well in the developers' version of RawTherapee.
Round Five: Colors
Can we still improve our edits in the current version? Yes, by playing with colors. The “Color” panel offers a lot of adjustment from vibrance and saturation to hue and color toning.
The panel is really big and contains even some advanced tools like an RGB channel mixer and RGB curves. If you want to keep it basic, you will be happy with adjusting the white balance and maybe playing around with the “HSV Equalizer”, which works almost the same as the “HSL” panel in Lightroom.

For adjusting the hue, I prefer the graphic interface of RawTherapee, because you can change the curve and directly see which hue will be changed in which way. This function worked best in “Darktable”, another free software, which I reviewed a while ago.
In RawTherapee, I only miss the option of color grading or even split toning. I can compensate that with other tools like “Color Toning”, but it would have been nice to find an easy and quick way to shift the color of certain areas of a photograph.
However, again, I’d call it a draw. RawTherapee offers the same functions as Lightroom, only hidden underneath different tools.
Conclusion: RawTherapee Is a True Competitor
RawTherapee is a true competitor, just maybe not for everyone. For beginners and advanced photographers who only like to apply basic adjustments, this program is just as useful as Lightroom. Even if you want to play around with colors and contrast, RawTherapee works amazingly.
To finalize my photographs, I sometimes want to apply a filter in a certain area, increase the detail in the sky, or lighten up some darker pixels around my subject. And I need to remove dust spots! That’s not possible in RawTherapee. Also, I wouldn’t use it to develop a full-day wedding, as switching between the photographs takes too much time. So does waiting for the adjustments to be processed.
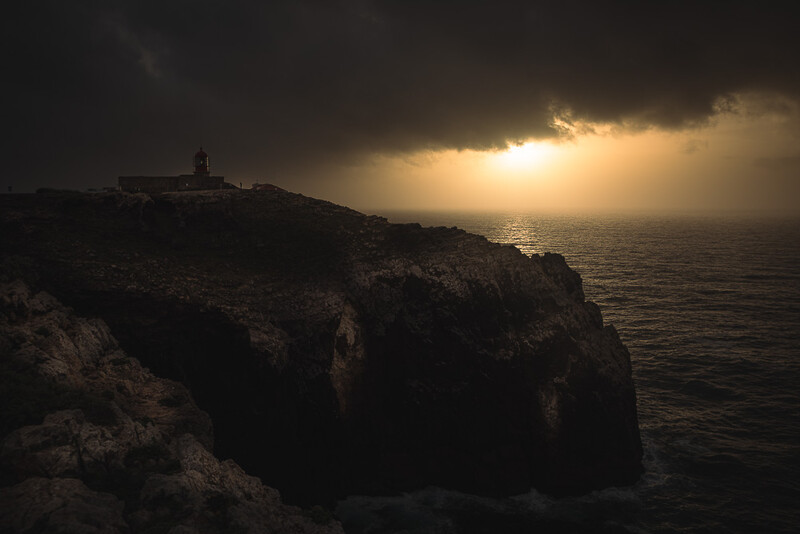

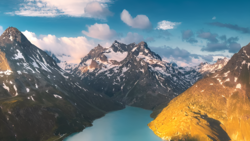
In the comparison above you see my Lightroom edit and my RawTherapee edit in direct comparison. While there are some differences, I guess both edits work well. When you edit landscapes, want to keep it as close to reality as possible, or learn the basics of editing, RawTherapee will be a great choice.
What I liked about RawTherapee’s “Editor”
- Easy to understand and handle
- 100 percent preview windows
- Options for adjusting the contrast
- The HSV Equalizer
What Could Be Improved for a Better User Experience
- General speed of the adjustments, the aim should be a “live” preview
- Local adjustments (are probably coming soon)
- Spot removal, if not a full cloning tool
- An updated design would be nice, too
- A color grading tool for quick color adjustments


Join the Fstoppers community for free
-
Post comments and join in the discussions
-
Browse the site ad-free
-
Share your work and get featured in the community
-
Compete in the photo contests for fun and prizes
8 Comments
Thanks for this comparison!
Maybe you can do one comparing RawTherapee and darktable at some point!
Thank you for your thoughts. I chose to use RT being retired and not thrilled with the subscription plan with Adobe. It works well for me as a non pro. Lots to explore.
My con is the lack of written how to's and limited video tutorials. The 500 page wiki is similar to an AutoDesk manual..
A very good idea to compare RawTherapee and Darktable - both have strong points. I'm more a fan of Darktable.
I've never been a fan of Lightroom, which is why I switched from LR4 to ACDSee (now using the "Ultimate" version). I like Raw Therapee, and I recommend it for those looking for free software, but I feel its value is diminished by the limited learning resources available for it. That is an area where commercial software usually does better than Open Source.
The biggest issue for me is that I'm using LR 5.7.1 becasue I'm not putting up with Adobe cloud bullshit. I bought it and updated it as far as I could go.I refuse to go to a cloud subscription because we did that at work and it's too chaotic. RT has always been a possibility, and I just wonder where we're at in comparison to the LR version I'm using.
I hope not to come of as a sourpuss, as I initially quite liked RawTherapee and I like how it handles dynamic range while editing RAW files, but if RawTherapee can compete or not will depend on your camera:
It appears that it struggles with some Fuji RAW files. Perhaps it's my incompetence, but I ran into problems with demosaicing of Fuji RAW files with RawTherapee (and also some other RAW converters, such as Apple's native RAW component and ACDSee).
When I first noticed the problem I did a comparison of many RAW converters for Fuji, the outcome of which I posted here:
https://www.dpreview.com/forums/thread/4546372
In short, there was a lot of fringing in the output of various RAW processors including RawTherapee that I did not manage to correct and that was not present in the original JPEG files produced by the camera itself.
Thanks for making this comparison!
I have chosen Rawtherapee because it very well meets my needs. I do not have an extensive experience about post-processing, but I think my photos have improved after switching from LR to RT.
On the plus side, you can always find some new tool that addresses a particular issue, and learn some new technique for your post processing.
On the con side, there is not a ton of information about how every function/option/command works, what it is meant to achieve, or what it is supposed to be used for.
It would be nice to see a comparison between Rawtherapee and Darktable!
That's one thing I like about darktable. There seems to be a lot of tutorials online for it.