
Vignettes can make or break an image and can literally lay waste to the final outcome if overcooked. I’ve never been a big fan of the vignette feature in Lightroom, but that’s not because of what it does or how I use it. It’s simply because of the immovability of it.
Working post-crop, the vignette feature moves in from the edges of the frame at whatever intensity you desire for the finished piece. But that’s it: it applies from the edges. What if you could move it and apply it to wherever you want and have more versatility in the process? Would this be more beneficial?
In this tutorial, I’ll show you how to create a completely moveable and editable vignette in Lightroom and show you how to save it for future edits, which will allow you to create vignettes that work better for your images The bonus is the process of creating it is simple.
How to Create the Custom Vignette
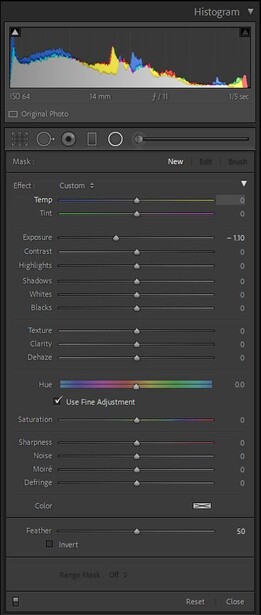
Under the Histogram panel in Lightroom, choose the Radial Filter Tool. Now, it really doesn’t matter what slider you choose here, as it’s completely editable when finished, but let’s just go with the Exposure slider. Draw that back into the minus territory. I’ve gone for -1.10, as shown below. Ensure that Invert is not checked, or you'll just create a dark radial with these settings.
Next, click on the Custom tab at the top, and in the dropdown menu that appears, select Save Current Settings as New Preset and choose a name for the preset. As you can see, I’ve named mine Vignette.
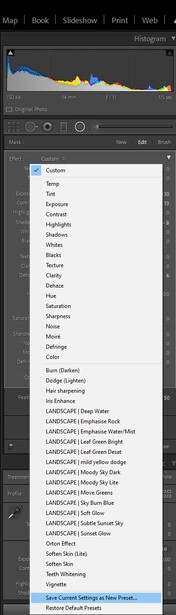
Honestly, that’s it. It’s as simple as that! But, this is also where the fun begins. Everything within the Radial control panel can now be used to control your Vignette. Exposure, Contrast, Highlights, Shadows, and so on, including Color and Range Masks. Everything can now be applied to your newly created Preset, plus you can position it wherever you want in the image. The beauty of it is that it’s saved in your dropdown menu for future edits.
How I Used It in This Image
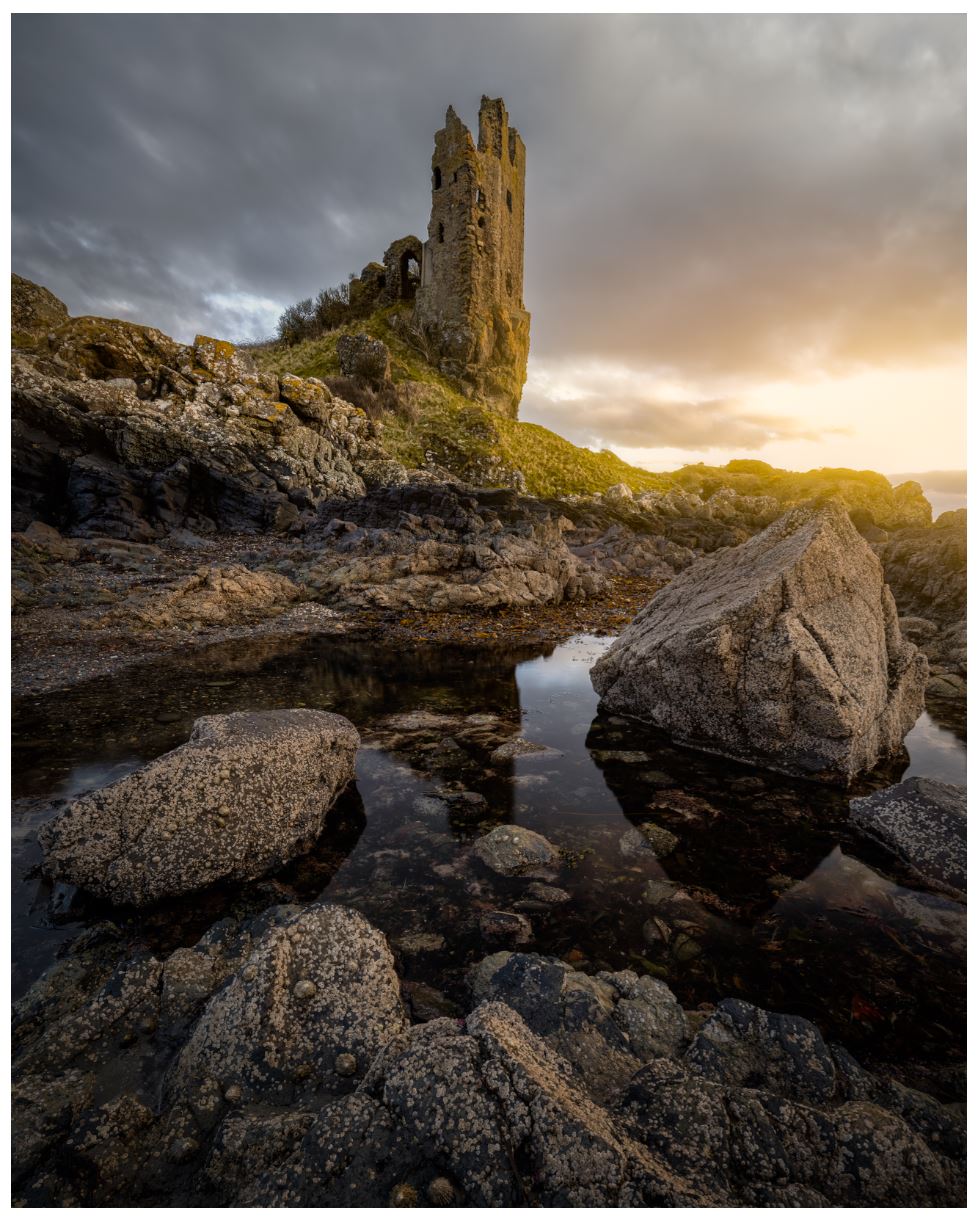
As we are always drawn to the lightest parts of an image, I wanted to create a custom vignette that wouldn’t intrude on the sunset and therefore undo the type of look I was going for with the edit. This is where my newly created Radial Vignette would come into its own.
I find it easier to zoom out and to see the bigger picture. Doing this allows me to see the effect over the entire image and also allows even more control over the placement of the vignette.
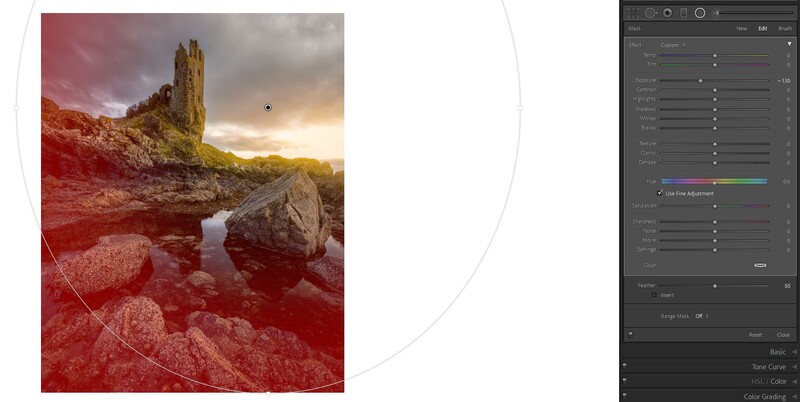
Placing the center of the vignette just above the sunset and pressing the letter O on the keyboard allows me to engage the mask visibility so that I could see where the vignette was and what parts of the image it was affecting. Personally, I use the Mask feature on the keyboard frequently, as it provides me with high visibility of the masked area, which I find easier before commencing with any adjustments.
From this point, I can use any of the sliders in the Radial panel to adjust the vignette to how I want it to be for the final image. If I wanted to for example to be more creative and add a color to the vignette, I would simply choose a color, and it would be applied to the areas that were shown in the mask.
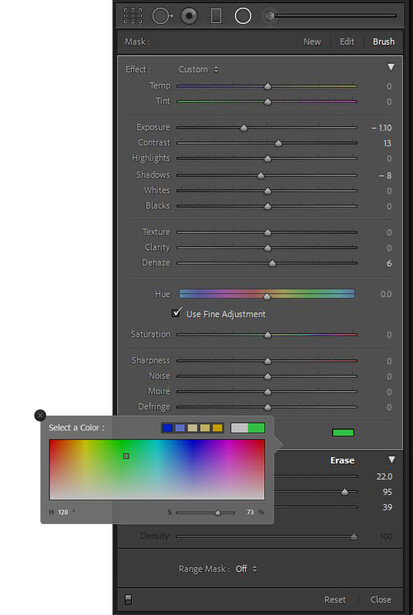
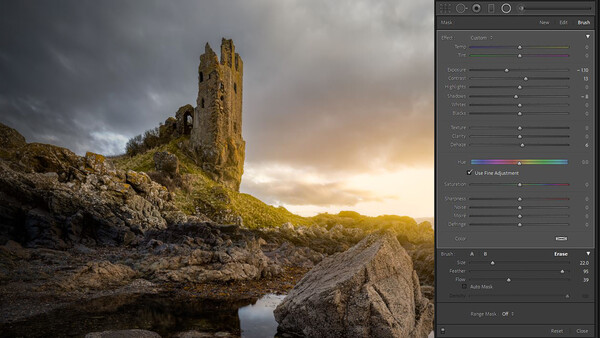
Erasing the Vignette
I was happy with the vignette and its positioning, but it had encroached onto some areas that I didn't want it to. So, I selected Brush in the panel, then Erase (both indicated below), and removed the undesired area, remembering to adjust my flow to the desired amount. Less flow, softer erase. More flow, more erased. It’s entirely up to you.

Conclusion
This is a simple yet effective way to create, use, and save a new Radial Vignette Preset, that is totally customizable and editable using the Radial panel sliders. Each time you use the Radial Vignette, it will revert back to the original saved preset, in this case, Exposure -1.10, and you will have to dial in new adjustments that suit each image individually. The beauty of it is that you now have a completely moveable and adjustable custom Vignette Tool that you can use to subtly emphasize the areas of your image that you want and not be stuck with edge vignetting and the restrictions of less creative output when realizing your finished image.


Join the Fstoppers community for free
-
Post comments and join in the discussions
-
Browse the site ad-free
-
Share your work and get featured in the community
-
Compete in the photo contests for fun and prizes
2 Comments
i absolutely love this article grate job Gary McIntyre
Many thanks.Glad you found it helpful.