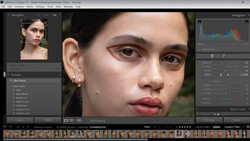
When you think of retouching skin, you likely think of using Photoshop over Lightroom, and for deep or intricate work, that is definitely where you should be working. However, Lightroom offers some built-in tools for this, and they can often be all you need to produce a finished photo. This great video tutorial will show you how to use them to produce naturally retouched portraits that still retain detail in the skin.
Coming to you from Chelsea Nicole Photography, this awesome video tutorial will show you how to retouch skin in Lightroom and retain detail. For intensive work, Photoshop is still the place to go, but it is always nice if you are able to finish a photo in Lightroom and save some time by not having to round-trip through Photoshop. That being said, the same principles apply when working in Lightroom as in Photoshop. In particular, it is important to not go overboard with the retouching to avoid ending up with artificial-looking images. I like to step away from my computer when I am done and come back a few minutes later with fresh eyes to give my photos once last evaluation before I export them. Check out the video above for the full rundown.


Join the Fstoppers community for free
-
Post comments and join in the discussions
-
Browse the site ad-free
-
Share your work and get featured in the community
-
Compete in the photo contests for fun and prizes
1 Comment
Interesting method : thanks for this skin retouching tutorial ! Personally, I prefer using a radial filter around the face, selecting skin color with range mask, and ajusting texture like you did and a little bit of negative clarity.
For me it's faster :)