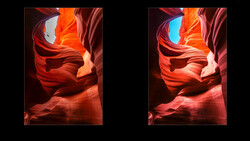
Soft contrast can change the mood of a landscape without making it look flat or faded. When you control it well, you keep detail in the highlights and shadows while giving the scene a gentle glow that feels natural.
Coming to you from Christian Möhrle - The Phlog Photography, this methodical video walks through a full edit focused on soft contrast using Lightroom. Möhrle starts with a raw file that looks dark at first glance, but the histogram shows no clipping in highlights or shadows. That matters when you begin pushing exposure. He raises the overall exposure to brighten the frame, then pulls the highlights down hard to recover sky detail. At the same time, he lifts the blacks to soften the deepest shadows, which immediately reduces harsh contrast and creates a smoother tonal base. You see how this balance between exposure, highlights, and blacks forms the foundation of the look before any local work begins.
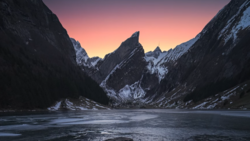
White balance comes next, but not right away. Möhrle adjusts global tones first so the color decisions are based on a more accurate preview of the image. He warms the temperature to suit the sunset and adds a touch of magenta to the tint, giving the sand and sky a more natural warmth. Then he fine-tunes texture, clarity, and dehaze. Texture goes up slightly to enhance detail in the foreground. Clarity is handled carefully to avoid crunchy midtones. Dehaze is nudged rather than pushed, keeping the atmosphere intact without flattening the glow. You start to see how small slider moves stack together instead of relying on one dramatic adjustment.
Local masking is where the edit gains depth. A large radial gradient is placed partially outside the frame to simulate light spilling in from the side. Contrast is reduced within that mask by lifting blacks and lowering dehaze, which creates a believable glow rather than a washed-out patch. He adds warmth directly inside the mask to restore color lost from lowering contrast. The effect is controlled and subtle. Then a linear gradient targets the foreground sand. Texture is increased for detail, but clarity is slightly reduced to maintain softness. This push and pull between sharpness and glow keeps the image from looking over-processed.
The landscape mask tools play a key role in refining specific elements. Möhrle isolates the natural ground to adjust the tone curve only in the foreground. Instead of using basic sliders, he shapes contrast with control points, lifting darker tones while protecting midtones and highlights. It is precise and easy to overdo, which he avoids by keeping movements small. A separate mask enhances the vegetation, raising whites and highlights to give the bush more presence. Subtle color grading adds warmth to highlights, and calibration tweaks the blue primary hue and saturation to unify the palette. Sharpening is applied with masking so only key areas receive detail, leaving smooth regions untouched.
You can follow the steps exactly, but the value lies in seeing how each adjustment connects to the next and how restraint shapes the final look. Check out the video above for the full rundown from Möhrle.

Join the Fstoppers community for free
-
Post comments and join in the discussions
-
Browse the site ad-free
-
Share your work and get featured in the community
-
Compete in the photo contests for fun and prizes
No comments yet