
It's always frustrating as a photographer to spend time shooting, editing, and printing an image only to see different results throughout various steps of your workflow.
That's why it's important for any professional photographer to create consistently accurate color between all their devices throughout every stage of a project, from shooting the image to the final print. The easiest way to do this is by choosing a system that will allow you to calibrate color on your camera, monitor, printer, projector, scanner, and even your ios device to match colors every time. Today, we'll be showing you how to create this consistency using the i1Studio by X-rite.
Although this video starts with the proper color calibrations steps on set, we don't explain the setup behind our shot. If you'd like to see those details, check out how we built our set with Erica here:
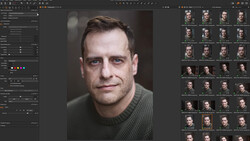
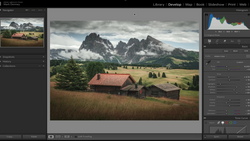
By using the color checker on set, creating a correct camera and lens profile for Lightroom, and calibrating our monitor, we were able to edit our image to show the exact colors that we saw on set. Using the other calibration options of the i1Studio allowed us to maintain the same consistent color on our final print. Furthermore, if we had had other devices that we wanted to show our images on, such as a scanner or an iPad, we could have calibrated those as well. Overall, we found the i1Studio to be a fantastic tool for maintaining correct color calibration through a photographers entire workflow. To see a more detailed write up of the i1Studio, check out the review written by Fstoppers' Jenny Edwards.


Join the Fstoppers community for free
-
Post comments and join in the discussions
-
Browse the site ad-free
-
Share your work and get featured in the community
-
Compete in the photo contests for fun and prizes
10 Comments
Unless they changed the design of the padded jacket for that unit, that thing's a royal pain to hang on your monitor to take a reading. I have the predecessor ColorMunki Design, which is essentially the same unit. I'm surprised x-rite stuck with that design. Even the low end ColorMunki Display is easier to use.
...OK, so I just saw that, yes, the same annoying sleeve is still being used. Also, at 3:50, I personally do NOT recommend leaning your monitor back and putting the calibrtor on it. That thing is heavy enough to press down on the monitor screen and it warps the pixel grid.
You should keep your monitor upright to minimize the pressure against your monitor screen. Of course, that makes it more difficult to get that clumsy setup to stay in place, but you don't want that thing pressing down on your monitor. I sugest gluing some black foam rectangles on each side of that clumsy jacket to keep it parallel to the screen and further reduce light leakage.
There's also the potential to destroy ports by leaning the monitor back. Don't ask.
Use http://www.lumariver.com/ to make your profile for your camera. x-rite´s software for making profile are not that accurate.. ;)
Adobe's new profiles are very close to what the eye sees. Just a couple of minor HSL tweaks and they're good to go.
Perhaps your eyes. :-)
No.. make your on profiles with a color chart and compare.. ;)
Overall a good video. Here's some nitpicks:
1:08 Ideally you don't want any shadowing from fingers casting across the patches for the Passport software reading.
8:10 You used As Shot WB and didn't sync the WB from the other image with the chart
12:00 Can't you print both charts in advance, rather than one at a time and waiting in between? That's tedious!
15:20 Another "ideally", having a viewing booth like a 5000°k Just Normlicht will save you lots of headaches because you can dim it down to match your monitor's brightness, and it's a constant color instead of the changing conditions throughout the day/night. It's damn overpriced, but it makes life much easier when it's sitting next to your monitor.
I've always been happy with my X-Rite products. I currently use their i1Display Pro for monitor calibration. I get pretty close to matching my screen with my Canon Printer, but having the ability to create customer printer profiles with the i1Studio sounds pretty awesome.
Great video Patrick! It feels like if I have taken my first lesson at an art school :)