
If you've ever shot on a budget lens, or composed a dark subject against a bright sky, you will have surely noticed color fringing — a glowing colored edge around any contrasted subject. Learn how to remove even the most difficult chromatic aberration in Lightroom Classic using some manual adjustments.
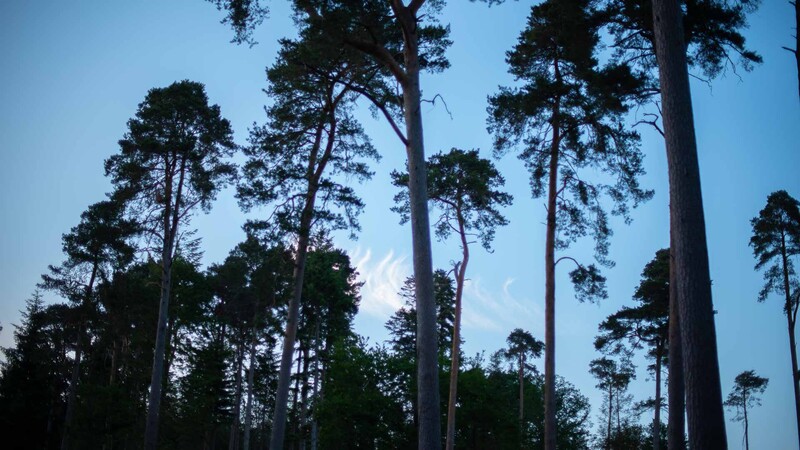
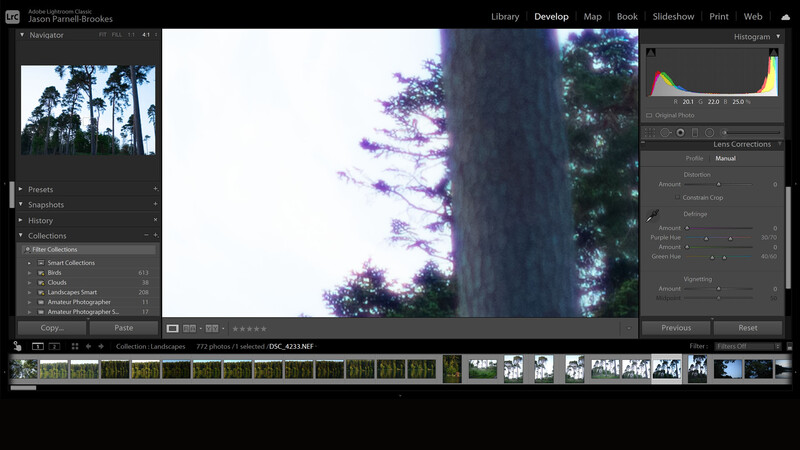
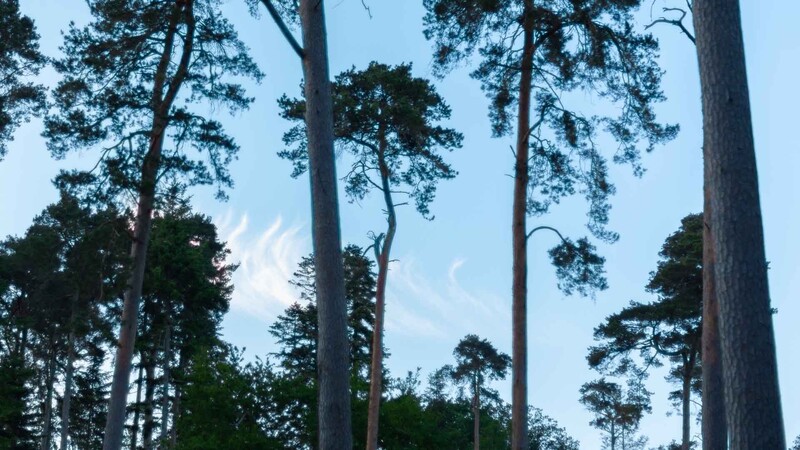
Chromatic aberration, also known as color fringing, pops up as a purple, green, or bluish tinge around contrasted edges. It happens because the glass in the lens doesn't allow each color to converge at exactly the same point on the image sensor. It's usually most noticeable when shooting subjects against a bright sky, such as flying birds, or trees as in this example. Check out this before and after achieved through using the steps below to see how powerful Lightroom Classic is when removing color fringing.
Lens manufacturers guard against this issue by perfecting the quality of the glass they use in lenses, and add or subtract glass elements to avoid this fringing issue. Special lens coatings have also been developed over the years to cope with this problem, as well as deal with flaring issues from shooting against light sources such as the sun.
Generally, the more expensive the lens, the more time has been spent producing and developing the glass to give optimum sharpness, contrast, and reduced chromatic aberration. However, lens design isn't perfect, so occasionally you'll find photos that have colorful outlines around contrasted subjects. That's where editing software comes in.
Lightroom Classic does have an automatic function to remove the chromatic aberration, which works great most of the time, but in some cases it's much more difficult to remove. So here's some simple manual steps you can take next time you need to rid yourself of this pesky optical problem.
Step 1) Try Enabling Profile Corrections

The first step to correcting any kind of optical issues in Lightroom is to head down to the Lens Corrections panel in the Develop module, and tick Enable Profile Corrections. By default, Lightroom should automatically read the EXIF data on the file and add the optical corrections for Distortion and Vignette adjustments based on the lens you used. If this doesn't work just click on the drop-down menus under Make, Model, and Profile to call it up.
Step 2) Tick Remove Chromatic Aberration
Enabling Profile Corrections doesn't always fix the issue though, especially if a photograph is suffering from particularly harsh chromatic aberration (otherwise known as color fringing). So next, tick the Remove Chromatic Aberration box above to let Lightroom automatically detect, and remove, color fringing in the image. This usually does a great job of vanishing aberration issues, but for particularly troublesome fringing, you'll have to go a step further.
Step 3. Manually Pick the Fringe Color
In the Lens Corrections panel there's two columns, Profile and Manual. Click the word "Manual" and you'll be met with an advanced pane from which to manually select the color. You can either use the Amount sliders, or the Hues sliders to adjust the purple or green hues (two common colors found in aberration issues) but there's an easier way.
Step 4) Use the Eyedropper Tool
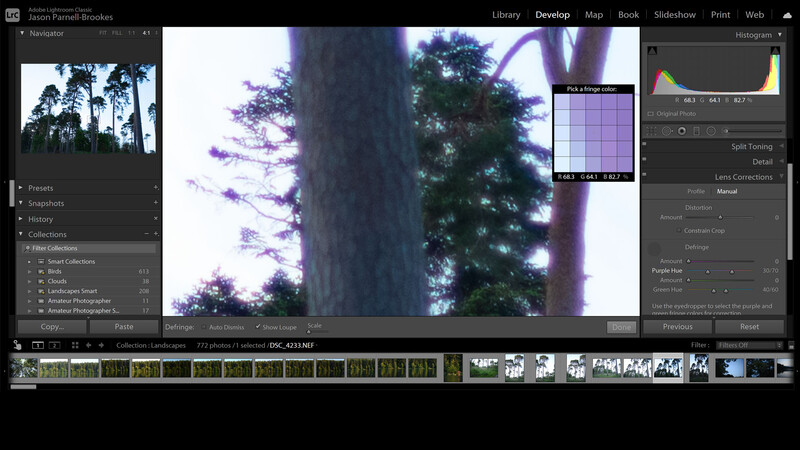
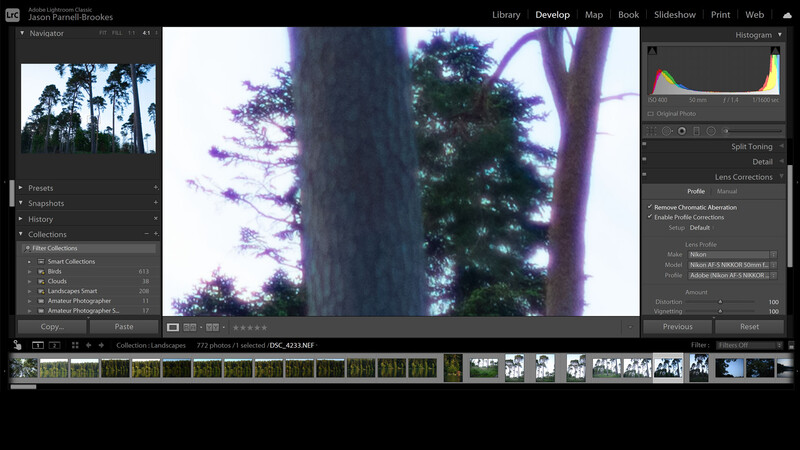
In the top-left of the Lightroom window, next to the Navigator panel, zoom into your image at least to a 1:1 level for a better view of the issue. Then head over to the Lens Corrections panel again and select the Eyedropper tool in the Defringe section. Place the cursor over the fringing color you want to remove within the image itself and click. In this example I'm removing the pinkish purple fringing from around the tree trunks. The Eyedropper tool will give a magnified small window view next to the cursor position for better selection accuracy.
Step 5) Make Custom Adjustments to the Color Selection
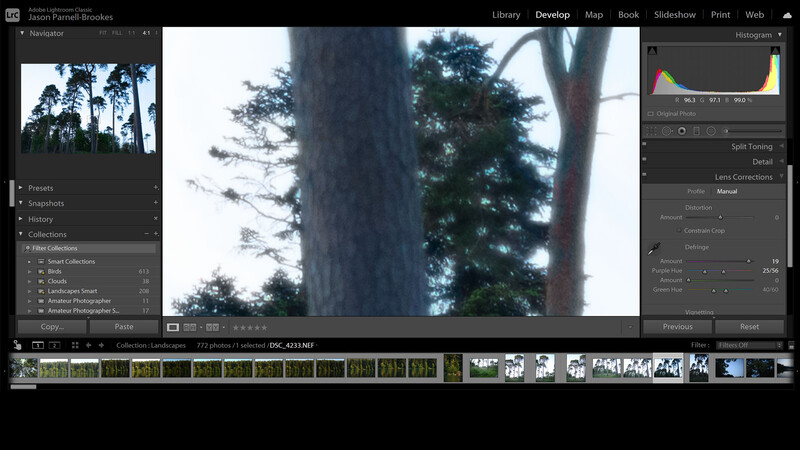
Occasionally, even the Eyedropper won't be good enough to manually select the exact color bandwidth you want to remove — particularly if the color fringing has a wide range, for example: from bright pink to dark purple. Fortunately, this can be adjusted with the slider controls. The Amount sliders determine how severely Lightroom eliminates the color fringing, whereas the Purple Hue, and Green Hue sliders give you control over the color range. In this example I've increased the purple Amount slider to 19 and set the Purple Hue bandwidth slider to 25/56 to adequately remove the purple chromatic aberration.
Final Image
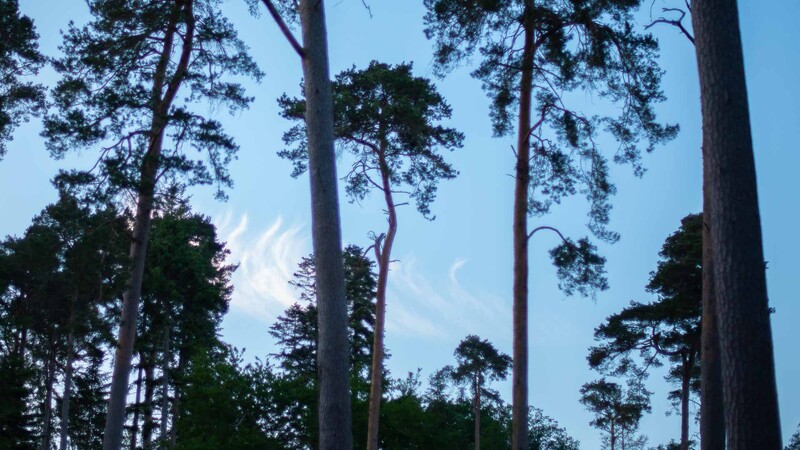
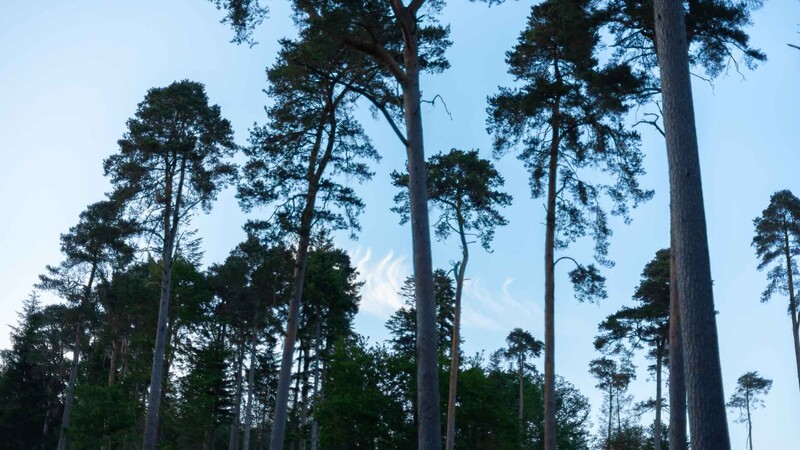
After doing this manual color fringing adjustment using the Remove Chromatic Aberration function in Lightroom Classic you can make those color-tinged photographs look much cleaner. In this example we've done well removing the purple fringing. Even though a little of the tree bark color has been removed from the edges of the trunks it looks less conspicuous.
It's possible to spend much more time fine-tuning this process, but this example is going to be one of the most difficult images to remove the color fringing from because we have the shaded side of the tree trunks set against a comparatively bright sky. Although sometimes it's not completely perfect, it's much better than erasing or masking manually in Photoshop, as I used to do back in the day!


Join the Fstoppers community for free
-
Post comments and join in the discussions
-
Browse the site ad-free
-
Share your work and get featured in the community
-
Compete in the photo contests for fun and prizes
11 Comments
I have one on this...
https://youtu.be/2XLIGXRX_EU
Would you please stop spamming this forum with your mediocre videos. This is for discussion and not for advertising your youtube-channel. Out of 115 of your comments as of today most of them is just spam. This is annoying.
Some, like me, prefer videos to see what is being done. It is just another viewpoint and experience. Everyone has their own. As for mediocre videos, I totally agree with you...These are all short videos made for reference and not with any commercial intent.
You are not commenting, are you? It reads "COMMENTS" above, btw.
I never see anybody replying, still you wouldn't stop. I think you just use it as a cheap way to advertise your channel. But this is not about you and your videos. What a selfish behaviour of a freeloader.
Totally agree!
This does not happen with budget lenses only. Shots with a wide open aperture against harsh contrasts lead often to severe chromatic aberration.
Buy Fujifilm and you won't have any.
Why is that? Is it some kind of engineering magic?
https://www.imaging-resource.com/lenses/fujinon/xf-35mm-f1.4-r/review/
https://www.imaging-resource.com/lenses/fujinon/xf-16-55mm-f2.8-r-lm-wr…
But impressive, how low it is. I picked two lenses which show some CA, most of them do not. At some point in a review they wrote that something must happen under the hood. They suspect some automatic correction is going on. Is this the answer to my question?
Compared to this:
https://www.imaging-resource.com/lenses/nikon/35mm-f1.4g-af-s-nikkor/re…
Fujifilm lenses do not have CA. Would you mind to elaborate?
I can only recall one or two cases in which I had CA in my images shot on Fujifilm.
For starters, the lenses are great. But most importantly the camera processor somehow "magically" removes it. That's why I don't see any fringing in Fuji X-sensor images. I am not an engineer, but it might be related to the cmos demosaicing processing. I don't know the exact reason. Whatever the reason, Fuji is great and has almost no CA. Cheers!
Late to the party but the 56 1.2 throws out as much colour fringing wide open as Canon's 85 1.8 under some circumstances. Like most lenses in this class it cleans up around 2.8. It's my goto for portraits on Fuji but it's not a particularly well corrected lens as far as CA is concerned.
let me 'humbly add' this quite easy article:
https://newatlas.com/remove-chromatic-aberration-color-fringing-lightro…