
Brian Rodgers Jr. has become the most popular and highly rated product photographer on Fstoppers, and today we are releasing his full-length product photography tutorial, “The Hero Shot.”
A few months ago we flew Rodgers to the Fstoppers office to create a free photography lesson. That video had instant success and many said it was their favorite tutorial that Fstoppers had ever produced. After that video's success, we decided to work with him to create a full-length tutorial.
We've worked with a lot of world-class photographers over the years but I am confident in saying that Rodgers is by far the hardest working photography instructor I've worked with. He worked at least 15 hours every single day preparing, filming, and then post-processing each of the shots for this tutorial without a single day off. We filmed this tutorial in in just seven days but it's taken us months to finish editing it.
Today, we are excited to announce that “The Hero Shot: How to Light and Composite Product Photography” is finally complete and up for sale. Head over to the Fstoppers Store to learn everything about this tutorial.

Join the Fstoppers community for free
-
Post comments and join in the discussions
-
Browse the site ad-free
-
Share your work and get featured in the community
-
Compete in the photo contests for fun and prizes
12 Comments
LOOKS AWESOME
Are shots like that often still done in the studio? Shot looks great and if I'd seen it on the street I would have assumed it was a 3d render.
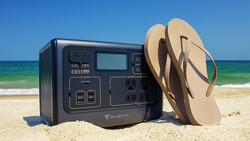
Hey Dominic, it really depends on the industry and the client. It's really a mix of both right now. That said, each have their own place in the market, and a lot of clients prefer that their product images are "real" (for lack of a better term) as they are a more accurate representation of their product. All of the images that I've produced for this tutorial were photographed with a camera, and then given that polished look in post-production.
Yes I agree with that, it is also often a combination of both world. I did a lot mixed things to get the best out of both world.
I like making 3d models for that type of plain background work, it cuts down on time when the clients wants to turn the image or decides they want more.
The initial cost for 3d goods is always the modeling after that it's cheap for clients to request more product.
If the product needs a set then I'll shoot it.
Looks like a great tutorial!
wow! Definitely a video i'm interested in!
Looks great Brian!... and love your "clean" and creative work.... Congrats!
Thanks Felix! That means a lot coming from you man, I'm a huge fan of your super creative work!
Well I'm fan of yours mate!!!!
Thank you for sharing the knowledge and I personally like your work. This shot is cool, only one thing is bothering me on the final image and maybe there's a specific reason for it, but i'm wondering why is it missing an highlight on the PlayStation symbol in the middle of the controller ? This button is a major button to the controller and also shows the PLAYSTATION symbol/logo which is essential to be seen from a client's point of view (if Sony was the client in this case), not only it would make the final image look better but also give texture to that button which resembles too dark atm.
Thanks again for sharing and keep up the good work!
This is a great looking image - well done on putting it together!