
The eclipse is coming. You know the one — it’s been the topic on most photographers’ lips for weeks. Have you thought about how you’re going to shoot it yet? On August 21, 2017 (this coming Monday), North America and some parts of South America, Africa, and Europe will get to experience one of the most spectacular sights available to us down here on earth: a solar eclipse.
Just a safety note before you head off into the sunset (sort of) with your gear in tow: it’s going to be bright. Like, really bright. You’ll have UV and IR up the wazoo and a little bit of caution should be taken to avoid going blind, or worse, damaging your gear. Don’t look at the eclipse without proper protective eyewear on, even when you think it’s dim enough because that’s exactly when it will do most damage, when your pupils are wide open waiting on those light beams to arrive. Make sure not to use the viewfinder on your camera either. Opt for live view instead, even when your ND filter is on at its darkest.
As long as you don’t have your aperture wide open you shouldn’t have to worry about your sensor, so be sensible, people. Now on with the important stuff.
What’s an Eclipse, Anyway?
A solar eclipse happens when the moon gets in the way of the light from the sun, causing a shadow to fall across the earth. It doesn’t happen often, which is why everyone’s been buzzing about it.
So here’s what’s going to happen on the day:
- Partial eclipse: the moon starts to slowly cover the sun.
- Start of total eclipse: here’s where you’ll see things like Baily’s Beads and the Diamond Ring effect.
- Totality: the main event. The sun is completely covered up at this point.
- Everything above in reverse order.
There are a few phases going on, meaning that while taking a photograph will lend to some cool images, you might like to try time-lapse. This will make sure you get to capture the whole event in all its glory.
The When and Where
If you’re a bit confused as to whether you’ll see a total eclipse or a partial, and when it'll all be happening, this next few paragraphs will make it a little clearer for you.
The eclipse will travel from the west to the East Coast of North America. While all of the U.S. won’t get to see a total eclipse, NASA has put together an awesome online resource that will tell you how much of the eclipse you’ll get to see and when you need to be there to see it.
If you’re on the path of totality (a 70-mile strip of land running from coast to coast where you get to see a total eclipse), you’ll have the best view of the eclipse. If you’re not, that’s fine; you’ll still get to see the eclipse, just not a total one.
The Gear
It’s important to have the right camera and lens combination. After all the hard work you put in to getting to where you need to be on time, you don’t want your gear to be your downfall.
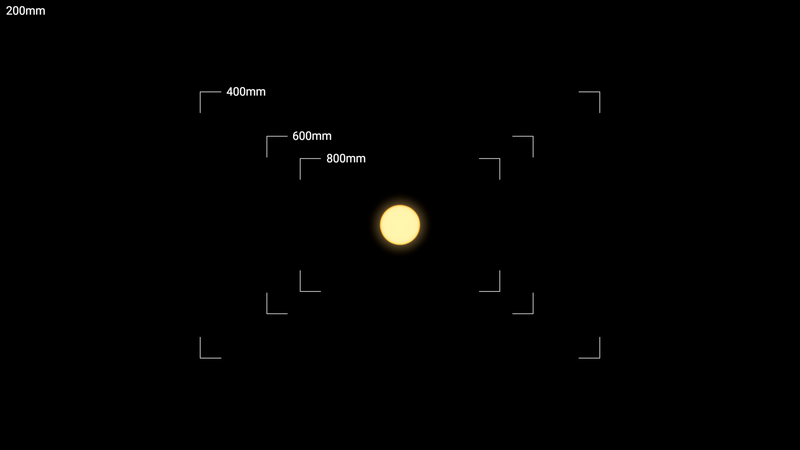
A wide-angle lens won’t be the best choice for this kind of shot. The sun will be too small in frame, so instead opt for something more along the lines of 200mm or more. The 600-800mm range ideal if you can get it. This diagram below shows you the effect different lenses will have on your final shot.
While long lenses can be pricey, you don’t need to splash out on anything too fancy. You’re shooting the sun, meaning it’s bright, so you don’t want to use a low f-stop anyway and can, therefore, opt for a cheaper lens.
A crop sensor can also work well here too; having a small sensor increases your focal length. For example, if you have a 200mm lens on a camera with a crop factor of 1.6, your actual focal length would be 320mm.
Getting Your Exposure Right
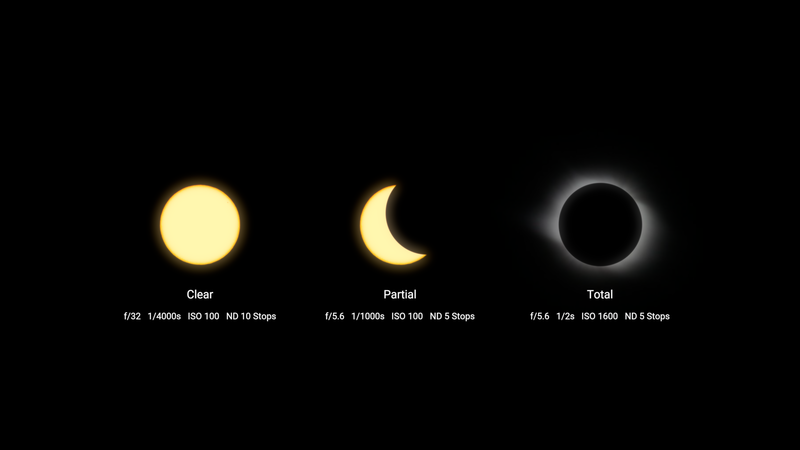
As light changes, your camera settings need to too, making exposing your time-lapse rather tricky. During the earlier stages, you’ll have to expose for the sun so will need an ND filter, but during totality, you’re not really going to need an ND at this stage. That being said, removing an ND filter during a time-lapse isn’t a good idea because it causes your setup to move. Fixing this in post would usually be an option, but in this case, there isn’t enough information for post-stabilization systems to use. Using a variable ND filter like the Syrp Super Dark is your best option here. It has 5-10 stops of light reduction which is enough range to cover you for the whole eclipse.
Something else that might add shake is manually bulb ramping your camera. The shortcut is to do this using your camera’s dials but again this will add shake. Try Canon Connect or a similar wireless option to solve this. You’ll also want to change one setting at a time to keep track of everything and to note the effect it’s having on your exposure, rather than all at once.
Here’s an example below of exposures you could use during the eclipse.
Interval
For time-lapse you’ll need an intervalometer, whether it’s internal or external. This will trigger your camera when it needs to. One option is the Genie Mini. This will mean you’ll have complete wireless control during set up and have the option of bringing in motion to your time-lapse which will enable you to track the sun.
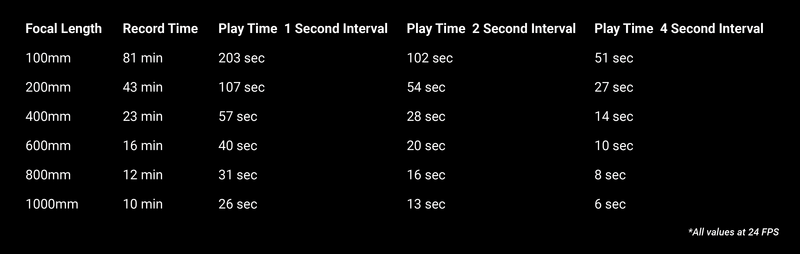
Different interval times will have a pretty big effect on the way your final time-lapse feels, so choose wisely. If your interval is too long, you’ll miss out the detail of the eclipse’s phases, but if it’s too short, your camera might miss some shots while it’s processing.
To help you out, here’s an animation of the eclipse as it would be seen shot at different intervals. A 1-second interval will give you about 6.6 seconds of totality in your final film, while a 4-second interval will mean totality is only 1.7 seconds long (at 24 fps).
Aligning the Sun
Both the sun and the moon move at 0.25 degrees per minute. It’s important to set your camera up to ensure they don’t drift out of frame. There are two ways to do this:
-
The drift method, where you set up so the sun and the moon drift into frame.
-
Tracking the movement of the sun and moon using motion control.
The Drift Method
This is your easiest option because it doesn’t involve introducing motion control.
Setting up your focal length should be your first port of call; This will have an effect on the rest of your setup and the duration of your final lapse. If you have a wider lens, it’ll take longer for the sun to move across the frame and the opposite for a longer lens.
Here’s an animation below of how different focal lengths will change the amount of the eclipse that you capture.
After your focal length is set, your record time can be worked out. You’ll need to calculate how long it’s going to take the sun to cross your frame. Have a look at the table below or use the equation (Horizontal FOV + 0.53)/0.25 where 0.53 is the degrees the sun takes up in the sky and 0.25 is the degrees per minute the sun moves. Once you’ve set your record time, the interval and play time will then be decided for you.
The next thing to do is think about where the main event, totality, will happen in your frame. Use the NASA website we’ve already mentioned to work out when it’s going to happen, then use an app like PhotoPills to set your time of totality. Then use the Augmented View and line up your camera to where the eclipse is going to happen. Make sure your camera is horizontally parallel with the path of the sun so that it crosses your frame from left to right.
Finally, you’ll have to work out when to press record so that you’re capturing totality in the middle of your record time (i.e., if you are recording for 30 minutes, you’ll want to press record 15 minutes before totality). Right before you press record, make sure the sun is to the left of your frame, just out of sight.
Then all you need to do is bulb ramp throughout the event.
Polar Alignment Track Method
If you use motion control to track the sun, you won’t need to worry about it orbiting out of frame, and it allows you to capture the eclipse at every phase, and choose the length of your record time more freely.
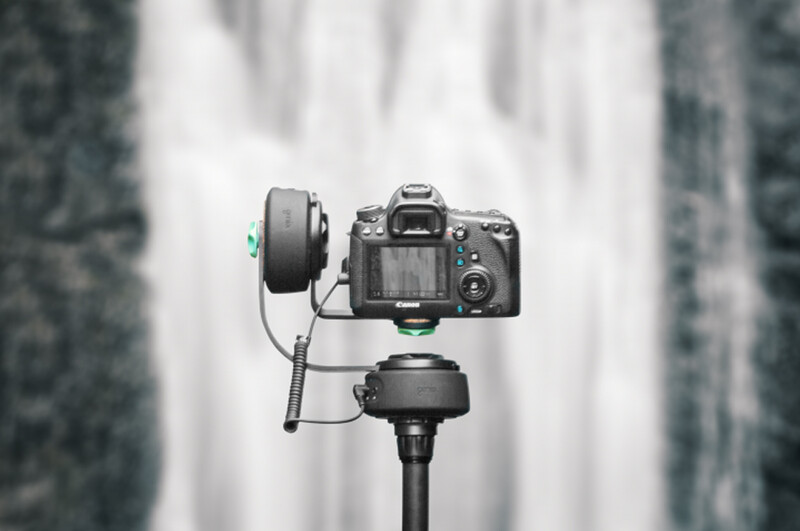
Throughout this example, we’ll be using the Syrp Genie Mini. First thing’s first, you’ll need to match up the Genie Mini’s axis of rotation to the earth’s. The most precise way to do this is using an equatorial mount but you can also use a sturdy tripod and head (although slightly less accurate).
Connect up your Genie Mini with your tripod head and open up PhotoPills’ Augmented Reality View. Lie your phone on top of the Genie Mini and adjust your tripod until your phone is facing the South Pole. When you’re all lined up, attach your camera to the Genie Mini using the tilting arm of the Pan Tilt Bracket. Balance out your camera and lens on the arm until the weight is distributed evenly, making it easier for the Genie Mini to move.
Next up is setting record time. At its longest, the whole eclipse will be 2 hours and 55 minutes long. Depending on where you are, this might differ so head back to the NASA resource and check it out.
After this, you’ll need to work out the movement of the Genie Mini during your record time. It should be rotating counter clockwise from east to west. The sun moves at 0.27 degrees a minute so you’ll need to multiply your record time by this. For example, 2 hours and 55 minutes is 175 minutes, so the equation would be 175x0.25=43.75 degrees. Set your Genie Mini’s rotation to 43.75 degrees and you’re good to go.
Start your time-lapse after lining up your camera with the sun and the partial eclipse has begun.
Using a Genie Mini Pan Tilt Kit and Timelapse+
Please note this method is in beta testing, and while it’s from a reliable source (Timelapse+), we haven’t been able to test it ourselves yet.
It's pretty straightforward — install the latest beta (enable it in Settings > Developer Mode) then either have a GPS fix or disable the GPS (Settings > GPS Module) and manually enter the latitude, longitude, and current time (in UTC) in the settings. Enable Bluetooth in Settings > Wireless Setup and up to two Genie Minis (they should automatically connect).
During setup, you’ll have the option to enable tracking "sun," and assign each Mini to an axis (#1 was the first connected). Or, better still, use the app (you need to enable the built-in AP and use the local 10.0.0.1 option with the beta) and then you can configure each axis and enable sun tracking. You'll also have a joystick mode with Live View for setup.
Here is how you can test the eclipse program mode:
- Disable GPS (Settings > GPS Module) so you can enter manual coordinates,
- Find the coordinates on Google Maps of where you plan to be, and enter them in Settings > Set GPS Latitude/Longitude
- Change the date to 21 Aug 2017 in Settings > Set UTC Date
- Set the time to a little before first contact: 16:00:00 in Settings > Set UTC Time (then check Information > Eclipse Info to verify)
- Go to Time-lapse and set Time-lapse Mode to "eclipse"
- Configure your settings for each part of the eclipse in Eclipse Circumstances
- Check Review Program to see the planned events and settings
- Start the time-lapse and see how it goes
We know it’s a lot to take in, but there you have it. Get out there and give it a go, and enjoy the view.
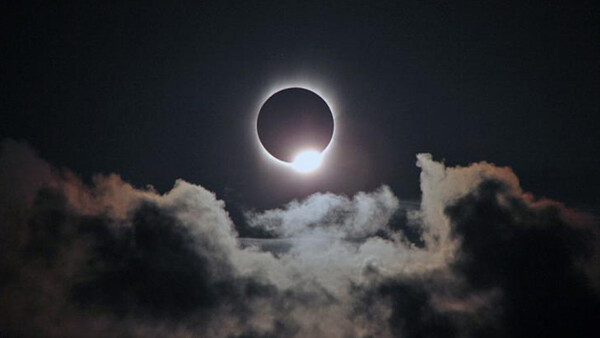
Credit: Rick Fienberg / TravelQuest International / Wilderness Travel


Join the Fstoppers community for free
-
Post comments and join in the discussions
-
Browse the site ad-free
-
Share your work and get featured in the community
-
Compete in the photo contests for fun and prizes
3 Comments
Is using live view the same as having your sensor open.... Wouldn't that be dangerous for the sensor if it takes you a few second to compose everything right???
Why would you change expose between clear and partial? The intensity of the sun remains constant and since you are shooting directly into the sun, I imagine you would want the color and brightness of that croissant to remain constant, regardless of how much of it is covered.
I'll be using the drift method, manually adjusting my tripod head to adjust for the sun's movement. I'm using a Vello ShutterBoss II as an interval timer. I'm experimenting with it to see how to use auto exposure bracketing with my Canon 5D III.