
Although there have been countless articles written on the subject of Frequency Separation - including several here on Fstoppers - the current state of retouching has me somewhat concerned about its use. Its widespread adoption, use and overuse has brought us to the point where frequency separation is fast becoming the number one culprit for poorly retouched and cringe worthy work. While I’m not convinced that we need to ban it outright, I do feel that the way we approach it needs to fundamentally change.
There's no doubt that Frequency Separation (FS) is a revolutionary technique that allows us to do lots of things that weren’t previously possible. Sadly, it’s this power that has also allowed people to misuse it by being given a false sense of security. The popular belief is that since the texture and tones are separated, there’s no limit to what can be done on the low frequency layer since texture will always be preserved. While the entire assumption is incorrect given that texture does require mid-frequency information to render correctly, it’s also critical to recognize the importance of the “low” tonal layer in producing a realistic result. If you’re unclear on what I’m talking about in terms of “high” and “low” layers, be sure to check out Julia’s detailed article on the theory behind the technique.
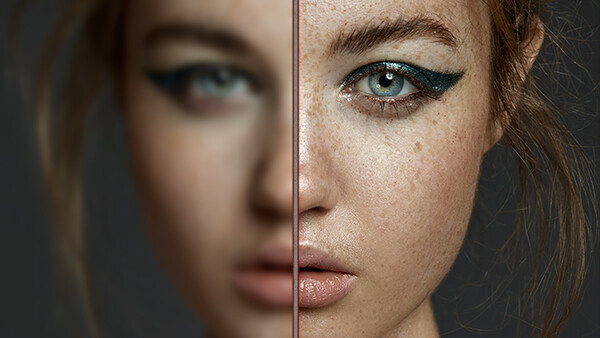
Now let’s be clear, I do believe that FS still has its place in modern retouching and I still use it sparingly in the manner I teach in my photography and retouching course on RGG EDU, but I’ve also reached this point through a series of mistakes on my end. For over two years I relied too heavily on FS and ruined a good number of photos on the process. I’ve since removed nearly all those photos from my portfolio and had to start anew with a different approach. While in some genres of photography the look often produced through frequency separation is acceptable, in fashion photography and most commercial work it’s best to avoid it and retain a certain degree of “rawness” and imperfection. In these genres the first thing we need to accept is that the image doesn’t have to achieve a completely unrealistic standard of beauty and that some “flaws” are OK and even encouraged. If we have to strive for a point of technical perfection to produce a good image, then perhaps the image doesn’t contain enough substance in the first place? So with our mind in the right place, how can we use FS and still leave our images looking great? Here are some dos and don’ts to put you on the right path and hopefully leave you with some food for thought as you approach your next retouch.

Don’t use it if you can avoid it
My biggest piece of advice is to stop treating FS as an all-around retouching solution and begin viewing it as tool of last resort. Try to go from a state of “OK, now let’s go into Frequency Separation”, to “Is there a problem in this image that I need to use Frequency Separation for?”. This simple question will help you to avoid the trap of working needlessly in it for “just because” reasons. Many of the things that people use FS for can be sorted out with a few adjustment layers, healing or dodging and burning so odds are that you’re using FS for one of the following reasons:
- I keep hearing about FS and it sounds fancy so I should probably use it too
- I’m used to using FS so I’ll just keep doing it
- I don’t understand the other tools available to solve this problem
- Using any other tool would be far too time-consuming or difficult
Of these reasons, the fourth is the only case where the use of frequency separation is recommended and justifiable, and I’ll touch on some of these scenarios throughout this article. So while my best advice is to reduce your use of FS to a minimum, if you do decide to continue using it in some capacity, try to at least adhere to some of the recommendations below.
Do use it to enhance or fix texture
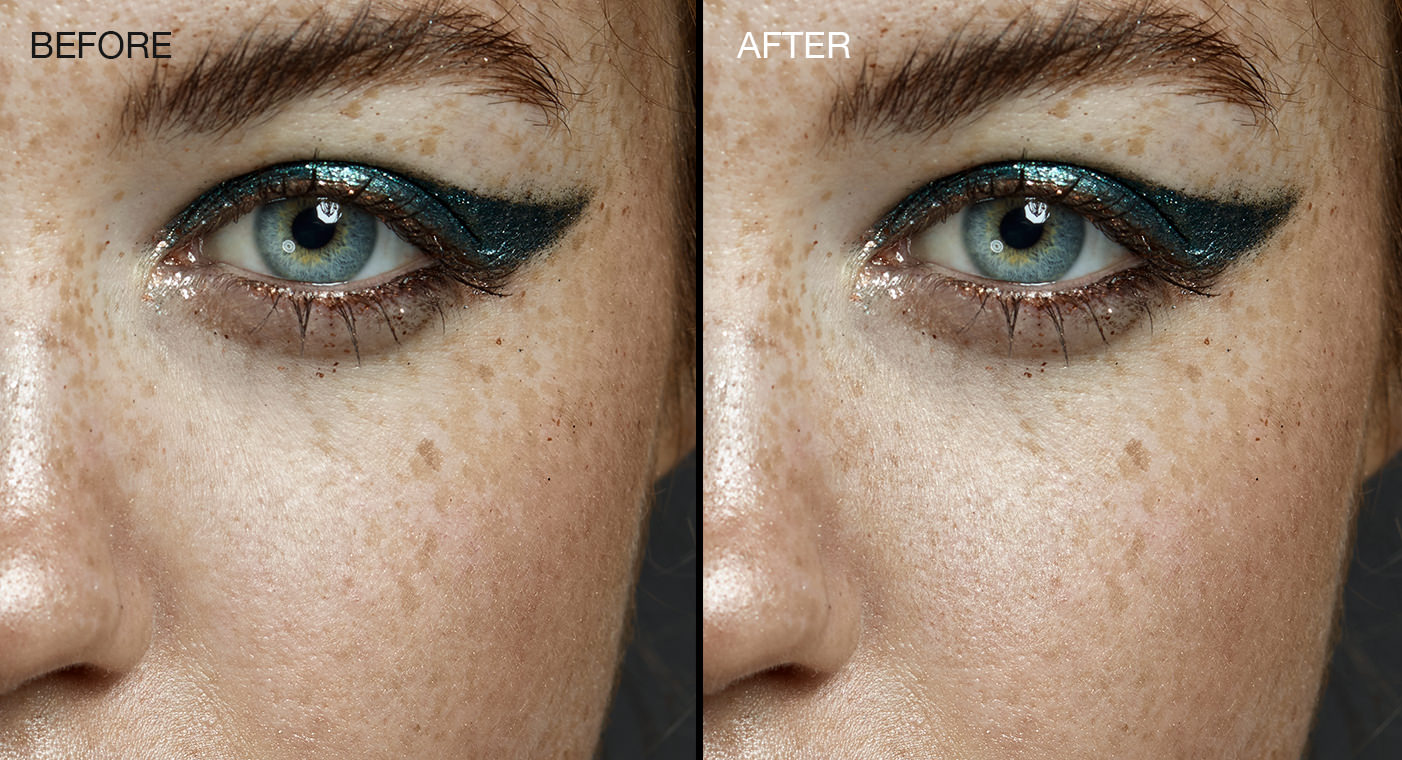
Working purely on texture based issues outside of Frequency Separation is both challenging and onerous, so this is one case where FS can save a great deal of time and help to produce a better result than through other approaches. In the below image, if you look at the area of the cheek close to the nose, you’ll notice more enhanced texture on the after image through the use of texture grafting under FS. For a demonstration and discussion on texture grafting, check out my article and video on the subject here.
Do use it at the start of your workflow
One of the main reasons that professional retouching houses frown on FS is because it’s destructive and can’t easily be changed or eased back the way adjustment layers can. Because of this, there’s really no ideal place in the workflow to incorporate FS, but the best compromise is to do so towards the start of the retouch prior to any color adjustments, corrections or dodging and burning. Since our goal is to apply it sparingly, the FS’d layer should contain only subtle changes from the layer below it allowing for some degree of opacity adjustment if needed. If you enter FS later in your retouch then you’ll no longer be able to make changes to your dodging and burning or color adjustments since the FS layer is rasterized and will cover those layers. If you're retouching for yourself then you may not find it necessary to maintain a non-destructive workflow but it's still a good principle to adhere to.
Do use it in the safe zones
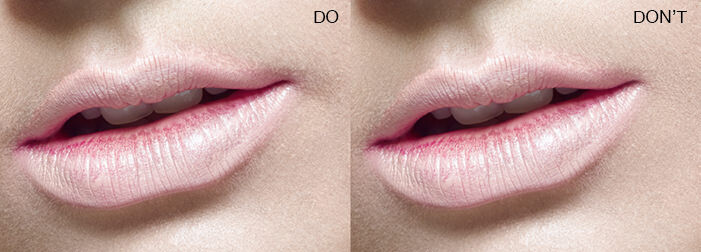
There are areas on your subject where FS can be used fairly safely and others where danger lurks. If you notice patches with color shifts, FS can speed up the process of eliminating them. While these can also be resolved with healing or adjustment layers, along some areas on your subject there’s often no harm in tackling them with FS if you're in a pinch. The safest areas tend to be relatively flat surfaces without a large number of luminosity shifts across them. These include the forehead, chest, legs and parts of the cheeks. Conversely, areas to avoid are those containing lots of luminance shifts that define the contours of the face. These are the periphery of the mouth, nose, eyes and eyebrows, hands, certain surfaces of the neck and the nasolabial folds. The below image shows a subtle yet important problem often caused by using FS in these “danger zones” whereby necessary contours are inadvertantly flattened.
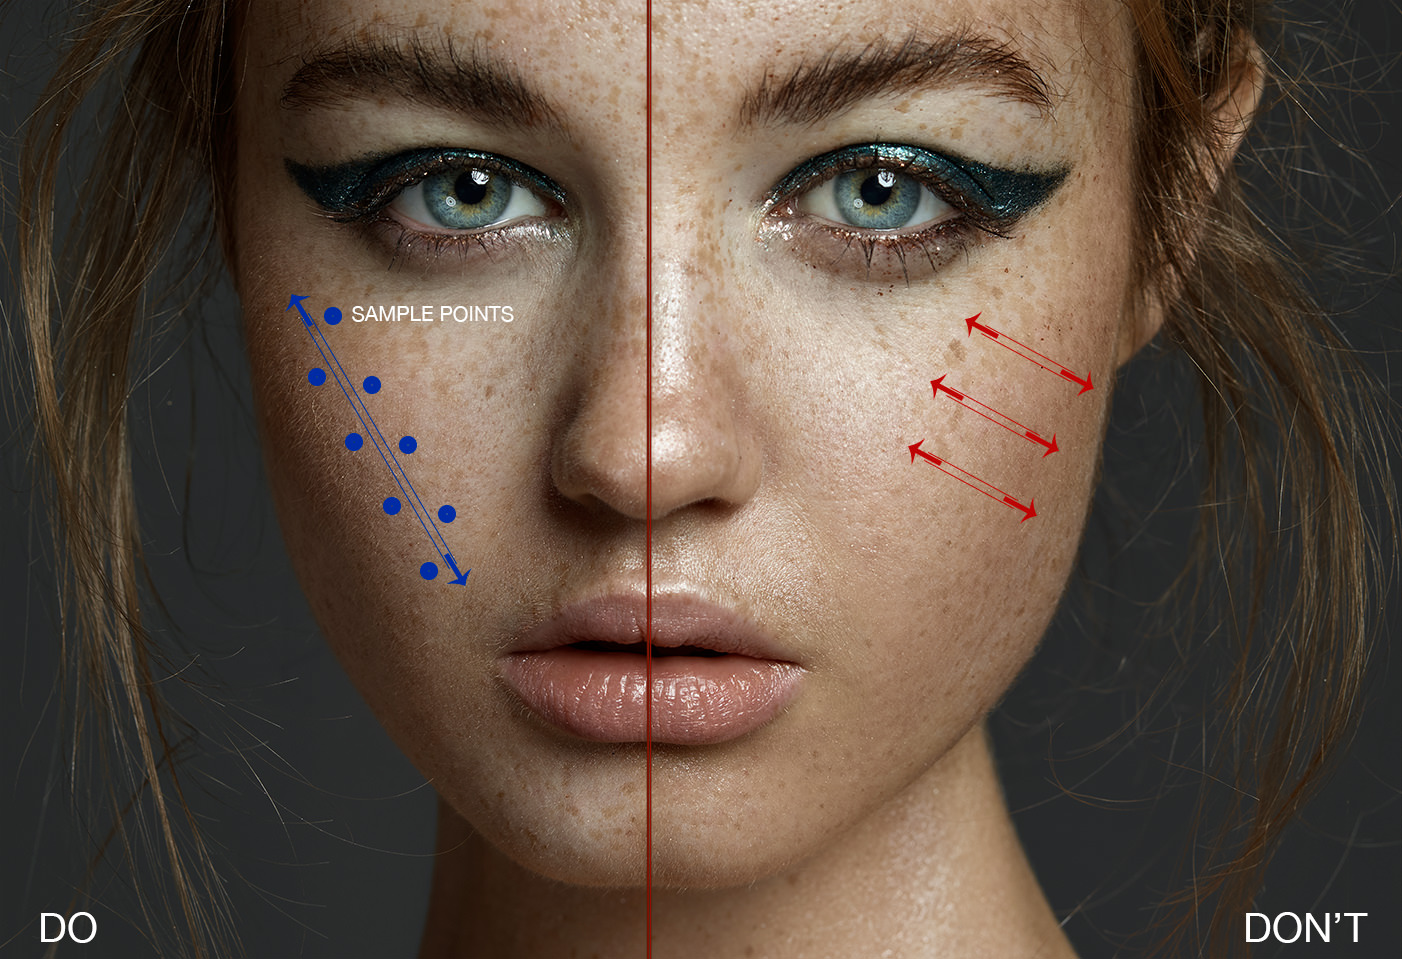
Do respect the direction of light and shadow
Regardless of whether you’re working in the safe or danger zones, one of the most important things to keep in mind is the direction of light and shadow and the overall contours of the face. Changes to these contours by altering the luminosity levels is one of the greatest factors for a failed FS application. Retaining the changes across these surfaces requires the following:
- Appropriate brush size - small brush for areas with lots of changes, larger brush for flatter surfaces (shown in the image below)
- Low flow/opacity - make changes gradually
- Correct paint direction - always paint parallel to the light change and never perpendicular to it (see image below)
- Constant resampling - paint only small areas with the same color and resample as you move along the surface
- Lots and lots of practice and restraint

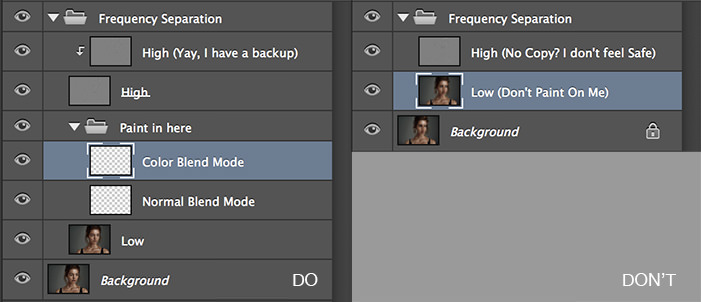
Do use blending modes and backup layers
In a perfect world, frequency separation should never change the luminosities of your image and work on color only. Luminosity adjustments are best saved for dodging and burning (D&B) which is a much more controlled and safe environment for making them. To avoid unnecessary changes to luminosities in your low layer, use a color or hue blending mode on your paint layer (see image below) to smooth out color transitions and leave luminance shifts for later adjustment in D&B. It may seem as though you’re not making much progress, but by creating a clean color base you’ll set yourself up for an easy retouch using other non-destructive techniques like D&B. One thing to keep in mind is to sample color from areas of similar luminance to your target area since the saturation levels behave differently in areas of shadow, midtone and highlight. Using a hue (instead of color) blending mode on your paint layer can combat this problem but may require further saturation corrections later on. Using backup layers is simply a pragmatic approach since it will allow you to recover areas that begin to look incorrect as you work through your FS application.
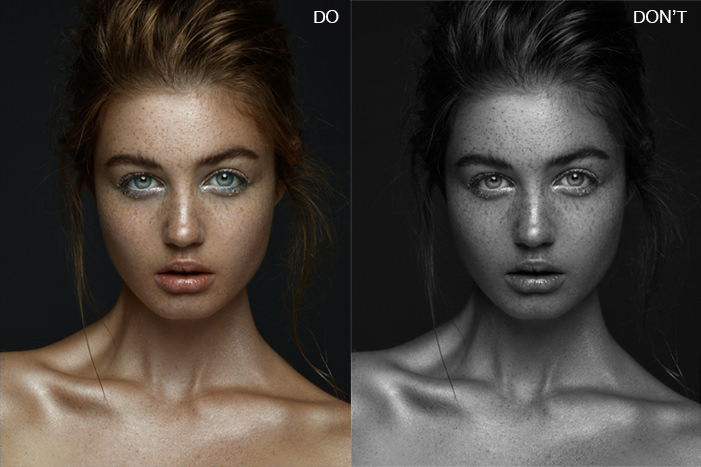
Don’t use it on black and white images
Since we’ve already established that FS shouldn’t ideally affect luminosities, using it on black and white images (which are luminosity only) is generally a no-no. B&W images should be worked on purely with dodging and burning and healing and hence represent a good exercise for practicing and perfecting these tools/techniques. The one exception to this rule is if you're using it to operate purely on texture based issues such as those we described above.
Don’t use it for large color shifts
Although we’ve talked about how to use the tool safely through hue and color blend modes, this shouldn’t be taken as a free pass for color matching large areas. If for example your subject’s neck and face don’t match color wise, make these corrections with a single adjustment layer and mask in as opposed to painting color over it inside of FS. Remember that whenever possible, we want to make an equal shift in color across all the surfaces (luminosities) of that area as opposed to completely replacing the area with a single color value. This is precisely why using multiple adjustment layers and masks is superior and safer than frequency separation; the former is a shift, the latter is a replacement. Let’s consider the case of a surface like the neck. The neck isn’t flat and has several surfaces across it that pick up light differently. These areas not only reflect different luminosities but also different saturation levels. By altering it with an adjustment layer, we’re retaining those initial saturation and luminosity levels and shifting them in one direction or another. When we begin to paint globally across them with a single color under FS (even in color blend mode), we’re replacing them with a completely different value and discarding (rather than shifting) the original. This is sometimes desirable, but often isn’t and represents one of the most dangerous elements of FS. If this concept seems unclear or confusing to you then I dare say that you probably shouldn’t use FS until you understand it in full. I hope you can now see that although FS seems like a relatively simple concept on the surface, lurking beneath it are many nuances that need to be understood and respected before you dive into it.
Do believe there’s a world outside FS
This for me was one of the most difficult tips to apply as I weaned myself off frequency separation. Frequency separation is a bit like a drug as it represents convenience and power in one simple package. We can do so much with a single brush stroke that adjustment layers begin to feel like a dated and archaic approach. While lots of these other techniques may seem antiquated as they’ve been around for years - some even in the darkroom days - they’ve stood the test of time for a reason and aren’t going anywhere. Start with a tapered approach where you give yourself a time limit on FS application. If you’re currently spending 30 minutes on FS, try to limit yourself to 20, then 10, and so on. Soon you’ll find that a five minute application gives you all you really need to complete a great retouch, your results will improve, and you’ll become a more well rounded retoucher in the process.
You can connect with me via the social media links below


Join the Fstoppers community for free
-
Post comments and join in the discussions
-
Browse the site ad-free
-
Share your work and get featured in the community
-
Compete in the photo contests for fun and prizes
47 Comments
good read!!!!
Thanks for reading Edwin, cheers
I've come to the same conclusion recently. Manual d&b + colour correction, when done right, just looks way beter imho.
Yep, definitely agree Thijs. It preserves the natural essence of the image much better.
Exactly!
A real big fan of your articles. I learn the most from you and Julia =D
Much appreciated Joe, thanks for reading
Finally someone comes out with this. :)
Glad you enjoyed it Srinath, cheers
But I would have really appreciated if you had mentioned this in the DVD that you sold. Now with this, it feels like you sold a material that wasn't fully informative. :)
awesome read, thank you Michael Woloszynowicz ... great article about retouching... love reading your work as well as Julia's and Pratiks
Thanks so much Tony, cheers
Dude, I haven't even finished reading yet, but I wanted to thank you for this. When I discovered frequency separation I was going way above and beyond with my work too, and after a while I started looking at my work next to the work of people I idolized and I noticed that my stuff lacked in several areas (of course this would be the case when comparing yourself to Mario Testino), but I noticed his images looked much more real and my stuff looked hyper real due to frequency separation overkill.
For a while I have been saying that people have been going too nuts with FS, and I am so glad to read someone of your caliber confirming those claims for me.
Ok back to reading.
Thanks for the thoughtful comment Anthony, it's definitely a slippery slope with FS. So easy to get carried away.
Nice to see someone else talk about this. FS got out of hand, even for me. I learned a while back to tone it back.
Thanks for reading Brian. Glad you were able to convince yourself to scale it back.
Absolutely agree. I'd even say that it might be a symptom of a larger phenomenon. When we learn a new technique, we try to find ways to use it everywhere. I'm sure we all remember the first time we got a fast prime and went on to shoot everything with razor thin depth of field for the next month (ok... year).
I think it's worth taking the time to look at our current direction in the perspective of our past work and the work that we admire. It's easy to jump on a bandwagon just for the sake of being one of the cool kids.
Very good point Louis. I like the prime lens analogy!
Great article!! Can you now write one on the overuse of dodging and burning? :)
Haahaa, sadly that one does need to be written too. Dodging and Burning is easy to get carried away with as well unfortunately but at least it can be scaled back easily and doesn't alter the original quite so dramatically.
Fantastic Michael, and very inspiring on how the commercial, fashion, publicity industry is changing too, with a more and more "no photoshop" shout-out these new tips and your insight is extremely valuable.
I would really love to have a follow-up article/tutorial on use of only D&B for cleaning-up as some photographers/retouchers do, with various layers and how to organise them all together, it would be a perfect "twin" article.
And thanks again for your time and sharing your knowledge with us all.
Good thoughts from experienced retoucher. I would like to have someone who had told me this thoughts much earlier.
So do I Evgeniy, got caught up in the FS craze myself for a bit too long.
Great article...very well written and puts the point across as strongly as any video. Thanks for posting it. I follow your videos on YourTube and they are equally as informative.
I also like how you decided to toss all your earlier work and start with new approaches...definitely brings credibility to the article. I think your earlier work is flawless...really great....but maybe sometimes too flawless. I'm hesitant to even say that because I don't yet have the skills to create a look so flawless so I shouldn't knock it. However, I know from music recording that sometimes things can be too perfect and they lose that organic spark.
FS if overdone definitely does that for my work, but then again I feel us mere enthusiasts perhaps rely on it even more because many times we're not shooting with real models...it's friends, wives, or frankly anyone willing to get in front of our camera for free.
Thanks for the comment Jason. Yeah, it really depends on your target audience, the earlier work just doesn't suit what I want to project to my clients today. It's not necessarily terrible and for some genres it's probably fine but I also don't want to confuse clients by having two different looks/styles. I always tried to keep my FS application light but even then it was taking me too far away from the original image.
Definitely not terrible...it's top notch stuff. It's just like you said, depends on your target audience, genre, etc. But yeah, we have a tendency to overdo some things.
Great article. More like this pls.
Fabulous article!!! I love learning from you. Always so much good info. Thank you!
agreed, good read.
photoshop is full of tons of useful tools, why stick with just one way of doing things.
Wonderful thoughts from one of the best in the biz; but may I add a little salt to the soup?
I think every point in this article may apply to "Any Retouching Technique" to the same extend.
Conclusion for me here: Use whatever, but do so wisely and with restraint, like seasoning a meal;
if already %&#* up then administer ketchup or instagram at own discretion.
- just my 2 cents from a perpetual padawan -
agreed. i think it's great to learn the technique and then how to scale it back and combine it with other techniques for the best results.
This article answer a lot of questions for me, also showed me many of the mistakes I have been making. Thanks again Michael for posting.
Thanks, Michael! Yet another useful article!
A more analytical explanation of frequency separation might help photographers better understand how best to accomplish it for any given image. I read Julia's ultimate guide to frequency separation but found it didn't really explain the finer points of the technique.
Great article as always Michael. The whole "dial it back some" concept affects damn near every aspect of photography. Any new technique tends to get over used by people. I often find myself finishing an edit and after sleeping on it wanting to dial back the opacity a few percent. Keep up the good work man.
Interesting reading! Thanks!
Did you adjust that in your classes? I was thinking about buying your training, and I did not buy it because most of your pictures did look like your first "don't" sample(the one commented with "earliere retouching....")
Good article, thanks. In general, I agree with you, but I have a few objections. Firstly about the middle texture frequency. Actually frequency separation method allows you to split the image to virtually any number of frequencies. You can select high, low, medium, and any number of intermediate frequencies having 2,3,5 or even more FS layers if you want. This allows you to isolate the most necessary part of the image from the rest and have mid-frequncy untouched if you want. Secondly all this principles are true for any other instrument, including for dodge and burn. I mean you need to understand what result you want to achieve and why no matter what technique you use. Otherwise you will get unnatural, inappropriate or some other un-in result.
This is a great article with awesome information. This will be really helpful to me in my workflow.
I've been using frequency separation technique pretty extensively from the moment I've learned it about a year ago and in my line of work, when my models not always have perfect skin, it's been the way to get pretty decent results and obtain them within relatively short time. But I have always been against heavy handed retouching (I still strongly dislike using tools like Liquify filter for example), so after seeing my first results I started having my first dilemmas regarding using this technique. Pretty quickly I started using it to make as minimal alterations, as possible, to cut down on the time spent using this technique and now, whenever I know I have time, I tend to focus more on dodging and burning as it allows for more subtle effects. I usually start with simple healing, then go for a bit of frequency separation, usually working mostly on the low layer, then spend most of my time dodging and burning with small opacity and flow brush and then go for global adjustments and colour grading. It just felt more natural to me to do it this way. However, there are still moments when I don't have much of a choice, but to do large part of my retouching still using FS, for example in instances when I'm dealing with more serious skin problems or when the deadline is really tight, frequency separation can come in handy as a lesser evil and a pretty good way to get decent-ish results within relatively short time spent in Photoshop. Especially that even with such images I'd rather go for smaller brushes on low opacity and flow.
But it's reassuring to know that somebody like Mr Woloszynowicz came to similar conclusions. Maybe I'm not that bad at it after all :D Great article, for me it was a real pleasure to read :)
OK - I am just starting to learn about FS because I am just thinking there MUST be a better way to edit skin than the method I use now (manual bandaid/cloning). My big question is - what options does one have when a model has really really bad skin - ie. severe to moderate acne, large pores, etc?
I honestly got no idea if what I am doing with the skin is right can someone take a look for me? http://jphilphotography.com/beauty
So, did I just needlessly spend hundreds of dollars on your retouching course (which largely consists of your application of frequency separation)? I am thoroughly confused.
This is a very interesting read Michael, I personally do not use frequency separation because I think It's destructive. But for people who are using it, I really think they don't know how to use it properly. I think people need to learn how to use it properly and when to use it. Very good article thank you for sharing Michael =)
thaaaaaaaaaaaank you! awesome article
Ah ! Really great article it's helpful to me. The last tips I use that (copy of 'high' layer) but never thought of duplicate twice the "low" for blending color mode :) Thank you !
Michael, I read this article again. For us that are getting into touching up portraits and all where can you recommend us to start? I have looked at your youtube videos and all. I do see mostly everyone I talk to suggest FS.
Michael thank you soooo much! I've found a great resource of information at this web-site! Wish you the best, thank you for sharing your knowledge with people!
Excelent article. I'm definetely trying to approach a more non-FS workflow. Your D&B tutorial and the color grading tutorial helped me tons.