It’s become a tradition for Phase One to announce a major new version of Capture One during the last quarter of the year. 2016 is no exception, and the tenth edition of the professional image editing software was just released today. The already fast and very complete application is now even better thanks to a couple of new tools and enhancements.
The focus for the Capture One Pro 10 development was the user experience, making it faster, better, and easier than ever. To achieve that goal, Phase One engineers have rewritten some of the major features of the software. Panning, zooming, and switching between images no matter the zoom, has become not just faster, but instantaneous. The default workspace was also redesigned to offer a more intuitive experience and adjust the photographer’s workflow to the new tools this major release has to offer.
Speaking of new features, the most noticeable one is the three step sharpening process that allows for the best image quality possible and remove any guesswork from the workflow. The steps consist of:
- The correction of sharpness loss due to diffraction.
- Creative sharpening on either the whole picture or locally.
- Output sharpening which can be easily adjusted depending on the final support (web or print), scale, and viewing distance.
The correction of diffraction is incredibly easy to achieve with the press of one simple button. Creative sharpness is what you have always known in Capture One as the Sharpening tool, but it features a new blending algorithm and offers a Halo Suppression slider as well. Finally, the Output Sharpening option is found when exporting files and is extremely interesting as it can be adjusted depending on what you intend to do with the image.
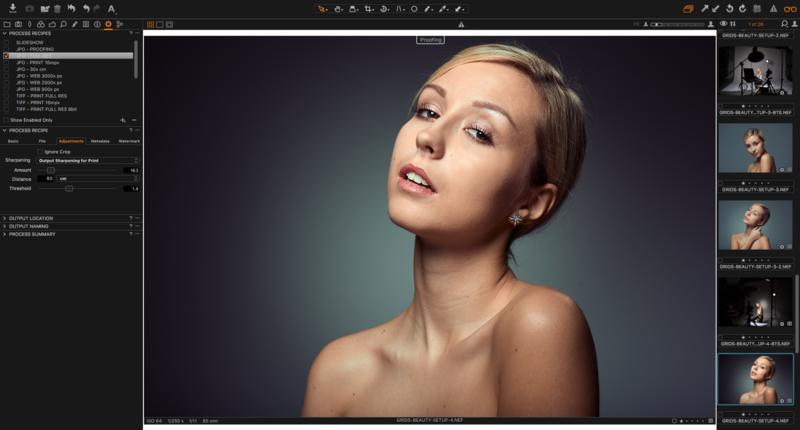
Phase One also improved the On-Screen Proofing, complementing the three step sharpening tool. Not only can you proof your colors by choosing an ICC profile like it was already possible before, but now you can also see exactly what the file will look like on the final media with the output recipe you wish to use. Meaning, if you want to export for the web in JPEG at 900 pixels on the long edge and add a ton of sharpening while compressing the file quite a bit, by using the On-Screen Proofing, you’ll see any possible over-sharpening, JPEG artifacts, or color issues.

Still life photographers will be happy to learn that the tethered module now includes a focusing tool. It will basically let them adjust the camera focus without physically touching the camera. No risk of changing the framing, no need for any accessory or anything like that. Plug your camera, and adjust the focus finely from within Capture One.
Another great news is the improved support of sRAW and mRAW files produced by Nikon and Canon cameras, including auto-masking. That latter feature is now also available for files produced by Xtrans sensors. This essentially means Fuji users will finally be able to play with every single fantastic feature Capture One has to offer, including auto-masking.
The last feature that I think is most noticeable and worth talking about is the support of Tangent panels. If you are not a video editor or a nerd, you may not know about Tangent. They manufacture panels specifically designed for the creatives. No need to try and find a solution to make your BCR2000 work with Capture One like all those plugins do for Lightroom; You now have a working, professional, and fully integrated solution.
For people interested, here is the full list of the new and enhanced features:
- Three-phase sharpening tools
- Output proofing
- New default and intuitive workspace
- Camera focus tool module for tethered cameras
- Tangent panel: full integration
- New filter option: search by orientation of images
- Optimization of JPEG output for size/quality
- Move folders in catalogs
- Auto masking extended to any editable file type (including Xtrans)
- Improved compressed raw and Fuji support
- Hardware acceleration – OpenCL is now enabled by default
- Stripe reduction LCC for 100MP
- Optimized LCC creation
- Computer ID in license for activation management
- Apple script – new properties (Mac only)
- New camera support for the Olympus E-M1 ll, Sony RX100 V, Sony a6500 and Sony a99 II.
- New lens profile for the Sony FE 70-200mm f/4 G OSS, Sony 70-200mm f/2.8 G, and Sony E 18-200mm f/3.5-6.3 OSS
Capture One Pro 10 is available for both Mac and Windows. A free 30-day trial can be downloaded here, and the full version can be bought on Phase One’s website. Users who bought a Capture One Pro 9 license after November 1, 2016 are entitled to a free upgrade. Other owners of a Capture One Pro 8 or 9 license can upgrade for just $99 USD. New customers can buy a full license for $299 US. Finally, users with a subscription ($15 USD per month) can download the new release free of charge. For more information regarding this release, head over to Capture One Pro 10 website.
https://www.youtube.com/watch?v=EDZCkAsqL-c
I have had the chance to play with the beta versions of Capture One Pro 10 since the end of October and honestly, the speed increase is astonishing. Capture One used to be faster than Lightroom for displaying large files, but they seem to play in totally different leagues now. The new features are also welcome additions and fantastic time savers. I didn’t want to write a full guide on the new features before I could put my hands on the final version, but now that I have, it won’t be long before I share with you a few tricks to make the best out of Capture One Pro 10. A guide to help you migrate from Lightroom is also in the work, so be sure to stay tuned for more!


Join the Fstoppers community for free
-
Post comments and join in the discussions
-
Browse the site ad-free
-
Share your work and get featured in the community
-
Compete in the photo contests for fun and prizes
26 Comments
Thank you for your post, Quentin. I tottaly agree with you - the speed increase is fantastic! I was a beta-tester of Capture One 10 as well and here is my review - http://captureoneblog.com/capture-one-10/
How's the support for Tamron lenses in Capture One now? I had tried earlier versions and Tamron lens support was non-existent, hope that's not the case now as I would like to give this a spin.
There aren't any lens profile for Tamron lenses. But it might be worth contacting Phase One's support and ask if they have any plan to add Tamron support in the future. The more users asking for a feature, the more chances to see it come to life ;)
I'm interested too :-)
I would love to have a profile for my 24-70 VC. I even sent a support request to Phase One asking them to incorporate Tamron profiles. This was many months ago, but no response other than "we'll look into it".
I'm surprised Capture One has no Tamron lens database, and possibly other third-party lenses as well. Lightroom immediately recognized my over 10-year-old Tamron 28-75 f/2.8, although it doesn't recognize my Tokina 28-70 f/2.6-2.8 or Sigma 400mm f/5.6 macro. There is a database of lenses for those manufacturers however, just not my particular lenses. As a matter of fact, there's quite an extensive set of lenses in the LR database, as you can see below. I wonder if Capture One recognizes Sigma and Tokina lenses at all. Safe to say they snub Pentax, and probably soon Fuji. ;-)
Just a note if you were not aware, CaptureOne previously only distributed to private buisnesses as it is/was the "holy grail" of post photo editing and was not available to the public. As in, CaptureOne was used for medium format camera's from Phase One, Mamiya, Red, Hasselblad ect and came packaged with them often as the only editor that could handle some of the .raw files produced.
Just in the past couple years they opened up purchasing access to the general public starting with full frame camera's and working there way down. I've read it's not as easy as you might think adding profiles for the huge database of lenses they previously had nothing to do with, hence the process is a little longer getting the rights and perfecting it....
Lightroom on the other hand was always in the consumer and pro-sumer market so their database would natually reflect that, the same way Lightroom couldn't handle a Hasselbad raw file without extra work arounf steps :P
everything to love about an already awesome app. :)
It will be interesting to see what the new sharpening processes can give you. I can't say I share your view of the existing sharpening process in Capture One to date, I find it really nasty.
I love Capture One and use it daily, but honestly I'm not seeing any killer features that make me wanna upgrade.
If they come up with a way to create custom camera profiles, similar to what Lightroom can do with a ColorChecker, I think a lot of C1 users would rejoice and people looking to dump Lightroom would be very excited too.
How is the output speed when processing/exporting a bunch of full resolution files? Any speed increase for outputting the files as the client waits is definitely important.
"Users who bought a Capture One Pro 9 license after November 1, 2016 are entitled to a free upgrade."
I'm glad that I didn't upgrade 3 days earlier...
I upgraded last night and also spent time understanding the improvements and enhancements. Nice. What I fail to understand is why PhaseOne don't address some of the more fundamental issues that C1 has, and has been dragging along for several versions now. It seems like more and more complex high-end stuff is being put on top of a no-really-optimal base workflow:
1) Crop/rotate is a function we all use many times a day, but compared to almost any other software, C1 is just not good at it. Why two tools to do one, unified thing? Even Apple Photo is better and faster.
2) Healing brush via layers is great, but why only one source per layer? Why can't I set one source per healing stroke?
3) Roundtrip to Photoshop or Affinity Photo means that RAW is converted to TIFF and upon return that all layers are lost as the TIFF file has no layers.
I love C1 for its RAW processing, colour grading capabilities and overall picture quality. That part is so much better than LR and any other engine I know. But I really think that in order to be a long-term player, the basics have to improve.
I'd say Phase One suffers from Adobe-itis in that they put out new features without fixing existing code. I just updated Photoshop, and it still requires me to select a tool on the toolbar (any tool) before hotkeys work.
Not sure what you are doing to your TIFF files, but round tripping works fine. Well, aside from performance issues selecting TIFF files in the browser and some occasional preview issues where it won't reflect the latest state of the layers but you can manually recreate the preview.
Bottom line though, if you save the TIFF with layers, they remain intact and editable once you open it up again.
I researched this a bit. The TIFF standard *does not* support layers. Adobe has registered two "private tags" to allow for layer support. Which basically means that Adobe is using a proprietary TIFF format to include layer support. Which also explains why no one else is supporting Adobe layered TIFFs.
I use Affinity Photo instead of PS as I find it much much better for photography work. They also registered their own tags for supporting layered TIFFs (as of version 1.5), which is wonderful but at the same time I am sure you can imagine the problem of every vendor having their own, private TIFF versions.
If anyone is interested in knowing why I use Affinity Photo over PS, II can elaborate, otherwise I will keep my yak to myself :)
I hear you Thomas.
My biggest gripes are still:
1) "Healing spots" (don't know the correct description in english) are limited to 100 (!) which I usually have to defer to Photoshop although they could be made without problems in COP.
2) "Healing spots" cannot be used on layers.
3) v10 Support PDF:
"It is only possible to show the Capture One toolbar in “Icon Only” mode."
Minor issue but still annoying: "icon and text" cannot be shown in the mac version in the "Toolbar". If you in a hurry on a set I cannot recall which function each symbol represents. I'd like to see it written below. This issue has been around since I tested COP in version 6 or 7 I guess. Not a dealbreaker but annoying that this seems not possible after all these years and with every new release.
4) No PSD import for roundtrips !! Is this a patent thing or a political move ? Don't get it.
But a dealbreaker for many users. I have learned to live with it.
5) Like user Spy Black mentioned: Hotkeys work not reliably. Sometimes they do. Sometimes not. After a while I don't even bother klicking them and use the mouse. But still an annoyance.
6) Although there is OpenCL support it is not as fluid with zooming like with Photoshop or Adobe camera raw. The trial of Version 10 "feels" a little faster. But could be subjective...
Otherwise a great application. Would be the greatest if these bugs would be fixed...or these features...
Regarding the local adjustments, keep in mind Capture One is meant to process raw images, it doesn't replace Photoshop, it's not meant to be used to retouch. The local adjustments are there for minor adjustments or to get something fast without having to go through PS, but not replace it. Making over 100 layers/healing spots sounds to me like a job for PS.
For PSD, I don't know why it's not supported. It would be nice, but at the same time, TIFF are just fine more most applications. Never had an issue using TIFFs instead of PSDs.
Hi Quentin,
I hear you. ;)
And I am aware of the differences. BUT I still try to do as much as possible in the COP raw development process because this way I am most flexible.
Sometimes I decide later to redo something in the RAW file. If I have done too much in PS already and change something in the RAW file I have to redo those steps as well in PS.
e.g. in PS I open RAW files always as smart objects. So I can go back to the "original" after the fact and retouch. Which I do often. It seems extreme but served me well in the past. That is why I am frustrated by the "100 spot limit".
Here is a screenshot of my raw spot retouching in PS: ;))
I would like to be able to do that in COP as well...
Great software. Only missing feature is a proper import tool from Lightroom, that imports all develop settings. And a better web module.
Once those are available, I will kiss Adobe goodbye.
I've only been using Capture One Pro 9 for a couple of weeks now and yesterday I upgraded to version 10. Am I missing something or is the noise reduction feature still light years behind Lightroom's? It is really the only major feature that I miss. Any tips out there?
I noticed that too. In both Capture One and DxO, whose PRIME NR engine is supposedly superior to anything, I get clumping, mottling "pixel lumps" in planar areas (skies, walls, etc) when trying to reduce noise in high ISO images. I don't get that in LR. Topaz has an NR process as well, but it did not strike me any better than what I get in LR.
You are totally right, the noise reduction is no where near what Lightroom's has to offer and here is why:
CaptureOne previously only distributed to private buisnesses as it is/was the "holy grail" of post photo editing and was not available to the public. As in, CaptureOne was used for medium format camera's from Phase One, Mamiya, Red, Hasselblad ect and came packaged with them often as the only editor that could handle some of the .raw files produced.
Since it was only for post editing for medium format cameras, those camera's didn't produce any noise to deal with in the first place, so that feature was useless on photo's produced from 25,000$ cameras....
Best case is to get a 3rd party noise reducer
Anyone has the same problem? Resizing the clone tool with the bracket tools has a huge lag. It is really unusable this way
I could not test that yet. But I experienced some lag with the masking tool. If I paint a mask sometimes it takes seconds until you see it happen on the screen. Restart helped though...
I guess v10.0.1 has to follow...
Waiting for a serial number from the B&H! :) Shortest review here - https://youtu.be/aHpYCJSAUOA
Yes, I've noticed it seems a lot faster... I put together a Portrait Retouching video that walks you through some of the new features... It's on the long side but hopefully you find it helpful. https://www.youtube.com/watch?v=fjYT_XTI7Qk