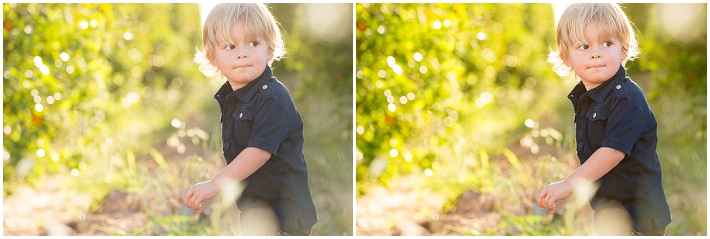
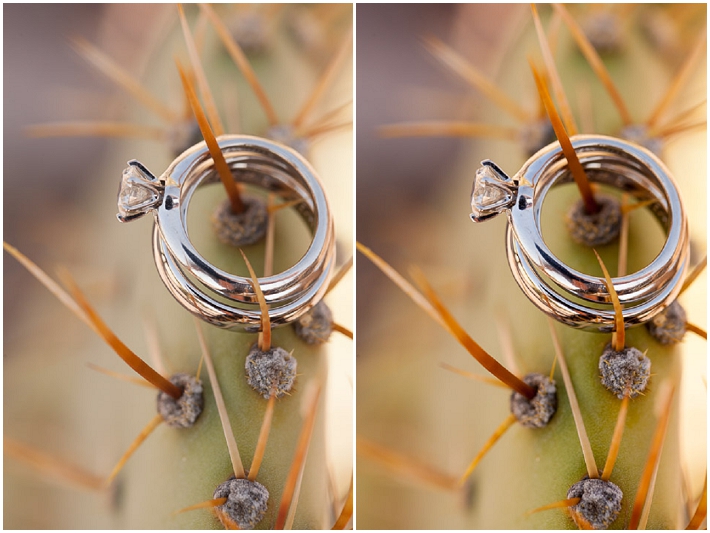
Shooting photos in RAW is the choice of most professionals. Unfortunately, we all know that once you import those photos into Lightroom, the vibrant images viewed on your camera LCD suddenly look flat. What if there were a quick fix that would make your RAW images better replicate what you see on your camera?
One of the keys to running a more efficient business as a photographer is to find the tasks that we repeat most often and find the most effective ways to do those. One of those tasks that I found myself doing over and over again was trying to make my RAW images pop like they seemed to do in the camera. The reason for the different look was because my camera LCD is showing me a processed JPEG preview, whereas the photo in Lightroom is the unprocessed RAW image. I therefore decided that I would put together a preset that I could apply to every image on import and would give me a baseline with which to start all my edits.

Before I share the information below, I must caution everyone. There is no one preset that is going to work perfectly for everyone. Each camera is different; each person shoots a little differently; each lighting situation is different; and last of all, everyone has different tastes. However, the following has worked wonders for me, and over the last couple years I have shared it with hundreds of photographers who have been grateful for the small but very useful tip that has saved them lots of time in post processing. So, I thought I would go ahead and share it here in case it could be beneficial for you, as well.
I simply call it my "Dayley Booster Shot", and I apply the preset to every RAW image when importing my photos into Lightroom. (Continue reading below to learn more about how to set up Lightroom to apply the preset on import.)
Here are my exact settings I apply to every image through my preset.


If you decide to use these settings and make your own preset, make sure you only check these 8 settings to change. You don't want your exposure, white balance, crop or any other of the important settings to be changed, as well. The goal of this preset is not to make every image perfect and ready for export. But what it has done for me is it has given me a great starting point to work with the photos. The colors and contrast now better reflect what I saw on the back of the camera.

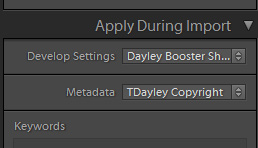
As I mentioned above, I apply this preset to all my RAW images when importing them into Lightroom. That is done in the "Import" screen by clicking on the menu "Apply During Import" and under the Develop Settings choosing the preset "Dayley Booster Shot." If you have given it a different name, then of course you would want to choose the name you have assigned to it. Now, when you import your RAW files, they will immediately display with the settings, and your files will look more like they did on the back of the camera.

If you would rather not apply the preset on import - or maybe you have already imported the files and want to apply the preset to all your images - there are two additional ways to do it. One is by adding the preset to one image in the Develop module and then choosing to "Sync" the settings to all your other images and select only the 8 settings above in the sync dialog box that pops up.
The second option, and one which I feel is even easier, is to go to your Library module. There you select all your images, and in the right menu box go to the very top and choose "Quick Develop." The first setting in the menu box there is "Saved Preset." When you click the drop down box you will be able to go in and choose the preset to apply to all selected images. The one benefit to doing this after you have already imported your images is that you'll be able to see the before and after to tell how well the preset worked on your photos. The easy shortcut to see a before and after of your image is by hitting the "\" key on your keyboard when you have the image opened in the Develop module.

Now, as I mentioned above, this might not work perfectly for everyone's styles, and the effect might be a little strong or weak, depending on the size of files you are working with. If the images are already JPEG's (not RAW files), then it also might come off too strong. It has been an incredible time saver for me, and has given me a great baseline to start with for all my images, making them nice and colorful which is in line with the style of images I give to my clients.
If this has been helpful to you, let me know in the comments below. To see more of my work feel free to check out my website or Facebook page. Thanks!


cannot express how useful this is. Thanks!
Very cool. Look forward to trying this with my own images.
this is great! Thank you!
Nice one Thanks
I've been using your "Dayley Booster Shot" on all my images during import for a few months now and it gives me a great starting point. Thanks for sharing Trevor!!
Really sweet tip. Thanks Trevor!
More contrast! More vibrance!
Ken Rockwell would be proud.
+1
total bullshit this is....
Simple yet terribly effective. Nice.
Cool share. That's exactly what I do for a couple of weeks now. It doesn't only save time - I feel it also helps to prevent overdoing in the development module because you have some starting point.
I took a different approach to this problem. I turn off all in-camera picture processing-Active D lighting, picture control, everything. Now what I see on the camera is pretty darn close to what I see with RAW, and I'm not tricked into thinking I have a good shot when I don't.
I agree... whenever I'm doing a shoot, I only pay attention to get important things right. Such as lighting, composition etc., for the rest I turn of everything in-camera processing and try to get as much as neutral image as possible. For onlookers the image in camera looks flat or dull, but since it's RAW I know that I've got lot of information in there to work on... and more neutral the image, more balanced information I get for both ends, highlights and shadows.
What would the values be for Aperture?
Shooting photos in RAW is the choice of "most professionals."
Unfortunately, we all know that once you import those photos into Lightroom, the vibrant images viewed on your camera LCD suddenly look flat.
LOL
These two sentences show how much of a joke Fstoppers has become.
Amateurs who don't understand how to shoot properly, and somehow make money, would be much more appropriate than calling them professionals.
Professional makes it seem like they do some sort of "work" to get to where they are. Not blindly getting gigs through sheer luck and thorough ignorance of their customers.
"It's not your fault. It's not your fault. It's not your fault."
+1
could not say it that good in my bad english.
Living the dream!
You sound like such an amazing photographer. Let's schedule a time to interview you for the site. You must have all kinds of great tips to share. I am excited to learn and share your wisdom with everyone.
Are you drunk? or just crazy? :)
One thing you cant say about Trevor is "Amateur". Unless you're trying to be funny... if so... you fail.
I've never quite understood how bashing someone like this in a public forum is any bit productive. It's one thing to not share the same sentiment or opinion, but just trolling with negativity shows such immaturity and an inability to deal with reality. Have you seen Trevor's work or even know anything about him? Obviously not...otherwise, I think you'd be singin' to a different tune. Thanks for the useful tips here, Trevor!
Come clean, this is really Ken Rockwell, right?
why you buy a RAW program if you then use the receipt of someone else?
learn to use a raw converter then you do t need such "tutorials" otherwise a RAW converter is wasted on you. it´s your image not the one from the guy who wrote this... so use your creativity.
I think you are mistaking this for a recipe. It is not. This is simply a way to get your images looking a tad better before starting your normal edits. You of course are still welcome to use your own creativity.
Actually, LR can do much more than this all by itself. The camera calibration menu can apply in-camera settings etc to raw files in a single click.
Looks great...will try it out
Trevor giving away his secrets.
Awesome idea! I'm going to build a preset today!
Very nice tip and I am sure it will be helpful for many, I've done some similar presets to start with, I think since you are mainly talking about RAW, then you also may consider adding "remove chromatic aberration", as well as some sharpening, but ofcourse it depends on the lens you were using, I found myself always applying those when shooting RAW even when using the best lenses, so I added them to most of my starting presets.
Love this post. Sorry about the haters. Nour, I'm so curious about how "remove Chromatic aberration" as a preset has worked for you. I found that on many portraits, it really interferes with parts of the face, especially teeth. Maybe my preset was too strong, but it seemed to add more work for me in the long-run.
i would like to see a tutorial on Black & White Lightroom presets. B&Ws are tough to figure out in general.
THANKS!
This is so basic. Pretty useless to know, you should be doing this anyway.
How is it "useless" to know if someone should be doing it anyway? Some people may not have known about it prior to this.
Lol kind of not explaining myself well there. This is just pretty much showing how to add contrast to your images. Something you'd think you would be doing anyway if your images were looking flat and not needing a tutorial on how to do.
I see where you're coming from now...it's just a simpler way to produce the same results without having to adjust each slider. Creating systems speeds up workflow, and some don't have those systems in place.
How would these settings look for LR3? (Yes I know one could just sit and figure it out) someone may know right away. Thanks
Is this the same as standard import from SLR lounge?
I'm pretty new to this, but I don't really understand the purpose of this preset. Either image is just a starting point for processing - why do anything at all to it? Why not just start from the original, unvarnished RAW import?
good stuffm especially with the new lightroom color section (it used to have blacks -5 in pre lightroom 4 versions, very annoying), one reminder though - you have to keep in mind that when you process the pictures for websites as jpg later its gonna crunch the blacks again, maybe not so visible in bright daylight pics but in dark images, so you have to be very careful with the black settings or you will get banding......
wôooooo exactly what I was looking for. Thanks!
Great post. Personally I think a vibrance of 45 has got to be too much, but the idea is still valid and something I will implement in my workflow ASAP.
Yep I do something like that. Probably not same exact settings, but my own that I prefer (and it changes somewhat depending on what I'm shooting). I had read somewhere at some point that it was because LR doesn't read the camera presets on Nikon Raw files. While this is true, and I proved it to myself by setting my camera to Black and White in Raw (images will import as BW but when it renders previews they'll "magically" turn back into color), However I see that you shoot Canon - so whoever said that was wrong that it was a Nikon specific problem. It would be nice if LR respected "as shot" with more than just the white balance.
To me, this seems so completely counterintuitive to the whole idea behind shooting RAW. If I want my images to "pop" straight out of camera... I don't know if such a thing is even possible (different scenarios need different editing).
I shoot RAW because I want as much information as possible in my shot, so I have the largest amount of flexibility in post. So in-camera I shoot with the flattest possible picture style (So I can quickly review proper exposure), and in my various RAW editors I have the default settings to be as flat as possible (so I can see what detail I actually have to work with).
If I wanted a quick-and-dirty catch-them-all default preset, I wouldn't go through the hassle of using a 3rd party RAW converter. Canon's Digital Photo Professional (their default and feature-poor editor) can set your raw files to use any of the in-camera picture styles, so you can get that in-camera jpeg even if you shoot RAW only.
Or you could shoot RAW + jpeg, and only edit the files that you feel need it.
(Note: I'm a hobbyist, and never encounter the "lots of things to edit" situation. It's always my free time anyway, so there's never any pressure.)
That is the difference between a program like Lightroom and Nik/Photoshop/CR - PS will edit a RAW to your heart's content, but only effectively one-at-a-time. LR also does a cataloging and batch editing. If anything, that is it's appeal more than the ability to manipulate sliders and mess with a single image.
This is a fair point. DPP has batch editing/converting, but it's slow. But no cataloging.
Personally I do all my cataloging manually, though my uncannily good memory usually does most of the work. Again: hobbyist with only 43900 *.jpg's and 17230 *.cr2's, so not that much to keep track of.
I thought just like you for the longest time - get it right in camera, or go all the way and do it in photoshop, LR was just a nerf'd photoshop to me. Then I tried it and saw how useful it was for doing batch edits, and I've been hooked ever since. There is no substitute for good organization of photos - be them CR2's or Kodachrome slides - but if you give me a tool that will save me time in whittling down a hundred-picture shoot, I'm all ears!!
I don't have clients, I don't have people waiting for me (usually), so I'm rarely in the need to work on large numbers of photos in a short timespan. I'll shoot 500 photos in a day, then maybe edit four or five of them... A week later.
When I'm working on an event where I need to do many shots at once (with little "creative" editing, just the standard no-nonsense "make it look like you know what you're doing", I'll select one or two shots from each lighting scenario and create a new preset for each of these, then batch-process the selected "good" photos with these independent presets.
I mainly use aftershot pro, so copy-pasting settings from photo to photo is completely effortless. Which means that when I say "create a preset", I actually just mean "edit a photo". Entirely non-destructive, and always uses 100% of your CPU when processing photos. I never liked the separation of "Library" and "Develop" in LR, and the export times are just sluggish.
Anyone know how these settings would translate to the built-in Adobe Camera Raw Converter in photoshop for those of us who don't use Lightroom?
I would like to know this as well!
pretty much the same. it´s the same converter afaik.