
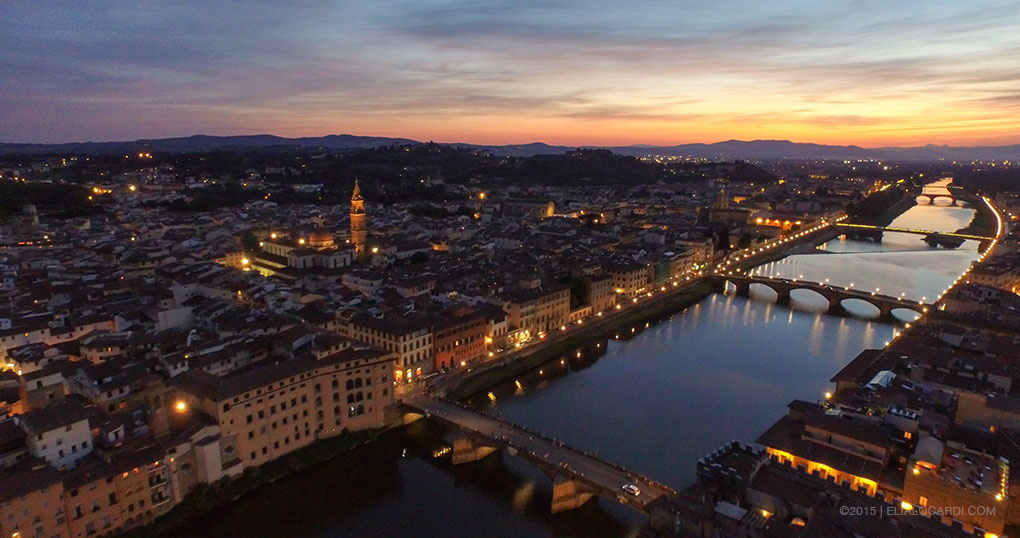
While I was flying my DJI Phantom 3 from Ponte Santa Trinita—one of the beautiful bridges of Florence—during our recent Italy Dream Photo Tour a wonderful thing happened.
A friendly Italian woman, probably in her mid-fifties, looked over my shoulder at the live feed from my mobile device and stopped dead in her tracks. Her transfixed gaze slowly lifted from the screen to meet my eyes and she said, “I was born in Florence and I’ve lived here all of my life, but I’ve never seen my city look as beautiful as this.” It was then that I noticed that her eyes were filled with tears. Smiling, wrapped up in the emotional moment and honestly becoming a bit teary eyed myself, I didn’t know what to say except, “thank you.”
This encounter was a turning point for me. I was already a huge fan and avid user of DJI Quadcopter / Drone technology, but these few simple words from a complete stranger solidified my perception of the sheer potential of personal aerial photography and videography devices. This statement may seem strange to some, but let’s dive into together as I share my perspective as photographer integrating these new tools for capturing the world.
Since I started traveling full-time as a photographer in 2009, I’ve consistently gone out of my way to find the most awesome vantage points possible for my photography. I’ve literally climbed mountains, paddled kayaks, ridden pack mules, contracted helicopters, you name it and I’ve done it. Whether it’s a 50 hour airline travel itinerary, a simple 25 meter rocky climb, or even multiple days sleeping in a car, or any number of other uncomfortable conditions for that matter, whatever it’s taken to get the shot I have considered well worth the effort. I often feel like most of my job is working to arrive in the best possible place to take a photo, because the location and framing of my subjects are the core of my unique style of travel photography.
Now, a fair bit of those climbs, offshore boat excursions, or costly helicopter hires can be solved with a small, affordable DJI Quadcopter that fits comfortably into my backpack. Don’t get me wrong, there’s nothing wrong with good old fashioned hard work and strategic positioning, quite the contrary. I’d just say that after adding a DJI Phantom 3 to my workflow, my perspective on travel photography has been forever changed. Welcome to a brand new world of possibilities, all controlled in the palm of your hands.
An edit of some of the drone footage I captured with 7 days in Italy during my 2015 Italy Dream Photo Tour. It was filmed entirely with a DJI Phantom 3 Professional Quadcopter at 4k resolution and edited with Adobe Premiere Pro. Additional color correction was applied using Adobe After Effects and Photoshop.
The Integration of DJI Drones Into My Workflow
While I said that the friendly encounter in Florence was a turning point for me, it wasn’t my first time working with DJI Phantom technology. In fact, I managed to start this story from the middle rather than the beginning, which doesn’t speak too highly of my organizational skills. In my defense, I do retain a high level of perpetual jet lag since I traverse international time zones more often than I change my clothes, which I guess doesn’t speak too highly of my personal hygiene either… But that’s a different story entirely. ;)
My fascination with DJI technology started early in 2014 when my Social Media feeds began to fill up with amazing photos and videos people were capturing with the Phantom 2 Vision+. Moreover, from the moment I had the chance to first fly one during Photo Plus Expo (PPE) in October 2014, I knew that I had to get my hands on one and fly it out in the field. If not for the amazing photographic potential, then just to help appease my childlike wonder and desire to fly my own quadcopter. In a way I could say that my initial investment in learning DJI technology was all based on a total geek out session. Soon after that though, it became much much more.

My first try flying a drone... So much for beginner's luck. ;)
At the time of PPE, I was already working to finalize plans with Lee Morris and Patrick Hall from Fstoppers to shoot our massive video tutorial series on Landscape, Cityscape, and Astro Photography. Lee, already a moderate DJI Phantom flyer, decided to bring along a Phantom 2 with an Zenmuse H3-3D Gimbal in order to capture aerial footage in 6 countries over the 80 day project including: Iceland, Italy, Singapore, Hong Kong, Cambodia, and New Zealand. We chose to bring the Phantom 2, Gimbal and GoPro option instead of the Vision+ mainly due to the ability to capture high quality 4k and 2.7k high frame rate video with the GoPro Hero 4. At the time, the Phantom 2 Vision+ only offered standard quality HD video at 1080p.

After only a few short days of filming in Iceland, Lee cut together our first promotional video “A Drone in Iceland.” By the time we left Iceland, Lee was already an expert Phantom pilot and I was completely hooked on self-controlled aerial photography and videography, and well on the way to mastering the art of flying myself.
While the Phantom 2 / H3-3D flown with a GoPro Hero4 Silver was extremely powerful, it had one major drawback. We were all flying 100% blind with no first person view. Each flight, we’d send out the drone, never let it get out of eyesight, and review the video on the tiny GoPro LCD screen when it returned. Having zero visual feedback was definitely frustrating in the beginning and it required a great deal of trial and error, but that same challenge also turned out to be a great way to truly learn how to fly a drone.
After wrapping up shooting with Lee and Patrick in New Zealand, I traveled on to Japan for the 2015 Sakura season. Since Lee took his Phantom 2 home, I arranged shipment of a new Phantom 2 version 2 and H4-3D from B&H Photo to use with my GoPro Hero 4 and take along for the ride. I had a lot of flight time in Japan and it was there where I learned how to overcome the second biggest challenge of flying a visionless system. Objects always seem to be much farther away from the drone than they appear to be.

At first this seems great. It means that you’re always a safe distance away, right? No, not exactly, because eventually you test the limits in order to get the perfect shot...
Let’s just say that learning to judge and compensate this optical depth perception issue is not without its casualties and flying in complex environments can be costly when you make a mistake. With my case in particular, a run-in with a tree, the cost of learning on the job was a new Gimbal and GoPro 4 Black. Thankfully the Phantom 2 itself came out with just a few minor scratches and still functions perfectly. Considering how mangled everything else was, that really speaks highly of the Phantom 2’s durability.

If you’re still considering the differences between the Phantom 2 and H4-3D Zenmuse Gimbal with GoPro vs. the Phantom 2 Vision+, or new Phantom 3 here’s some basic pros and cons to consider.
Pros of Phantom 2 and H4-3D Gimbal + GoPro Hero 4 Combo
-
Upgradable camera system since GoPro makes regular model updates
-
Ability to use ProTune function to capture a higher bitrate for more control in post-processing
-
The GoPro can be removed and used in other environments
-
Flying blind can teach you a solid foundation of flying skills based on fully understanding your environment and real-time spatial relationships.
-
The remote is smaller, more lightweight, and doesn't have the bulky smart device attachment.
-
You can add Lightbridge and have the same visual feedback as the Phantom 2 Vision+ with the GoPro but it’s a costly upgrade
Cons of Phantom 2 and H4-3D Gimbal + GoPro Combo
-
Flying without a first person view can be very difficult when you’re a beginner to cinematography techniques.
-
GoPro Wifi upsets the flight controls and is only suitable for very short distances. This makes the built in GoPro video transmission useless when flying.
-
Registering true depth can be very difficult without live visual feedback
-
GoPro camera distortion which can be intense when shooting at ultra wide and wide settings. (Note that this can be corrected fairly easily in most editing packages)
-
Cannot remotely trigger recording, still / video capture, or change settings during flight without returning the drone home.
Enter The Phantom 3
From Japan I traveled to China to attend the P&E International Photography Exhibition and speak at a few events in town. When I returned to Shenzhen with my colleagues, I had the opportunity to visit DJI Headquarters, meet some of the great team that works there, and get some hands on time with the new Phantom 3 Professional prototype.
They took me outside to the DJI “official” testing site–an awesome empty concrete lot next door that’s riddled with the partial remains and broken props of countless drones. Within just the first few minutes of flight, I knew that this wasn’t just an incremental product upgrade, it was a completely evolved design.

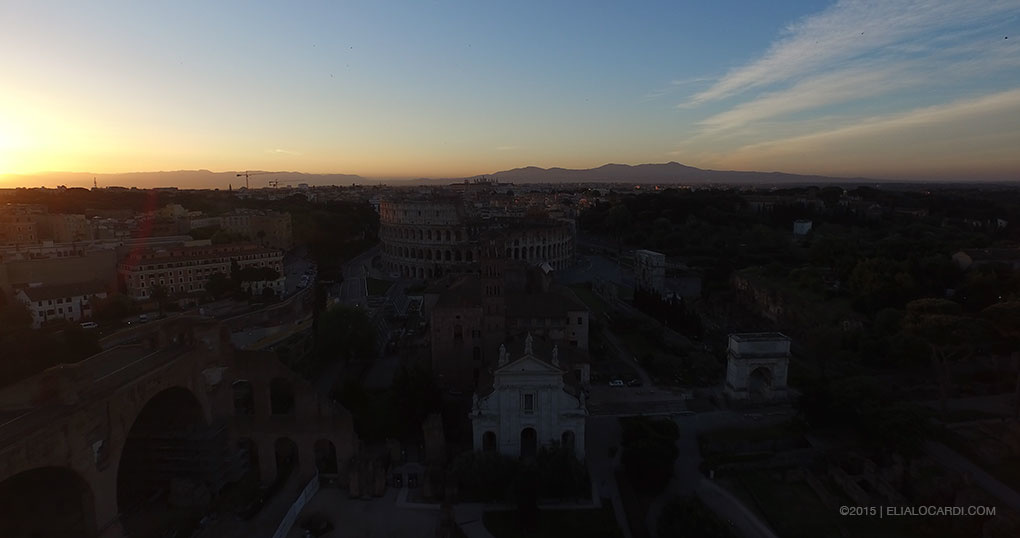
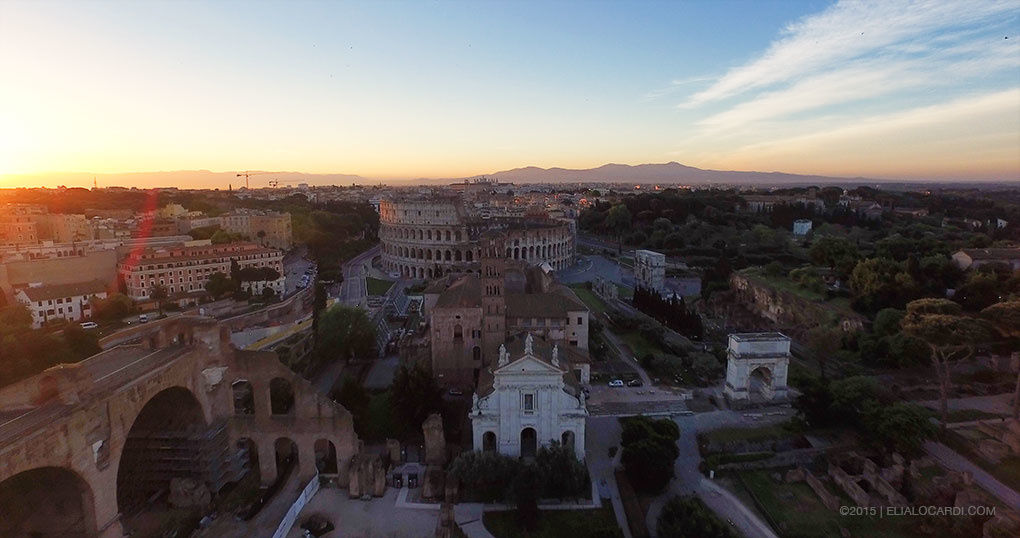
My new friends at DJI offered to send me a Phantom 3 Professional prototype for me to test out on my 2015 Italy Photo Tour. So on the Italy Tour Day 1 (May 7th), I hit the ground running, or better yet, hit the air flying with an inaugural sunrise flight over the Roman Imperial Forum.
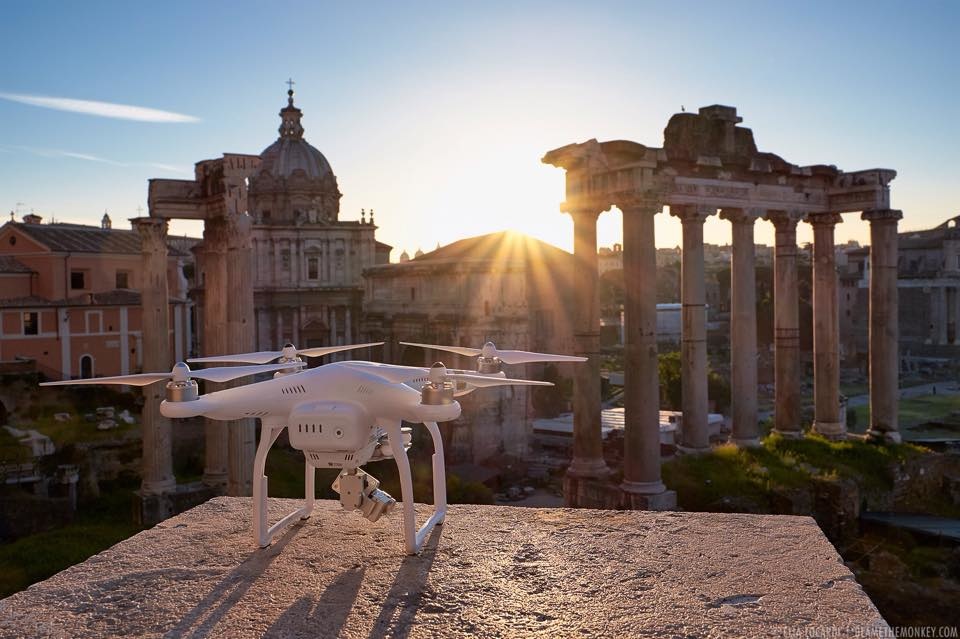
Arguably, I should have picked an easier location for my first round of test flights, but with so much heavy preparation for the photo tour, I decided to learn using my favorite method...trial by fire.
Unfortunately, I waited a bit too long before flying and had to shoot directly into the intense Roman sun, so while I was able to adapt to the new feeling and performance of the Phantom 3, my nervousness with the environment also caused me to make a silly mistake. When I was in manual mode, I wasn’t paying enough attention to the screen and I accidentally underexposed the video by a full stop. Oh well, good thing that this was only day one!
Society's Love Hate Relationship with Drones
Now that I’ve almost caught you up to that defining moment I had with the woman in Florence, it’s time to push forward and talk specifically about my experiences in Italy with the DJI Phantom 3 Quadcopter / Drone.
Throughout the Italy Dream Photo Tour, this little drone sort of became our group mascot, as everyone who joined us this year was delighted to see it fly, review the video, and ask questions about it. No matter where I flew, heaps of people would gather around in fascination and sometimes even applaud a successful landing or catch. I even had a handful of people find me in Cinque Terre after watching my Facebook feed all week. They saw the DJI Phantom 3 fly around in Vernazza and knew I was there.
All in all, my DJI Phantom 3 was greeted with almost 100% positivity all over Italy. I really only had a handful of negative comments, both in the field and on Social Media, throughout the entire trip.
For some of us, these quadcopters make our inner child come alive as we’re presented with the opportunity to fly our own personal aircrafts. It’s a feeling of pure excitement and exhilaration that’s palpable, but also hard to describe. It’s almost like being a kid on Christmas morning—a feeling that I personally haven’t experienced in years.

A look of pure joy on my friend Gaia’s face when I was teaching her to fly the Phantom 2 in Tuscany for the first time. She fell in love with the drone from day one and couldn't wait for a chance to try it out.
With all the love in the air for this new technology there’s also a small, yet noticeable, negative side. There are people out there that really dislike drones in general and are very adamant about expressing it. We’re also being faced with increasing restrictions worldwide as countries, cities, and individual counties start to create legislation to regulate personal quadcopter usage. As usual, the media at large is perpetuating the hate by only publishing the few negative articles associated with drones and not covering how positive they can be as well. As a result, certain places are starting to take these new tools away from artists and that’s very unfortunate in my opinion.
On this same note, it’s worth sharing that while that nice woman shared a very special moment with me in Florence, a man walked by behind us shortly after and said something like, “Oh, a f@*%king drone? They should throw that guy in the river." For the record he wasn't an Italian, he sounded American to me.
Mixed in with the hundreds of positive comments I received on my Social Media channels when I posted about flying in Rome was also this one negative commenter.

The reason I bring this up is not to disgrace people that are against the use of this technology. To the contrary, I believe that everyone should be entitled to their own opinion about things. I just want to make sure that if you’re interested in flying drones, that you don’t let the negative minority take any joy away from your flights. With any new technology there will always be naysayers and there will always be people that are resistant to change.
Don’t let people take away your artistic tools or scare you away from trying to create your own unique style of art using drones for aerial photography and videography.
Be a Responsible and Respectful Pilot
While we can’t control all of the negativity out there, we can do a few simple things to soften it a bit. Since these are personal aircrafts, we’re personally responsible for the ways and circumstances in which we use them. So in short, please fly responsibly and be as respectful to the people around you as possible.
-
When in the learning phases, take it to an open space like a park, vacant lot or other uncrowded space and practice your skills before flying in populated areas. This will help you build your confidence and prepare you to fly in more technical places.
-
As a general rule, don’t be a dick! If you feel like you’re doing something wrong, you probably are.
-
Do your best to research whether or not there are restrictions in the area you plan to fly and take them into consideration.
-
Assure that your drone is in perfect working condition before taking off.
-
Avoid taking off and flying in very crowded places. This will definitely cause some negative attention and will likely alert the authorities to your location.
-
Avoid flying around quiet places like cathedrals, churches, or any other place of worship. Drones in flight sound like a loud swarm of bees. This is very disruptive to serene and peaceful environments.
-
Don’t hover in front of people’s view. I’ve heard stories of drones photobombing popular locations. Just like you wouldn’t stand in front of other photographers, don’t hover there either.
-
If you’re questioning whether or not you can fly in a particular location, it’s best to fly for as short of an amount of time as possible. Wait for the right light, get your shots quickly and move on. Don’t wear out your welcome.
-
If the authorities ask you to stop flying and you don’t have a permit. Just apologize and stop. Don’t argue or make a scene. Simply move on.
-
Look happy while you’re flying. Smiles go a long way to diffuse tension and make people feel more comfortable. It seems simple but it actually works.

Flying the DJI Phantom 3 vs. the DJI Phantom 2
Not just a minor update, An Absolute Game Changer
If you’ve read (or skimmed) up until this point, you know that I was already a huge fan of the DJI Phantom 2. So when I picked up the DJI Phantom 3, I was immediately impressed with the responsive control and agility in the air. What I didn’t expect was the dramatic increase in power. Where the Phantom 2 flew extremely well, the new Phantom 3 zips through the air with pinpoint precision and even more responsiveness. It’s not like flying an upgrade, it’s like flying a completely new product. The Phantom 3 is a finely tuned bad ass little piece of engineering mastery. It even torques its engines twice before takeoff to tighten the props and assure that everyone knows that it’s the coolest thing around!

Flying the Phantom 3 with First Person View And Real-Time Controls
For me, the transition from flying blind to having high resolution first person view and real-time control was by far the biggest game changer. Within the first few days of flying, I really felt as though the world around me was accessible in the palm of my hands. Coming from a background of visionless flying, the only challenge was trusting the live view and letting the drone leave my comfort zone and line of sight.
Christopher Columbus once said (or according to the internet, he said), “You can’t cross the ocean until you have the courage to lose sight of the shore.”
I have to admit that this was a bit terrifying at first, but once I learned to fly only with a combination of vision and GPS, it opened up a whole new world of possibilities. It also validated all the years and countless hours of video games I played when I was younger. See mom? I told you it would be important someday! ;)
To geek out even further, my first few flights actually reminded me of when Luke Skywalker was trying to blow up the Death Star. Except in this case I decided to abandon the force, give Obiwan the finger and trust my digital display instead.
![]()
Welcome to Lightbridge
The reason why the Phantom 3 boasts a crystal clear 720p HD view of everything your camera sees in real-time is because of the DJI Lightbridge image transmission technology. With up to a 1.2 mile (2km) range, each of the four legs of the Phantom 3 actually contain hidden high-powered antennas that broadcast a live feed back onto your personal device.
Speaking with the team at DJI, they shared some of the technical details of how Lightbridge functions and how they invested high production and R&D resources to make it accessible by the large production scale of the Phantom. Previously it was only available on the more expensive Inspire 1 or as a costly add on to the Phantom 2 series and others.
Before I get overly technical about it, I should just say that I was really blown away by the clarity of this video feed, especially when I was in the country and away from tall structures and signal interference. Alternatively, in cities like Rome and Florence, I was able to achieve a full range but occasionally the signal would get a bit shaky if I flew too close to tall objects or when I was obstructed by buildings.
In any situation where I lost my FPV entirely, I’d assure that I had gained enough altitude to clear obstacles before triggering the “return to home button.” Usually in a matter of a few seconds, my Phantom would return into range and my live view would come back to the screen.
The DJI Pilot app is very intuitive and easy to use. For me, the beautiful real-time video display also justified investing in a mobile device with a bigger screen. In this case bigger really was better from a live-view cinematography aspect. The only advice I would give for the app is to make sure and close down other applications before jumping into DJI Pilot. You’ll want to give it as much device resources as it needs. It’s also wise to put the device into Airplane Mode before you take off, or else you’ll be distracted by random notifications while you’re flying. No! Don’t check your email while you’re flying! Bad drone pilot, bad!
The New DJI Phantom 3 Camera
One of the most attractive features of the new DJI Phantom 3 is the built-in camera. There are two models to choose from with the only difference being the maximum video resolution of the camera. The Advanced model shoots 1080p at 60fps and the Professional model is capable of shooting full 4k at 24fps.
Other than that, both models are pretty much identical with the same aerial stabilization technology and 3-axis gimbal. Both cameras have an amazing distortion free 94 degree field of view and the ability to shoot bracketed RAW stills at 12 megapixels.
Another great feature is that the camera is lighter than the previous version. This means that the combination of a lighter aircraft + a lighter camera + a lighter gimbal + an improved battery = more flight time over all, which is a win-win.
DJI Phantom 3 Professional Video Performance
Auto Video Mode
The auto video mode works extremely well and smoothly transitions in changing lighting scenarios by automatically adjusting the ISO and shutter speed on the fly. I was consistently pleased with the wide dynamic range that I was able to capture during sunsets and sunrises and rarely found myself needing to switch to manual mode.
Another great feature is that you can EV shift while in Auto Mode by rolling the right index dial. This is useful when shooting into either bright lights or in low light environments. For example, in Florence and Tuscany while I was flying into a very bright sky, I found it useful to EV shift -⅓ to ensure that the sky was never blown out. Just like editing photos in post, it’s very easy to bump up the shadows in the video to rebalance the scene. So instead of getting too technical again, let’s look at some results instead. Here are a few screen grabs “straight out of camera” (downsampled for web resolution).
Before Example Tuscany

Before Example Florence

Let’s compare after light balancing and color correction
Tuscany After Example

Florence After Example
Remember that first flight I was talking about in Rome?
While that was an unintentional underexposure of one entire stop, I was actually able to bring the scene back fairly well. Check out these two images that illustrate both the “straight out of camera” and “corrected” result.
Rome Before Example
Rome After Example
Low Light Video Performance
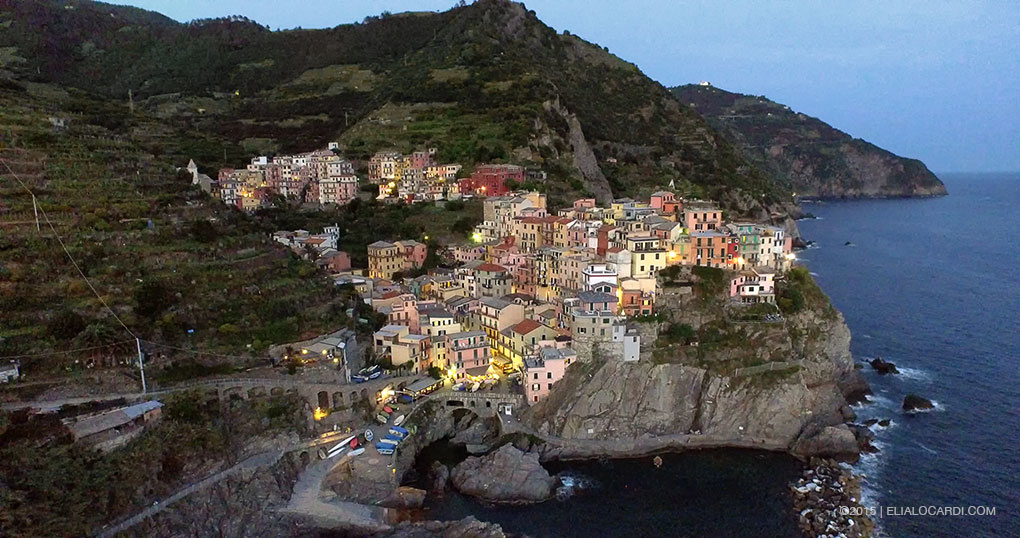
One of the new selling points of the DJI Phantom 3 camera is its improved low light capabilities. Coming from a background of shooting GoPro, which has less than adequate low light performance, I was really looking forward to putting this to the test. Check out the low noise from these night flight shots over Florence and Manarola. Again, these are “straight out of camera” just downsampled to web resolution.
Florence Before Example

Manarola Before Example

Now, those of you who follow my work know that “straight out of camera” isn’t something that you’ll find often in my vocabulary. So let’s take a look at the color corrected results.
Florence After Example

Manarola After Example
Manual Video Mode
When shooting in Auto Mode, it’s very easy to toggle to Manual Mode for full control over shutter speed, ISO, and EV Shift. Simply press the button on the bottom right corner of the screen and adjust setting accordingly. This is really great for static lighting environments or when you need a bit more control over the result. Just make sure to pay attention to your settings and make adjustments as the lighting changes.
Phantom 3 Camera Still Image Performance
RAW DNG Files
Both versions of the Phantom 3 shoot RAW DNG files that allow you to capture much more dynamic range than a typical jpeg. These DNG files can be edited in Adobe Camera RAW or Adobe Lightroom with great results.
I was able to put this feature to the test while shooting over the Vatican in Rome during a very beautiful sunset. The first photo was captured “straight out of camera.” The second is my final edited result using a single RAW file. The dynamic range is very impressive.
Rome Before Example

Rome After Example

Auto Mode VS Manual Mode For Photography
Similar to any other type of photography, when capturing stills it’s best to take the camera out of full auto mode, especially when shooting in low light environments. In auto mode, the Phantom 3 will compensate by raising the ISO which will add noise to your image. Instead, toggle to manual mode, leave the ISO as low as possible, and adjust the shutter speed instead. With the stability of the Phantom 3, you can easily shoot long exposures of 4 - 6 seconds without any motion blur, or even longer if you’re far away from the scene.
Exposure Bracketing and Other Shooting Modes

In addition to shooting RAW, by pressing and holding the shutter button, you can access a few different shooting options including burst mode, timelapse, and exposure bracketing. With exposure bracketing enabled, you can choose to shoot either 3 or 5 exposures. This is extremely powerful if you want to do any manual blending or HDR effects. The Phantom 3 captures all exposure quickly with very little lag time.

A look at my choice of a Phantom 3 vs. an Inspire 1
Portability
Though the Inspire 1 is a very impressive flying machine, the main reason I chose the Phantom 3 was the extreme portability. Many companies are producing bags, including the Think Tank Photo Airport Helipak I'm using, that carry both the Phantom 3 as well as a full gear load of camera equipment. This is important to me because I’m not just out there capturing aerial video footage, I’m also a full-time travel photographer and I require a large selection of camera bodies and lenses in the field. Instead of carrying a second bag for the drone, I prefer to put it all on my back.
Bear in mind that this isn’t just for practical reasons, it’s also because I can carry this one backpack on the plane with me no matter where I’m flying. If you decide to check your drone (which is perfectly safe inside of a pelican case), you’ll need to remove all of the batteries first and carry them on with you. The airlines are starting to get extremely strict about this.

You can see here the difference between a small pelican case for the Phantom series and the new Think Tank Photo Airport Helipak. The Helipak holds all of my gear with plenty of room to spare. The peli case only holds the drone but on the other hand, the props can stay on for quick access.)
The Appearance and Intimidation Factor
With all of the new drone restrictions being written into law, many countries are creating a distinction between recreational and professional use. The Phantom 3 is much smaller and lighter than the Inspire 1 and by effect is much less intimidating when taking off, landing, and flying through the air. Expect certain regulations to factor in both size and weight when making the distinction between which drones are professional. I have a feeling that the Phantom 3 with it’s small form factor will always come up under the recreational category. This is going to be very important when you want to get footage in semi-restricted areas.
As I already mentioned, the Phantom 3 fits into a small backpack or even a shoulder bag which means that I can easily carry it into many cities and urban areas without alerting local authorities. When it’s airborne the Phantom 3 looks like a toy helicopter, which is exactly what I want them to think!

Conclusion
I’m fairly new to flying drones in general, but I can’t help but feel that they are going to play a key role in the future of my photography. While the Phantom 2 had me hooked from the first flight, the Phantom 3 with its incredible performance and feature set, has earned a permanent place in my camera bag and I plan to travel with it full-time from now on.
I also want to say that this is a general review where I wanted to talk about how I became hooked on drone photography and how I’ve begun to integrate it into my daily and professional workflow. In the future, I’ll do my best to release more articles and reviews about specific features and tools.
Thanks for reading and if you have any questions, feel free to comment here or reach out to me on the Social Media Site of your choice. You can also follow regular behind the scenes posts from all over the world.
Instagram | Facebook | Twitter | Google+ | 500px | Porfolio | Blog


Thanks for this article! My Phantom 3 shows up today and I can't WAIT! Unfortunately, my first flight will be over a large construction site in my back yard and not a cool place in Italy. =)
Even if it's just a construction site, you'll still get some excellent practice to prepare for the next epic location. :)
What a fantastic article. Thanks so much for all this info! Truly appreciated!
Thanks for the compliment! Happy to hear you enjoyed the read.
Just amazing. Thank you.
Thanks Geoff!
I'm still waiting for an affordable jetpack to be released.
Oh my, now you're talking. ;)
What an excellent and thorough review. Thanks for putting it together, Elia!
Thanks Casey!
Pleased to have been with you on the Dreams Photo Tour Elia when you shot some of the video, for the novice a fascinating read
I appreciate that Gordon! It was an absolute pleasure to have you there. Of course, that's only speaking personally. I don't think Ray and Norman feel the same. ;)
A very thorough review with some great footage. But I wonder, do you feel that the experience you and those around you had whilst shooting, claimed as nearly 100% positive, would be completely different, had drones been more common-place, and had a larger number of people been flying at these locations along with you? Because it certainly could head there without some form of 'regulation' over drone video/photography. And I really am loath to combine the words 'regulation' and 'video/photography' into the same sentence, for fear of artistic regulation. However, if the ubiquity of photography these days tells the photo community anything, it is this: those so-called 'epic' and 'serene' and 'wild' places are quickly losing exactly those qualities which bring us all there -- in no small part due to droves of photographers flocking to them, armed with ever-less-expensive and ever-more-capable photography equipment. I worry about an impending ubiquity of buzzing drones littering the sky in the near future, because let's be honest: there's nothing discrete about the sight or sound of a Phantom drone flying above the beach or above the plaza or around the abbey. Multiply that experience (of which I've had a few times) by a factor of ten, or more, and it soon becomes a scenario that is unpleasant for both drone video/photographers, and everyone else that has come to experience the magic of a place.
Some of the best stills I've seen out of the P3, Elia. I just wish multicopter glass was a little better. Anyone know of a gimballed solution that carries 14oz?
The best thing about this technology is that it's rapidly improving every day. :)
Support me in trying to lift the ban on flying in our National Parks System. Without input from the public the NPS has arbitrarily placed a ban on flying at ALL National Parks.
This was supposed to be the summer of the ‘drone’ yet the golden age of drones may, in fact, be over before it got started if we continue to stand by and let regulations impede out flying.
I fly to photograph I’m not really interested in the flying part. If I couldn't carry a camera I wouldn’t be involved in the sport.
Our National Parks have some of the most amazing landscapes and vistas in the world, yet those that fly are prevented from photographing this beauty.
I get the whole FAA exclusion when it comes to area of the NPS that overlap yet there are tens of millions of acres that are not near airports that are off limits because of this ban.
Here’s the link:
http://wh.gov/iKJVn
It needs 150 signatures to be searchable, 100,000 to require a response from the White House.
The deadline is June 25th.
I'm all for the "ban" as it stands. This hobby needs regulation unfortunately.
Watch these videos now, because it's just a matter of time until they are forbidden.
Your comment about finally trusting to fly out of line of sight is exactly the problem and against the new fcc regulations in the USA. Soon to be worldwide. As beautiful as these shots are , the break almost every "rule"
Yeah, I heard there's a major tightening of regulations in the US, especially for commercial purposes. Oddly here in Canada, it seems to be going the opposite, though it's only a matter of time before that changes too..
Some countries are defining fair classifications between Professional and Recreational use. Some countries are more fair than other obviously.
Yeah, I'm actually a little surprised how Canada is supposed to get a little more lenient. For commercial purposes, unless you had an open license, you had to fly a flight plan 30 days in advance (if you did have an open license, that got cut down to 3 or 4 days). I'm not sure of the specifics of what they're changing, but from what i remember hearing, those commercial rules would for the most part be abolished.
Great article!
Only thing I have to say though... It's not necessarily bad media spin (though that's part of it) that's causing regulations to be put in place, but rather the few idiots out there that think it's a good idea to do stuff like fly one to spy into someone's apartment, or the growing number of incidents where they've been flown way too close to planes landing/taking off. So yeah, there should be some sense of regulation in place to make sure you're aware of what actually consititutes proper operation, and that you're not some silly person that thinks it's good to fly it 30 feet from a landing plane.
I sometimes work on Mayday/Aircrash Investigations, and I'm dreading the day we do a story about a drone flying into an engine, because it'll eventually happen :-/
That all said, I bloody well love that this kind of value of shot is so easily accessible! That and that you dont have to spend $10k just to get a good rig :)
You're totally right. There can be thousands of people flying drones in positive ways but as soon as one person does something reckless or silly with it, that's all the media wants to talk about it. It's a shame that a few people can ruin it for everyone.
That being said, I think it's important for us to be showing the more positive and artistic applications that this technology can be used for. Hopefully in a small way we can help to offset the damage that a few silly people can do.
Absolutely, and if we can show that we're level headed and professional about it, we'll show today governing bodies that there are a lot of people that use these things in a proper manner, to do some cool ass stuff :)
This felt more like a paid endorsement rather than an actual review. Well put together, just seemed quite biased. Funny how there were no "cons" for the P3. My guess is that you loved the P3 so much partially because you were doing so much wrong with the P2 (i.e. flying blind, etc). While the subject matter in the video above was great, the quality was not. The 4k from this camera is noticeably worse than the GoPro. Some of the worst I've see so far from P3. But thanks for sharing. Saw enough to safely pass on this one.
nice work Elia.
i really like that pelican case - does anyone know where i can order one similar to that one? i really like the fact you dont need to take off the propellers and there is a little support on the side of them - any help?
I use the hard cases by GPC:
http://www.bhphotovideo.com/c/product/1145202-REG/go_professional_cases_...
I have a hart time believing the hype of easily capturing 4-6 second exposures. Proof please?!
I'll be testing it more very soon.
Been flying my DJI Phantom 3 Pro for a week or so now with no complaints, loss of signal etc. (Always set your compass calibration). Your review is the most thorough and comprehensive I have read to date. Not to mention the stunning photography. Also impressed with the distance you are operating your DJI P3Pro. Haven't built up the "confidence" to that level yet, so thanks!
Thanks for the feedback Michael! It sounds like you've been having a great time with the P3. I don't think anyone will see signal interruptions with the final production models that are shipping now - even when pushed close to the maximum range of 2km. I was flying in Italy with the beta though early release pilot app and a very early production model P3. Even considering that, everything seemed to perform perfectly, especially in the countryside where there were no buildings. :)
Nice article. Is there any difference in the quality of the raw files between the two camera option in terms of DR, noise etc?
I believe that the 12mp stills are the same on both models.
Elia - Thank you for such a great review - I am currently waiting on my P3P. I am an experienced photographer but have zero video experience. Do you recommend Adobe Premiere over Final Cut Pro? Do you have any other advice for new videographers who have photography experience?
Thank you again!
If you're already accustomed to Adobe products than Premiere will be a natural move. FCP is great as well - just different.
Hi. What a great article! I live in Italy and I'm waiting for my Phantom3. I'd like to do something similar to what you did but the problem is to have the right permissions. How were you able to do that?
Great article, Elia. I really enjoy your photos and videos. I just received my Phantom 3 Pro three weeks ago and have enjoyed taking photos with a new perspective. Here are some of my favourite photos taken in Singapore to date:
https://jefftan.exposure.co/phantom-3-pro
A fantastic drone
Great article thanks for that! If you are traveling from one country to the next did you have issues with Inspire or Phantom3 intelligent battery not letting you fly? or could you travel anywhere (obvious laws granted) and have no issues traveling (GPS change - FCC regs etc) with the same craft.. curious.
Wonderful article, thank you! While I'm more proficient with my P3 than I am with the camera I was wondering if you have any articles that teach/tutor how to get such a major difference out of photographs as you have in your "Before" and "After" pictures? Perhaps you can share what you did to bring out the otherwise hidden beauty of your shots? Thanks!!
I plan to write a bit more about it in the future but it all boils down to how I post-process my images. A lot of the same tools and techniques that apply to photos, apply to videos as well. We just released a 12+ hour video on Landscape Photography and Post-processing. I'm sure some of that content would more than answer your questions. www.fstoppers.com/elialocardi
Many thanks!
Buongiorno Elia, very good article. Almost covered everything, I am very interested to know more about how you get around the world with your Phantom3. I'm living in China, and soon traveling to Italy for the first time with my phantom. I hope you can give me some suggestions. I have seen your carry on in the pic above. looks just like mine without all the cameras as i have only 1 with 3-4 lenses. At customs and/or airport security have you have encountered any issues? do they just let you by? anything you can share with me to make the traveling with the phantom smooth? thanks in advance !
I would highly recommend the ThinkTank Photo Helipak. I can fit 3 camera bodies, multiple lenses, the Phantom 3, and plenty of extra batteries inside. The bag is slightly larger than carryon allowance but I have had zero problems so far on normal sized planes. Just make sure to board the plane early to secure overhead space.
Thank you for an inspiring review. I have had the P3 for about month now and like it very much. However, when I look at a DNG raw from the P3 at 100%, the resolution is pretty so so. At 200% not good. Is that what you see? Maybe it is designed for the big long views and not much cropping or good resolution expectations. Not any better than a point and shoot. Your thoughts? thanks, gib
Great article Elia. It answered many questions for me. I am saving up for a Phantom 3 Pro at the moment although the biggest hurdle will be justifying it to my wife. What do you consider is the minimum amount of batteries to have?.
I came across this awesome article as I am preparing for a New Years Eve ski tour up a local mountain in British Columbia along with friends, fireworks and a DJI phantom 3. My Pro model is being sent in for repairs and I
Awesome article! I discovered this while researching tips on taking low light shots and video with my DJI Phantom 3. Do you have any tips for me concerning what I am preparing to shoot tonight? It is New Years Eve and I am ski touring up a local mountain in Chilliwack British Columbia with friends, fireworks with the intention of camping enjoying a bonfire and taking some shots of the northern lights with the drone. What settings would you recommend and how far can the minimum temperature limit be pushed? I expect temps in the range of -2 to -6 degrees C with clear skies.
I know this review is from last year, and since then the Phantom 4 has been released. Well, the P4 is out of my budget so I'm looking into the 3 series. Elia, thank you soooo much for this review! I know there are a kzillion other reviews out there but most are written mainly on video performance, I'm a photographer with very little experience with video (maybe I get more into it in the future), and you're detailed write up got me sold on the P3 (particularly the Advanced model). Hopefully I can capture some cool images of downtown Vancouver! And speaking of Vancouver, when are you visiting us Elia? ;)