

All hype aside, what did I learn from putting the brand new Nikon ZR and NIKKOR Z 24-70 f/2.8 S II into the field to make my new series, The Pickup Artist?
I’ve written a lot about the Nikon ZR since its announcement, and I’ve run a great deal of footage through it. But it’s one thing to shoot test footage and another to depend on the product when in front of a client. Every camera has something of a baptism-by-fire moment, when all the theoreticals go out the window and it will have to sink or swim.
I am leaving town tomorrow to shoot an ad campaign, and I’m planning to use the ZR as part of the mix. It’s a hybrid campaign with stills and motion. I’ll be using the Z9 for stills and the RED Komodo for motion. But on the video side, I’m planning on using the ZR for supplementary shots when its small form factor can provide decisive advantages.
But before putting the camera into a high-stakes scenario, I wanted to push it a little further to see if I could get it to break. Because I also wanted to try out a few technical concepts I had in mind as well as put the new NIKKOR Z 24-70mm f/2.8 S II through tests of its own, I put together a new project where I could get more practical use of the products in the field to identify any red flags prior to getting on set next week.
The Basics
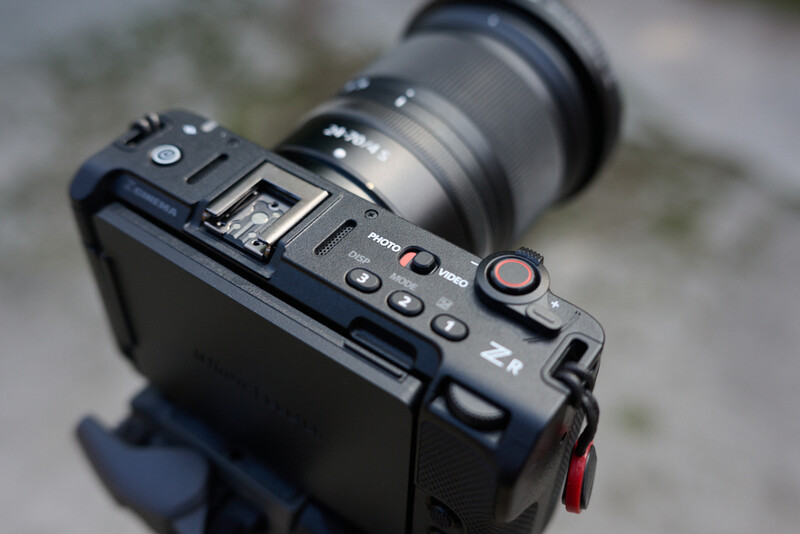
By now, you likely know all the top line specs of the ZR. If not, I’ve got an in-depth review you can check out here. But here are the things you need to know. The ZR is the first collaboration on a body by Nikon and the newly acquired RED Cinema. Its main features are internal 32-bit float audio as well as the ability to record in 6K 12-bit R3D raw video (actually a newly minted variant, R3D NE). It also sports a massive 4 inch folding LCD screen, which I’ll discuss more in a second.
The Z 24-70mm f/2.8 II is the updated version of the classic Holy Trinity workhorse. It is 16% lighter than the original and has internal zooming. This means the barrel doesn’t have to physically extend when you zoom in or out. It’s all internal, which can help in two ways. One, it helps lessen the opportunity to have debris sucked into the lens mechanism. And, two, it can make things easier when mounted to a fully rigged video setup to keep rod-mounted components like FTZ connections properly placed throughout the range. The non-extending lens also benefits gimbal shooters, as it removes shifts in the center of gravity when adjusting focal length on the lens barrel. It has a control ring with a click/de-click switch. Minimum focusing distance is also improved. You can focus to 9.4 inches at 24mm and 1.1 feet at 70mm. Nikon says focusing speed is 5x faster than the original version of the lens with a sound reduction of 50%. I didn’t run specific tests to challenge those numbers, but, in real-world terms, I can say that the AF system performed as you might expect. Rocket fast.
The Scenario
As mentioned, this project was done primarily to work through a couple techniques and tools I plan to use on an upcoming project. That project is commercial and not something I’ll be able to post here for legal reasons. So, you’ll just have to live with this footage from the personal project as an example. As I said, I was less interested in shooting lens charts or trying to break the camera’s dynamic range. Instead, the objective was really to answer the only question that actually matters to me. Will the product help me get the result that I want? And, further, will it do so in a dependable way that makes it easier for me to focus on the art itself rather than harder.
I’ve done a deep dive into specs in an earlier article, so for today I want to get more into the nitty-gritty base details that actually end up mattering in the field.
Size Matters
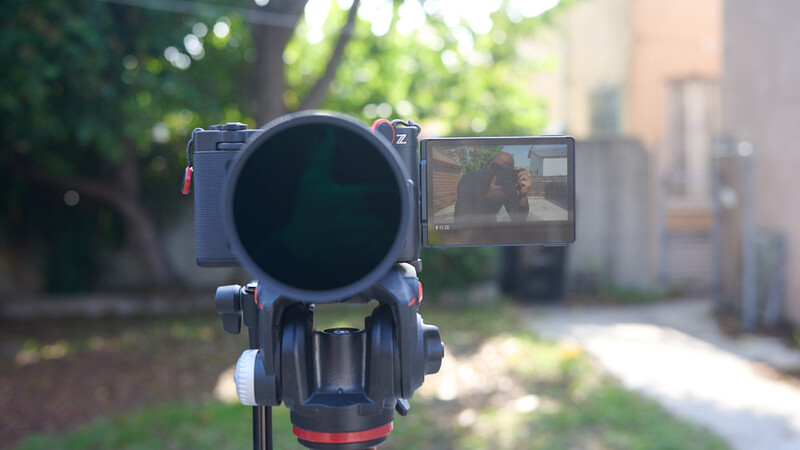
The small size of the Nikon ZR comes with real advantages as well as some additional considerations. I did really enjoy the smaller form factor, as it also allowed me to shoot from a lightweight monopod (with mini legs that allow it to stand alone) as opposed to needing to break out a heavier set of sticks. This was further augmented by the fact that the 4 inch LCD negated the need to mount a heavier monitor to the camera, which may have thrown off the balance. As a result, it took far less time moving from setup to setup simply due to having less weight to maneuver. This meant I could move faster and try more things in a shorter amount of time.
There is, however, a flip side to having a light camera. Don’t get me wrong, the ZR’s small size was a major contributing factor in me deciding to purchase it. I’ve been working with heavier mirrorless bodies and cinema rigs for so long that I was looking forward to taking some weight off my shoulders. But one thing I forgot about is that, with super light cameras, you can also bring back microjitters. The IBIS definitely helps. But almost every super light camera I’ve ever shot with (regardless of brand) tends to come with small, barely imperceptible microjitters. These are small camera shakes that come from the minute jitters made by my own hands. I don’t even notice them happening when I’m shooting, but when playing back the footage I’ll just see these small sudden jerks in handheld footage that can throw off my shot. The movements aren’t grand. Just barely enough to annoy me.
When shooting with a heavier camera body, those microjitters are dampened by the heavier weight of the camera. It’s literally more difficult to jitter when there’s more weight to move. But, with a light camera, there’s nothing holding my hands steady. Again, your mileage may vary on this point. But, since this is a nitty-gritty detail article, I want to mention more offbeat things like that, as they do affect how I’ll end up using this camera. Specifically, I think this is a camera which I would use mounted to a tripod/gimbal more often than I may have originally been thinking. I will totally get more used to the weight and be able to get less microjitter over time. But I think, for a lot of the time, I’m going to want to mount it to a monopod or some form of stabilizer. This, of course, somewhat counteracts the advantages of the small size. Again, I’m not saying I would never handhold it. Just that I think I’m going to end up putting this on a tripod even more than I might have with some of my heavier cameras.
LCD and Micro HDMI
Many early reviews I’ve seen have mentioned that you don’t really need a full-size HDMI with the ZR because of the 4 inch screen. And that theory does hold in a one-man-band situation where you are running and gunning solo. But, if you want to work in a true cinema workflow (as they are billing this as a “cinema” camera), with an AC, clients, or other team members, you are most likely going to want to send a video signal out. Even if only to a wireless transmitter.
Even though I was working solo for this test, there were definitely moments when I would have liked to have sent out a signal to either a larger monitor or a secondary feed. I totally could have connected via the micro HDMI in those cases. But, one, I wanted to test the camera in its most native configuration. And, two, I’ve had such bad experiences with micro HDMI ports in the past that I’m decidedly gunshy about going anywhere near them.
So that meant that I was relying 100% on the 4 inch LCD. It was big and bright. It did work for framing, although one thing I’m hoping all camera manufacturers adopt are the newer bracket systems which allow you to flip the LCD both out to the side and straight back as well. Perhaps I’m just not used to it yet. But I did find trying to adjust my grasp to account for the LCD sticking out where I wanted my left hand/wrist to be sometimes awkward. Not a red flag. Just something I’ll need to get used to. I’d love a way to shoot with the 4 inch LCD tipped straight back from the camera (as opposed to out to the side then back), as I might use the LCD on my Z9. I know such brackets exist and would be a big help for me so I could hold the camera in a more comfortable position when I’m standing behind it.
With that said, shooting and framing with the LCD was fast. I was shooting all interiors, so I didn’t have to deal with much glare. The other day I took the ZR on a fun walkabout at midday and did have some issues with glare (especially with the LCD tipped up and the sun overhead) that had me begging for an EVF, but that wasn’t an issue on this shoot at all. Although there was one thing about shooting with the LCD that I’ll need to spend more time with.

Exposure Tools
I was having a blast shooting with the LCD. I was even enjoying some of the footage so much that I would play it back for my talent on set to show off. But, when I got the footage back to my computer, I noticed a section of it was underexposed. It looked great on the back of the camera but was reading as a stop to 1.5 stops under when I was in my editing bay. I’m not blaming the camera for this. It’s human error. Clearly I was lax in my exposure settings a few times. But, even on set, I do remember noticing that the image I was seeing on the LCD didn’t seem to match with what was showing on the waveform.
I still haven’t fully worked it out yet, but I think what it boils down to is that the monitoring tools work in a slightly different fashion depending on what flavor of raw you are shooting. I think I had the monitoring setup to show me the preview for the wrong type of raw (NRAW vs R3D NE) and that, in turn, was throwing off my waveform.
All of which brings me to the takeaways from using the exposure tools in the ZR. One, I am hoping Nikon will add false color in the next firmware update. I love waveforms. I do. But dialing in exact exposure and lighting ratios I think is a little easier with false color. Better yet, if Nikon can add RED’s stop light and goalposts exposure tools via firmware, I’d be over the moon. In the interim, I think I’m going to start using zebras a lot more than I usually do.
R3D Workflow
Now, the upside of shooting with R3D NE files is that they are very easy to manipulate in post. This doesn’t mean that setting your exposure on set isn’t crucial. It just means that adjusting exposure in post is a bit more intuitive. For that reason, what I’m finding useful is to always shoot at one of the two base ISOs, either 800 or 6400. Shooting outside of those numbers can introduce unwanted noise. I’ve seen some complain about noise in raw video. But I think most of this can be avoided just by understanding a bit more about how RED R3D files deal with ISO versus other formats. Short answer is that, if you stick to one of those two base ISOs and control exposure via lighting/ND filters/etc., then you should get the cleanest images. Then, once inside of your NLE, the R3D NE raw controls operate in much the same way as the R3D files from any other RED camera. You can freely adjust ISO. I find I like this way of working in post because it’s easier for me to get my head around adjusting exposure in stop values. So I can quickly go from 800 ISO to 400 ISO or 3200 ISO, etc. I just personally find that easier to understand and make subtle and repeatable adjustments.
Aside from the workflow, I am finding R3D NE to be my personal favorite of the three raw video formats available in the ZR. Specifically, I think the RED color profiles are what are adding the most. Add that to the R3D workflow benefits, and I think this is probably the format I’ll be using 99% of the time with the ZR.
32-Bit Float
I recorded all audio for my project directly into the camera in 32-bit float. I used the Hollyland Lark Max 2 32-bit float system running directly into the 32-bit float ZR to maintain that across the entire audio chain. Massive speed benefit, as it allowed me to be essentially wireless (aside from the coiled cord from the RX into the mic jack). I said it in my full review, but, even with all the video format upgrades, the thing about the ZR that will likely matter most to my own workflow is the audio.
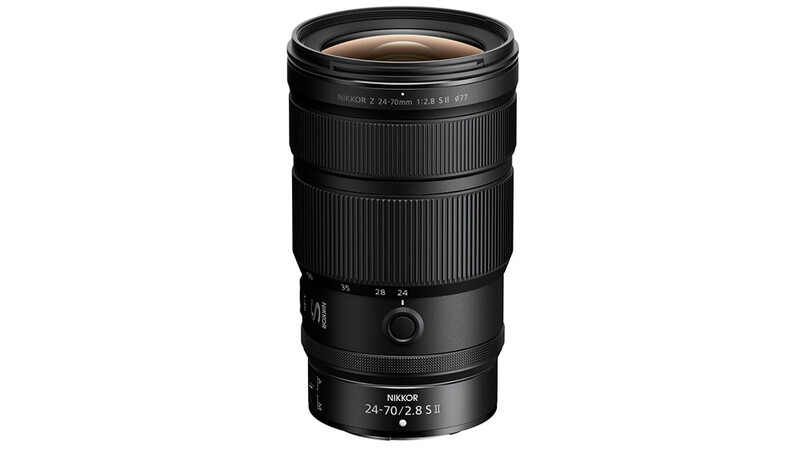
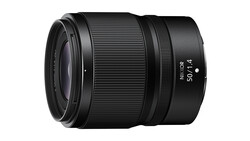
Z 24-70mm f/2.8 S II
If you know me, you’ll know that I very rarely take my 24-70mm f/2.8 off my camera. It’s the focal range that falls within my personal sweet spot. And f/2.8 is fast enough for the majority of my needs. I have the original Z 24-70mm f/2.8, so I was viewing the new version through the lens of the benefits it brings versus the one I currently own.
I mentioned some benefits earlier. The internal zooming is probably the most tangible in the field. If you are someone who is using your camera on a gimbal, not having to rebalance every time you change focal lengths could be a huge benefit.
The other very tangible difference, which I had completely forgotten about until I got onto set, is that the filter size on the f/2.8 II is 77 mm compared to the 82 mm on the original f/2.8. This is meant to help keep the weight of the lens down, which is an advantage if you are starting your 24-70 journey with this piece of glass. I mentioned that I forgot about the changed filter size until I was on set for a reason. Bad Chris. Because my entire lens ecosystem, NDs, diffusion, etc. is already built with 82 mm in mind, that means I need a step-up ring to attach my existing gear to the 77 mm thread. Not a big deal, except that I hadn’t brought my 77–82 mm step-up rings. As a result, I ended up shooting the majority of the video footage on my other lenses simply because I couldn’t attach my filters to the f/2.8 II. I did, however, shoot all of the stills with the new lens.
Nikon is saying focus time is 5x faster with the newer model. I didn’t break out a stopwatch. But I can say that the autofocus speed was plenty fast. This wasn’t an athletic shoot, but there was movement, and it kept up with my subject with ease. I also found the lens to be plenty sharp, speaking from a purely subjective standpoint. Whether it’s worth upgrading for existing owners of the Z 24-70mm f/2.8 is a personal question only you can answer. But there’s no question that this is an excellent lens and the best 24-70mm f/2.8 in the Nikon lineup.
If I were just getting into the Nikon system, I would absolutely opt for this over the original if it is within budget. Currently, the original is about $800 cheaper brand new. That lens is also excellent. So, you can’t go wrong with either choice. With the newer version, you just get the internal zooming and a lighter footprint. Also, to note, the original is shorter when fully collapsed. But, because of the extending nature of it, it becomes longer than the second version at 70mm. The new version is longer to start than the original but maintains its length throughout the zoom range, so it ends up being the shorter barrel most of the time depending on your preferred focal length.
Conclusion
This is more of a hands-on ramble than a full review. As I said, for detailed specs, you can see my previous, more tech-heavy article. For this test, my goal was to put the camera into a real-life situation that I might personally find myself in to discover any kinks in its armor that would make me wary of bringing it with me on my commercial shoot this week. I didn’t find any major issues that would stand in my way. And the good news is that I’m getting more and more comfortable with where exactly the ZR is going to fit in my workflow. As mentioned in the first section, I think I’ll be using it on a tripod more than I had anticipated. And I will be sure to trust the scopes over the image on the beautiful 4 inch LCD when judging exposure. But the images produced by both camera and lens are excellent. Very strong tools that actively enhance my workflow.


Join the Fstoppers community for free
-
Post comments and join in the discussions
-
Browse the site ad-free
-
Share your work and get featured in the community
-
Compete in the photo contests for fun and prizes
2 Comments
I'm seriously looking into the ZR. Not that I need it, but more like I'd just like to see what it can do.
You should definitely check it out. It's a nice additional camera to add to your system. Especially if you are already using an R3D workflow.