
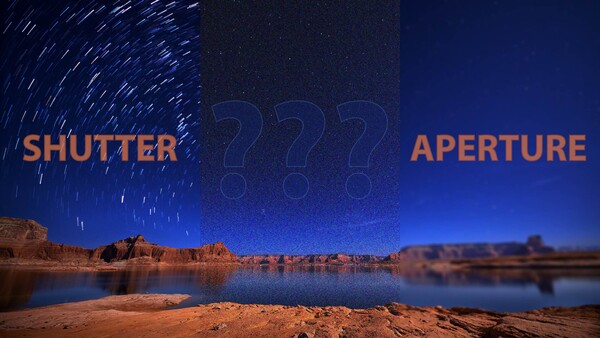
In this article, we’ll highlight a shortcoming of the exposure triangle, one that’s more a relic of film days than a modern requirement, and we’ll see how an exposure “V,” with just two legs, might actually afford us more flexibility and control over our images.
What Is Exposure?
First things first. Let’s start out by defining what exposure actually is from a technical perspective:
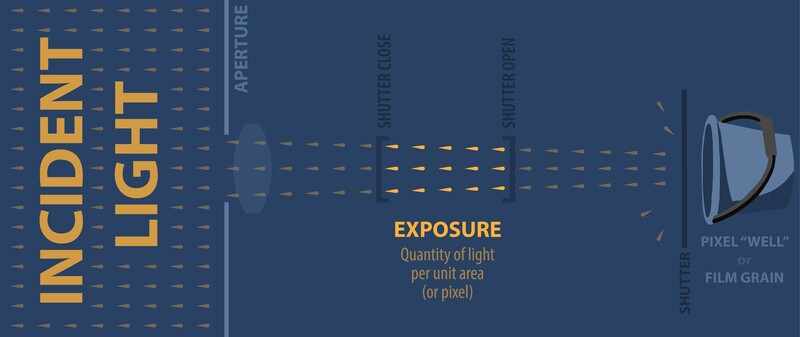
Exposure is the amount of light accumulated per unit area of the film or sensor.
The factors that influence exposure are illustrated in the figure below. They include the intensity of the incident light, the size of the aperture, and the elapsed time between the shutter opening and closing.
That’s it.
The Exposure Triangle
You might recall, however, that those aren’t the three quantities highlighted by the traditional exposure triangle. To the best of my knowledge, the notion of an exposure triangle was first set forth by Bryan Peterson in Understanding Exposure. In the introduction to the fourth edition, Peterson details how this conceptual framework began to crystalize for him in the early 1970s. There, he suggests that the keys to a well-exposed image are aperture, shutter speed, and ISO.
While aperture and shutter speed are included in our working definition of exposure, ISO is not. Why, then, might it have taken such a prominent place in Peterson’s and our collective understanding of exposure for so long?
The Collection Versus Translation of Visual Information
First, let’s distinguish between two different phases in the creation of an image: the initial collection of spectral information and the translation of that information into a form that’s appropriate for human viewing. The initial exposure of the film/sensor is related to the former. It’s during the exposure that information about the incident light within a scene is captured by either a photosensitive film or an image sensor. Visually inspecting either media immediately after an exposure (assuming we could do so without altering the information it held) would be wholly uninteresting, however. A digital sensor does not look like a little facsimile of a sunset after a shot taken at the beach.
Before it can be appreciated by the human eye, the raw chemical or electrical information that represents the scene needs to be translated into a different form. This involves a couple of steps, regardless of the target media: signal amplification and color gamut translation.
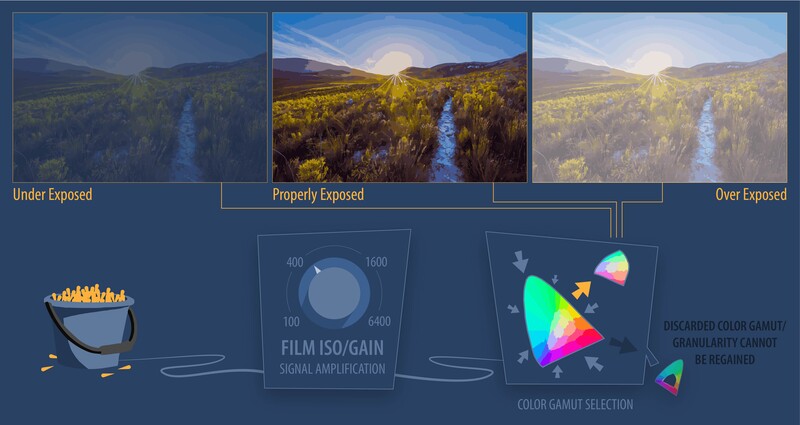
When shooting a film, one chooses both how the signal will be amplified (ISO) and how it will be rendered in color space when they load a particular type of film into the camera (Kodachrome 200 versus Velvia 50 versus Black and White Ilford 3200, for example). The same is largely true when shooting straight to JPEG. There are often a few options in addition to ISO (think white balance), but the same premise holds. One selects how the raw signal will be amplified and translated into the final visual color space even before the image data is collected.
This has two important consequences. It means that:
- The same gain (ISO) is applied uniformly across the whole image.
- The color gamut is reduced before any image editing takes place.
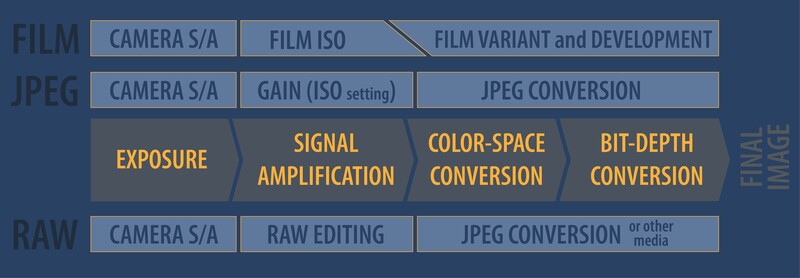
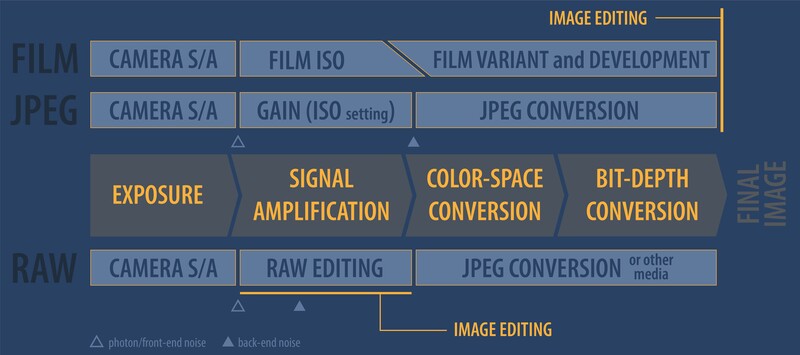
The figure above lays out these steps in more detail, along with their relationship to three photographic workflows: shooting to film, shooting straight to JPEG, and shooting to raw. Four stages are highlighted:
- Light is physically collected by the film or sensor during the exposure process, where the amount of light acquired is determined by the intensity of the incident light along with the camera shutter/aperture (S/A) settings.
- This signal is amplified according to the choice of gain the photographer makes, whether through the selection of film, the ISO setting on the camera or as part of the raw conversion process.
- The result is converted from a broad environmental/working color gamut to the reduced color space of the final media.
- The granularity of the color channel information is reduced to that of the final media as well (film, print, monitor, etc.).
What’s critical to note is that in the first two workflows, any image manipulation occurs only after signal amplification and color-space conversion (this is highlighted in the figure below). The early choice of ISO fundamentally constrains what can be accomplished in the final image. This is why ISO played such a central role in the early exposure triangle and why it should continue to do so when shooting to film or JPEG.
Digital Sensors, Shooting Raw, and the Exposure 'V'
Shooting to raw, on the other hand, allows some or all of the signal amplification to be moved from the film or camera to a raw converter/editor. In doing so, it allows sophisticated image editing tools to be fully integrated with the signal amplification process and any color/luminosity manipulation to be performed before color-space/bit-depth conversion. I’ve written previously about why this can be critically important.
Further, signal amplification under this paradigm need not consist of a single level of gain (ISO) applied uniformly across an entire photograph; rather, the gain can be varied selectively within different portions of an image based on a plethora of additional information, including both the global and local distributions of color and the artist’s detailed vision for the final product. The Shadows and Highlights sliders in Lightroom or Capture One, for example, do precisely this as well as any adjustments applied with a mask.
So, what’s the catch?
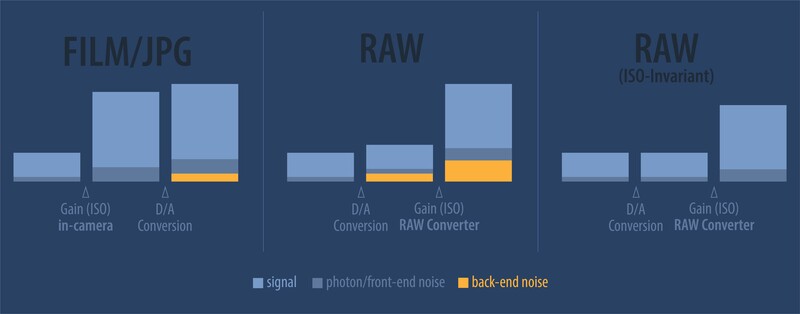
There is, technically, a difference between adjusting the ISO in-camera and applying the same gain in a raw converter. Before the signal from the sensor can be exported from the camera, it must be converted from analog to digital. The process of reading and converting the signal to digital can introduce back-end read noise, which is then amplified by the raw converter along with the actual signal. This is the reason for the slight difference in noise level that Lee noted in a previous article when he compared the use of in-camera and raw-converter-based exposure adjustments.
As the amount of back-end read noise is further reduced on modern sensors, we’ll eventually get to the point where it truly doesn’t matter whether the amplification is done in-camera or digitally, where the process becomes ISO invariant. This is already effectively the case in many situations. As cameras become effectively ISO invariant, the ISO edge of the exposure triangle fades away, leaving an exposure “V.” In this case, all images can be made at the camera's base ISO, minimizing any potential for highlight clipping and precluding the need for a single level of gain to be applied across the whole image. The result is a lot of additional flexibility, in terms of both shooting and editing images, at a minimal cost.
Camera Settings
How might a camera be set up to take advantage of this potential flexibility?
At this point, I almost always have my camera in manual mode to make it as easy as possible to adjust both the shutter and aperture, the two critical components of exposure. Setting the ISO to Auto, then, allows it to float, performing some of the amplification in-camera before any back-end read noise is introduced (the best modern cameras have very low back-end read noise, but it's not zero). By pairing this with the highlight-weighted metering mode on the Nikon Z 7, it’s possible to minimize the likelihood that the in-camera amplification blows out any highlights, essentially doing as much amplification before any back-end noise is introduced without cutting any information off in the bright bits.
In scenes with a wide dynamic range, this can render the EVF preview fairly dark. Disabling the “Apply Settings to Live View” option on the Z 7 makes it possible to see what the camera’s best guess at a nominal exposure looks like which can make composition easier (this apparent exposure isn’t applied to the actual image capture). Note that on the Z 7, the depth of field preview also applies the actual exposure settings to the live view. If you set this as one of the custom function buttons, it's easy to toggle between the two preview modes. Similar functions exist on other brands' cameras.
Also note that if the camera automatically sets the ISO to its base value, it may be an indication that the combination of shutter speed and aperture is likely to result in some highlight clipping and that the total exposure may need to be reduced (if you want to fully preserve the brighter areas). That’s not an ISO constraint, but rather a warning that you’re running up against a fundamental limitation of the sensor. In many/most situations, however, too much light isn't the issue!
If you haven't shot much in raw mode or haven't had the chance to experiment with low-ISO captures and editing, you might try playing around a bit. You might just find that you have one less thing to worry about than you thought you did!


Join the Fstoppers community for free
-
Post comments and join in the discussions
-
Browse the site ad-free
-
Share your work and get featured in the community
-
Compete in the photo contests for fun and prizes
10 Comments
What the heck? Every time, I see that you published an original, I know there's something new to learn. Great idea and incredible background knowledge, Thanks!
Thanks Nils! Hope you guys are doing well!
Very well written. Unfortunately for me, this means buying more equipment to be able capture RAW video....
Yea, just starting to shoot a little video. It's always a little frustrating thinking, "Man, if this were just a RAW file, I could .... !"
Interesting but maybe over-egging the sauce. Maybe I am missing something but this seems to me no different in actual practice to shooting raw, protecting your highlights and using as low an ISO as possible.
I'd be interested to know what the actual real world benefits are. Does this approach result in a 'better' image? If so, in what way?
Hey Nick, really appreciate the comment.
I was trying to hit a couple of target audiences. For the more advanced photographer, such as yourself, I was hoping to make a couple of points ( ... may not have done as well as I could have). First, even if someone's been shooting RAW for a good while, they may not realize just how much flexibility they've got at their fingertips. Maybe they've tried underexposing by a stop or two, but were fearful of going beyond that. Perhaps they hadn't realized that they might actually be able to get away with underexposing by five or six stops (or more) in some circumstances. There may be an unrealized potential for gains/flexibility that they haven't taken advantage of yet. Second, as more of a point of interest, I wanted to draw a connection between something the community often takes as foundational knowledge, the exposure triangle, and the ways technology may be changing that. That shift in perspective might, further, help more advanced photographers mentor less experienced folks, say, by providing them with a more wholistic understanding of exposure and editing from early on.
The second audience I was hoping might see some value are photographers who are still a little earlier in their career/hobby, who maybe haven't switched fully to shooting RAW (if that's the path they'll eventually want to be on), who are still diligently contemplating ISO settings and the exposure triangle for each shot. Those folks might find there's a little different, more flexible, way of thinking about exposure that could be beneficial to them now or in the future.
From even a quick glance at your profile, I get the impression the latter category isn't you. Love your work!
Thanks Brent. Yes, fair enough. I have never actually owned an ISO-invariate camera so have not seen how far they can be 'pushed'. I know the theory, but have not seen for myself.
One aspect you didn't mention was that using a variant of your approach allows the use of higher shutters than might be expected. This can lead to sharper pics with more DoF. One of my colleagues (Alan Shaller) takes this approach when using the Leica M-Monochrom.
I have long thought that the term "exposure triangle" was a misnomer, because ISO doesn't really have to do with how much light the sensor is being exposed to. I am glad that you explained this truth explained in such a clear, logical manner.
Thank you.
I have always seen the exposure triangle as a base point for creative decisions. Interchanging preference of motion freezing, depth of filed and noise. Pulling each part up or down to create the required outcome. This then becomes very useful practice when doing daylight mixed flash. I'm not sure using exposure correction over pre A to D gain is a great idea. I know some sensors use a base iso and just set the selected iso in meta data.. Getting the exposure bang on is the best thing to do..
I’m not sure I get the overall point. You use the exposure triangle to get the image right in camera. If you have blown highlights you reduce the brightness which potentially darkens areas of the image than can be restored in processing because a lot of cameras are ISO invariant. Not sure what’s new in this proposal. Exposing to the right helps ensure the most data is captured. I don’t think the wheel is being reinvented.