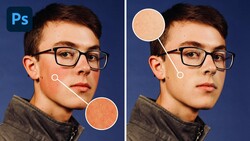
I know that many of our readers are real estate photographers or have at least tried their hand at real estate photography. The most common method used to create 'good enough' real estate photos is HDR: whether it is tonemapping or exposure fusion, HDR is definitely the most-used method for real estate and beginner interior photographers. In this post, I'll do a comparison between tonemapping, exposure fusion, single on-camera flash, and multiple off-camera flash, and show you the benefits (or disadvantages, rather) of each.
I've been shooting and writing about architecture, interiors, real estate, and generally everything that needs to look pretty but cannot be moved for awhile now, and it seems every time I post an article related to my field(s), there are plenty of comments debating the use of HDR and the use of flash in the comments. Flash users insult HDR users, HDR users insult flash users, everyone cuts a knee open, and everyone goes home disappointed. It is as dependable as the sun rising and setting - I honestly cannot remember any time when it hasn't happened.
So on a recent shoot, I was presented with a perfect scene to demonstrate the differences between methods, and (here's the important part) remembered to shoot it with this article in mind. I bracketed for HDR, shot for the highlights, the shadows, shot with flashes, shot with flashes again, and then moved the flashes around and shot again, just because I wanted to leave no stone unturned.
So let's get to it, shall we? I know this is real edge-of-your-seat entertainment, so hold on tight.
The Scene
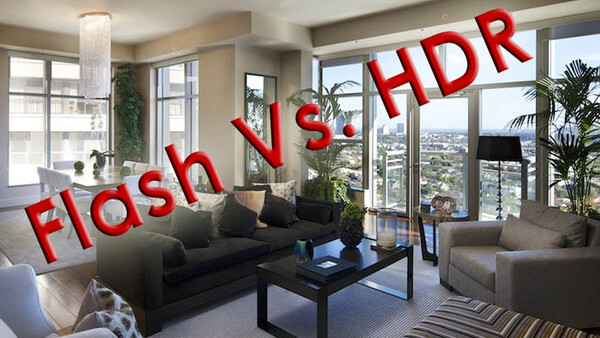
Let's get a feel for what we'll be working with. I was recently contacted to shoot this neat apartment in Westwood, Los Angeles, CA for a client of mine. Now here's the fun part: I had an hour to create 10 images. That hour included unloading a huge Pelican case, scouting it, chit-chatting with the client to exchange ideas, and shooting it. I managed to finish early which allowed me to set up my little test and spend ten or so minutes on just this scene.
Here is a single exposure of the scene as my camera sees it. I dropped it on a tripod, spun the dials until the exposure meter was centered, and clicked off a frame. This is what resulted:

It's about 2pm and sunlight is streaming in those floor-to-ceiling windows like crazy. No camera would be able to capture the deepest darks of that couch and the brightest brights of the exterior in one image in these shooting conditions. I'd bet my business on it.
If you're familiar with the LA, or any other high-end real estate market, you're well aware that the view here probably cost multiple millions of dollars, and letting it blow out isn't going to make anyone very pleased with the photos. So we'll need to make sure that we expose both the darkest darks and the brightest brights properly. Sure, we can just expose for the windows, but we'll get something that looks like this:

And for obvious reasons, we can't deliver that, either. We can expose for the interior:

Which might be deliverable depending on the circumstances, but really, it's quite far from anything that I would even consider delivering. This would at least be useful as a scouting photo, but it still fails to accomplish what we're being paid to do: to show off the interior and exterior views of this gorgeous apartment.
So in order to show off this space in the best possible way, we've got a couple options. Let's start off with...
Tonemapped HDR
Loved by many, vocally hated by just as many, and used by everyone at least once in their careers, Tonemapped HDR is certainly one way to go about things. Tonemapping is what most people think of when the phrase 'HDR' is mentioned: those radioactive landscape scenes and, um, "artistic" renderings of city scenes are some popular applications for tonemapping:

Apologies to all Tomcat lovers around the world for that one. Usually, tonemapped HDRs are created by shooting three or five exposures spaced one or two stops apart, which are then merged together using a program like Photomatix. Using tonemapping can create some passable results, but the images quickly fall apart under scrutiny or enlargement. Here are the three images I used to create my tonemapped interior shot. One is, according to the camera, two stops underexposed, one is properly exposed, and one is two stops overexposed. In other words, a typical, run-of-the-mill application of HDR.
And after loading the three images into the Photomatix engine and playing with the result, this is what I was able to come up with:

At first glance, it's not the worst thing in the world. We've got details out the window, details in the interior, and we can tell what's going on. I guess if you were being paid $100 and the client expected you to shoot with a potato, you'd be in the clear. But upon further inspection, things really start to fall apart. The sky is a muddy mess with clipping everywhere, and there's no real saturation or crispness due to the overexposed frame being entirely blown out in that area. The colors in the interior are incorrect (especially from the lights - tonemapping loves to oversaturate warm colors) and the transition between the interior and exterior around the windows is a bit rough. The shadow noise is also a bit unruly at 100%, but like I said, it's not the absolute worst real estate marketing photo ever. I also spent way too much time massaging it in post to get it to look like this, and I can imagine that it's very easy to screw something like this up if you aren't very familiar with Photomatix's controls.
Exposure Fusion HDR
Another popular method for photographing interiors is to use Photomatix's Exposure Fusion program. This (in very unscientific terms) uses a different blending algorithm to create a more natural result, but at the expense of creative control, which may actually be a good thing. Exposure fusion averages the exposure across the scenes and takes bits and pieces from each exposure to create a more life-like image. Using the same base exposures, I was able to come up with this:

Which is a decent improvement from our tonemapped shot. Still, there are a number of issues with this shot. Try as I might, I wasn't able to pull out the window view to get it to look the way it really should (well-exposed, good visibility) for a property like this. I could split a few more hairs, as well: the contrast in the scene isn't really what I'd call ideal, and it's kind of muddy overall. It doesn't really scream "this is a high-quality, sharp, snappy marketing image that I'd want to print out for a magazine article to sell my expensive piece of real estate."
Again, I spent some time in Photomatix pulling and pushing the sliders to get this to look as best as I could. If you were really devoted, you could bring this into photoshop and replace the exterior scene with a properly exposed one. But unless you're getting paid a significant amount, it's just not worth the time to mask out all of those details or pull out your hair dragging the pen tool around the screen for thirty minutes to do so. As Sweet Brown would say, "nobody has enough time for that."
A deliverable shot, to be sure, given the right budget and client. But as I said, there is a lot of room for improvement. So let's try another method: the flash.
On-Camera Flash
The single on-camera flash is another approach to this type of photography that I frequently see being used, oftentimes with utterly disastrous results. There are times where it can be perfect, however: in small rooms with white walls and big windows, a little kiss of light from an on-camera flash can really help to fill things in and add some sparkle to run-n-gun real estate photography. But in a challenging situation like the one we are faced with in this post, well, I'll let you be the judge:

Okay. So it's a Xerox, essentially. All of the information is there, presented in a very ugly format. But it's there. There's some light on the scene, you can see what's going on, but...dang! That window is still long gone. My flash is already at full power, ISO 320, f8, 1/80th, bounced right into the ceiling. I'm letting some of the ambient light from outside fill in the scene to add some natural light and fill. But I really want to see that view, so what do I do? I bump up my shutter speed, which effectively puts me right at the edge of my sync speed and also kills all of the ambient light's filling effect. Which gives us this:

So there's our view, but we have completely destroyed any sense of ambience in the interior. Gorgeous, eh? Keep in mind that the flash is on full power here. That is one dark interior, and I can't go any higher on my shutter speed or I'd cross the sync speed and lose a significant amount of flash power. I could bump my ISO or open up my aperture to increase my flash power, but again, I can't make my shutter speed any faster because of the sync speed limits, and that would negate all of the gains granted to me by bumping the ISO and changing the aperture.
That light, though...is just...so...ugly. Yuck! How can we improve it? By using...
Multiple Off-Camera Flashes
Keep in mind that I had an hour to create ten images (plus details and vignettes, which I shoot with a prime lens, hand-held usually) for a client that called me at the last minute of the eleventh hour. This was a great client, so I wasn't going to say no, and I was compensated fairly for my time and expertise. Yet I still wanted to create the best results possible given the time constraints, without resorting to HDR or shooting single exposures.
On my usual and ideal gigs, I usually shoot eight to ten images per day using multiple off-camera lights, and, often enough, I have an assistant helping out to speed things up. As you can imagine, I wasn't able to spend that much time on each image here (2-3 minutes at most). But I think that the results speak for themselves: the window view is crystal clear, the interior looks relatively natural, the colors are all correct, and the shadows and transitions are natural and smooth, unlike all of the other methods I've touched on. I will admit that I cheated a bit here: I had to crop out the edges of a pair of umbrellas and crop down from the top of the frame to conceal a minor hotspot. I pulled some shadows and pushed some highlights in Aperture, and of course added the usual contrast and saturation. In reality, I spent no more time in Photoshop/Aperture caressing this image than I did on the HDR images. All things considered, however, the minor cropping and 'cheating' here produces a much better result:

Of course, it's going to take time to be able to effectively light a dark interior in a way that captures every necessary piece of information in order to entice potential buyers. It's not an overnight solution, and there is always room for improvement. I'm not 100% happy with the quality of light that I created in my final image here, but I spent all of ten minutes on this scene for results that, to me, appear to be the clear winner in the quality and deliverability categories. If I had more time I'd love to play with the composition, different lighting setups, using scrims and cookies, and all of that fun stuff to make a really killer image. I might even kick around for a few hours until the sun started to set to get an amazing twilight shot, but alas, I did not have that liberty on this shoot.
Conclusions
Four methods, all of them producing unique results. Do I believe that HDR and on-camera flash have their place? Absolutely. If you are just starting out, it might help to ease into interiors and real estate photography by using HDR to learn how to compose, get comfortable with the dynamic range and limitations of your camera, and realize how they can be improved. From there, slap a single flash in the hotshoe and master that. It might be ugly for awhile, but it will only get better in time. From there, I'd suggest making the jump to off-camera lighting. Can you create great images using HDR and exposure fusion or other methods that I haven't mentioned here (for example, manual blending in Photoshop)? Yes, and people do. I may or may not think that those people might be insane due to the amount of time they end up spending in post, but they do. I also enjoy the fine control I can have over a scene when I am the one who is creating the light and mood, rather than being the one who is trying to work within a set of boundaries imposed on me by the scene. The more control I have, the better, but that is another article for another time.
If you're on a time limit and don't feel comfortable juggling five or more speedlights, then by all means get familiar with HDR and its Exposure Fusion engine. You'll need to know the limitations of the program and what kind of scenes it will struggle with, such as the one in this post. But don't let me mislead you: there are many situations in which HDR can be applied and used to great effect, it's just that there are some situations where it definitely would not be my first choice.
Everyone has their preferences, and I've tried to lay out each method in an unbiased format so you can make your own decisions about how you shoot your interiors or real estate photography. But for me, when it comes to quality, my time, and pleasing my clients, it's off-camera flash every time. Do note that architectural and commercial photography differs greatly from real estate photography, and a bit beyond the scope of this article.
Here's a side by side comparison of HDR and Flash, to wrap things up. Note the snappy contrast, which was only bumped the slightest bit in Aperture. The lack of bloom around the windows, the smooth transitions, controlled dynamics and life-like colors of the flashed version when compared to the HDR version.

If you would like to see more of my work using off-camera lighting techniques for real estate, architecture and interiors, head on over to my website at mpkelley.com or check out the strobist article detailing some more of my techniques and work. Those should give you a good idea of just what is possible with lights when it comes to shooting this genre of photography.

Join the Fstoppers community for free
-
Post comments and join in the discussions
-
Browse the site ad-free
-
Share your work and get featured in the community
-
Compete in the photo contests for fun and prizes
93 Comments
Thanks, very clear and well explained. I would however like to know more about the settings and placement of the speedlights if possible, that would be useful.
agreed, would be nice to see how your off camera lighting impacted the scene :)
i agree, this article was super informative but i'd love to hear how you set up your off camera lights :) awesome job by the way, your work is amazing!
Nope... not this time.... im not saying anything
Turns off fStoppers.
I'm interested to hear what you would have to say.
After checking out your portfolio, I think it's safe to say that your comments or opinions aren't really worth anything anyway. No big loss to the world to see you go.
I don't know what you're talking about; his interior and architectural portfolio are pretty good.
Bill, lets see your work then, dont hide behind a "no face" ive been shooting interiors and architectural images in Europe for over 6 years, been a photographer for in excess for way over that. My qualifications in the London market speak for itself.
Wow, arrogant much?! What a pompous douche.
Max i apologie if it comes across as that as im far from it but judging by Bills other posts i think its perfectly reasonable to back my background up and defend myself, Criticism is always part and parcel of the job-but its only fair if your willing to offer up examples of your work....and only fair i back my stance up in the process.
Max hit this one on the head. Pompous. Anyone that comments by saying they can't even be bothered to comment, is a douche. You're basically saying "I'm a big deal, and my opinions are important." Sorry to break this to you, but your name doesn't mean anything to anyone here. Do something better than sub par for once, and maybe people will care.
Wow, Bill could you be anymore arrogant and Pompous. Who do you think you are Bill92? Sorry to break this to you but your name doesnt mean anything to anyone on here either-youve not even the guts to show your work to people. Youre just a bully who only ever posts negative comments or tries to provoke and bait people. Why dont you do something better with your life. Douche
James,
I'm not sure why you feel that way. I didn't come out and say 'HDR is the devil and should never be used,' I simply stated that in all situations, it isn't the best solution - there are definitely times that it struggles and other methods would be preferable - this situation being one of them, and there are many situations where it is applicable, but flash is, in my opinion, more applicable in more situations. If you would like to write a counter-article or walkthrough detailing how you use HDR in a similar situation, I would be happy to publish it on Fstoppers for you. Contact me if you are interested. Yes, you will be compensated for your time.
Mike, I'm shocked at the offer to post a counter article...what a guy! James, I'd be all over that one if I were you.
I've been using HDR for three years and feel like I've got a good handle on things. Like all things though, if you find yourself able to do something in your sleep- in this case HDR- like me, it's time to move on to more advanced workflows. I scooped up four speedlites and pocket wizards to match...looking forward to leveling up in the real estate photo game. Thanks for the article, Mike.
-Tim Furlong Jr. | realestatephotography.pro
Canon 5D Mark III
Canon TS-E 17mm
Hi Mike.
Sorry, i think we are actually on the same page. I have no issue with the article or the way you have written it my issue is that the fstoppers "interior and architecture" posts on here are largely American focussed. My "im not commenting" isnt to do with your final assessment its to do with using HDR at all! I dont want to be drawn into another pathetic argument where no one believes what i say on here (like last time). Last time i tried to explain the methods we use in London no one believed me at all and then you end up getting silly posts like Bill92.
I have countless conversations following this post with European RE photographers and lighting technicians and that "the most common method used to create ‘good enough’ real estate photos is HDR: whether it is tonemapping or exposure fusion, HDR is definitely the most-used method for real estate" is not simply true over here.
I have always used flash or even if architectural spaces no flash, no photographers i know that shoot in the London Real estate market shoot HDR, ive never met an architectural photographer over here using HDR and the magazine guys use mostly natural light and one soft box. Ive worked for three of the biggest Real Estate agents in London in a 6 year career and i also do work for a massive American company who simply dont accept HDR. Mike Haggis recent post on shooting Real Estate without using HDR or strobes is a great example of how we (largely obviously cant say everyone) shoot in London ive just simply never needed it!
Thanx for the article. Some very interesting points. And for the short amount of time you have put into the final image, it looks already very promising. I assume you'd probably go ahead and try to pull the sofa out of its swamp of darkness with an additional light or two. Also, I'd probably wait a little longer, so it wouldn't be as bright outside and the warm light from the lamp(s) (and slightly gel'd strobes) would have a bigger impact on the interior then the cold light from outside.
This was an excellent article, kudos to Mike. I appreciate his point of view, and admire the skill in his final image. Nevertheless, the presentation of HDR was not quite fair. Better HDR results are possible than Mike showed, with less post-production work than he reports. Also, Mike says he "spent all of 10 minutes" on this shot for his multi-light technique, felt rushed having only an hour to produce ten images of a small apartment, but that on his "usual and ideal gigs, [he] usually shoot[s] eight to ten images per day using multiple off-camera lights, and, often enough, [he has] an assistant helping out to speed things up." Eight hours for 8-10 shots, with an assistant, means two onsite man-hours per setup for his highest quality work. For those of us who need to shoot much faster than that, without assistant, multi-light techniques aren't always an option. If HDR looks as bad as what is shown here, you're not doing it right. A good HDR setup of this scene would take about 2 minutes, not the 10 minutes Mike reports for a multi-flash setup, and he's an expert. That adds up over a large shoot. Used skillfully, HDR can fill an important niche. It comes close to the production speed of ugly light from on-camera bounce flash, while offering a reasonable portion of the quality of magazine-grade multi-light techniques. That's important for clients that do not have budgets for an all-day shoot. A lot of people are happy paying 20% of the cost to get 80% of the quality.
I can't help but agree. I'm curious to know how the author knows he applied a good HDR technique in order to make this comparison with flash photography, where he obviously has more expertise. I have been dabbling in both flash and hdr, and I am nowhere near an expert, but I would not tonemap or touch photomatix at all for a natural look. (I would also shoot with 1 stop increments starting from -3)
Thanks Dave! A very balanced reply...you've stated much of what I was prepared to write back to Michael about re: his post...thank you!! A RE photographer must balance many variables, not the least of which is the limited time that an agent has to sit around the property waiting for the photographer to finish. I have used HDR exclusively for my RE agent clients and they've been thrilled. One of the realities that doesn't get mentioned (and I'm not sure if it's the same in the US as it is in Canada where I'm from) is that the final product delivered to a realtor ultimately goes up on an MLS listing, as well as their own personal website - both of which usually don't provide a platform to have the viewer appreciate the enormous amount of skill/work involved to get a RE shot ready. If you're shooting for an architecture mag or an interior decorator where hi-res/hi pixel images are a must, then yes, multiple off-camera flash, intelligently used is probably the way to go. But for many realtors only need no more than 980x653 pixels at 72dpi, Dave's comment about 80% of the quality for 20% of the price is bang-on!!
As a post-producer I do a lot of this type of work. The photographer usually just gives us all the exposures he can get, and we then proceed to merge them all together by hand in Photoshop, usually requiring to select with the pen tool all the windows to show the other exposure, and lots of times even replacing the sky because most clients want clear blue skies to avoid a "wintery" feel. We've tried HDR several times, but the results are just unusable. And if they are, they usually take more time to fix than to do it by hand in the first place.
But anyway, this is for a more refined final image, as it usually takes an hour per image.
Would have loved to see a setup shot of your speedlight placements.... just sayin...
Very nice article. The descriptions of the images are well done. Thanks for sharing.
Although it's not what people commonly think of as HDR, manual hand blending is HDR, as in simulating High Dynamic Range. The guys who are good at the manual blending can do it in less than a minute. Check out Charles Lynch on flickr. As Mike mentions all are good tools to have in your wheelhouse.
I have one question, I don't like HDR done by the software, but have you ever considering shooting 2 exposures one for the interior and one for the windows, and just masked the windows out in photoshop? Might be time consuming but I get great results... even though you got great results with the lights, but in a situation when you dont have time I think it could be a better solution than traditional HDR.
"I was compensated fairly for my time and expertise". - I'm curious what amount that implies?
Also the side by side comparison of HDR and Flash - I would have rather seen a rollover comparison or just both complete images above and below each other. It was very anti-climactic to look at and try to decipher. That said, I don't generally care for HDR. I have the NIK app, but I use it in situations that warrant a different effect than Enfuse, or blending by hand with masks. But thanks for posing the question of which to use. I'm sure it will get more responses!
John,Great pictures on your web site!
I also like the light in your food shots!
Thanks Thomas! My food work is mostly ancient and needs more current styling i.e., shallow DOF and less is more.
Im drawn to your Black and White work. Some really lovely stuff.
Great article!
I don't like when the windows are washed out. And many times it is not possible to get the right result with just HDR.
Therefor I always use my Speedlights.
See comparison here:
http://thomasengstrom.com/baobab_comp.jpg
The hotels promo shot is way better than yours. Sorry. The last thing a hotel needs is a cramped, skewed room that looks like its in the middle of a laser light show.
They bought my picture after comparing the two.
I guess I did the right thing - since I got paid for the picture.
it doesnt look as if its the same room at all !!
And you have made the room look much smaller.....
Im think they must have bought the picture out of pity.....
Your perspective is very bad Im sorry to say
People pay for bad photography all the time. Just because something has a price tag doesn't mean it's good.
you are clearly just a troll or have a horrible eye. Thomas's image is MUCH better
Yeah, my eyes are pretty horrible. I think I was blinded by the overuse of flash in Thom's photo.
Damn, you guys (assuming you could be the same person?) are just sour grapes. Grow up! Instead of bashing T.E.'s results, why don't you show your website(s) so we can see what wonderful things you do? And show your solutions to this situation. So instead of shooting with a 16mm, he used a longer focal length and shot high and shifted down. Although I probably would have been somewhere in between the two views, there's no need to bash him for getting paid by a client that approved his work!
Nobody is bashing him cause he got paid. He's getting bashed for trying to show off, and being delusional about his ability.
Well here's your opportunity to put your money where your mouth is and show us all how it's done! Otherwise, like my grandmother used to say, "If you don't have anything good to say, don't say anything at all"!
Here's something good to say. The original photographer did a great job on his shot. Showcased the room in a well executed and professional manner.
Personally, I would've suggested to the client to shoot it at dusk to have less contrast from outside to inside. I know there are time constraints, but if the client wants the best end results sometimes they're willing to bend and take the advice of the professional they hired to get the best possible results. That said, I'd still like to see a bit more "info" on the interior. I realize this is an extreme contrast case, but I think more strategically placed lighting would bring out the detail a bit better in this scenario. IOW, I don't envy Mike for having to pull off this shoot under these conditions, but just maybe he could have gotten his client to stretch if he asked. However, shooting it the easier way wouldn't have made for such good controversy, ha!
Hey Bill. Lets see your portfolio. You talk a lot of game but I haven't
seen one single picture. You are entitled to your own opinion but
realize that everyone has different taste.
yeah, was this room remodeled? the painting is gone, the lamps are different, even the shelf along the left was is different.
The pictures were taken before the hotel was finished. This was the model room that they changed during construction. Therefor the changes of lamps and painting.
Living in Prague (Czech Republic) and I just got a request from a hotel to shoot their rooms at the same style as Thomas'. Google KNA Design and see for yourself -it's the style they are aiming-. Wide angle and light 'as it is' is history, I believe.
KNA Design actually knows what they are doing. There is a huge difference between what they do, and what Thomas has shown here. If your client is expecting KNA calibre, you better not deliver Engstrom as an equivalent.
I agree with you 100%. Way better and more interesting shot. The outside is a bit took dark for me - looks maybe a bit too much fake. But all in all, i really like it.
My 2 cents:
While your photo is much more artistic and nice looking, it fails to do the job. The job is: show the room! We aren't trying to show our 3D renderings but the size, structure, theme, design and feel of the room.
The hotel's photo, unlike yours, doesn't break some fundamental photography rules too.
So far it's 50-50 between both photos.
The hotel rooms photo, taken from the same angle, with open curtains, bracketing, off camera lighting would have had the same elements you had in your shot to make it artistic + do its job of showing off the room.
More often than not, photography is a personal taste. So in this business we MUST do what appeals to the larger percentage of the Macdonalds eaters.
Hi Бублик,
As a commercial photographer you are sometimes in the hands of the client.
They saw the shot I took. Bought it and published it at the time. I might have done it a little bit different if I would have used it for myself.
Today - 6 years later - I hope they would go for something different when it comes to lighting.
I photographed a "back packer's hotel room" for TUI ( Europe's leading travel group) a few years back. They couldn't use my pictures. It didn't show the room, they said.
It showed a "Three star hotel room". So sometimes adding light to a room can make it look much nicer than it is. My bad.
/ThomasinLA
Come on! Just stady how to work with flash and buy radio slaves!
I'll take a guess at where the off-cam flashes are...one in the chandelier over the dining room table...one bounced against the wall on the left side, one behind the chair on the right aimed above the window.
What puzzles me is the natural light highlights still stayed the same...usually, with off-cam flash, you'll have different lighting edges from where you placed the flashes...