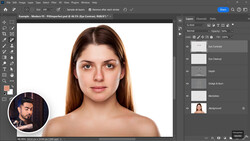
Michael Woloszynowicz is a great photographer and retoucher. Not only that, but he is a great instructor. His videos always provide clear and detailed instructions on techniques many of us want to know. Recently, Michael released this video regarding the issue of color casts on models. Although Photoshop offers many tools to get close, this method is a truly a brilliant way of thinking.
Being able to utilize color theory, the effect is natural and subtle. Most great retouching techniques implement gentle and subtle approaches in order to get to the end result.
Although we see the use of a portrait in the video, keep in mind that this technique can be used for any type of image. If you ever have an issue with a color cast coming into the frame from an outside influence, this will take care of it.
Check out more of Michael's videos on his YouTube channel. You can also stay posted on his work and future videos on his Facebook page.
[Via Vibrant Shot Photography]
__
Also as a quick heads up for anyone interested, I will be teaching a few retouching classes at the Fstoppers Workshop in the Bahamas this May. I'll be going over my workflow and techniques that I use on a regular basis. I kept the cost of my class low so that everyone can make it out. Check out the details here: https://fstoppersworkshops.com/pratik-naik/. Come out and spend some time with us, you need that break! Check out the promo video on what you can expect at this year's workshop!


Join the Fstoppers community for free
-
Post comments and join in the discussions
-
Browse the site ad-free
-
Share your work and get featured in the community
-
Compete in the photo contests for fun and prizes
17 Comments
Thanks so much for the article Pratik. Very much appreciated!
@michaelwoloszynowicz:disqus Thanks
oooooollllllllllddddddddddd
to you
Check this out 134123mutz...
Thank you Michael Woloszynowicz and Pratik Naik for posting this tutorial. Hope there's more helpful tutorials like this to come.
Wow. Great tip. looks super useful.
I saw the first part about the layer to neutralize color casts globally in a magazine article a few years back, but without the separate shadow and highlight layers, which are a very good idea given mixed lighting. And having the video and the way Michael explains it makes it much easier for people to understand, so thanks for sharing. Now I'll have to check out what else Michael has to offer.
Nice.. great article!
Love it when authors get straight to the point. Good video with a really interesting tip.
Great tip, thanks. Definitely faster than the way I do it.
Simple and effective!
Thanks for the succinct video.
The article says this works for any type of image, but don't many non-portrait images have highlights with many different colors than just skin tones?
I normally just do: Stamp Visible > Blur / Average > Invert > Blend Mode: Color > Reduce Opacity.
Separating it for the shadows and highlights is a cool trick though, that I wasn't aware of yet.
Thumbs up!
I see this skin tone problem a lot when shooting in Adobe RGB and then having to convert to sRGB for the web. If you know your image is going to the web, you can save yourself a lot of hardship by working in sRGB from the get-go. This applies to product photography as well (not yellow-wise, just in general), but I see this a lot in skin tones transformed from Adobe RGB to sRGB.
great i like it .....
Well explained...and well done!
extremely helpful