In my opinion, nothing is sexier than a glossy black surface. And you don't even need a black backdrop sweep to achieve it.
During my time as the lifestyle photographer for JackThreads, I shot many different products in many different ways. Since I was shooting an average of 10 brands per day, I had to work quickly and in a tiny space. Through working in this condition, I developed some cheap and easy lighting scenarios.
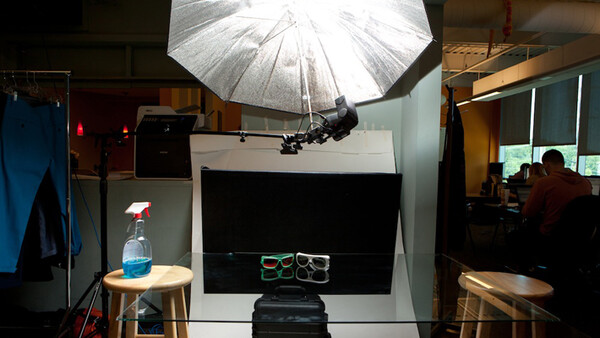
In the top photo, you can see that all I have is a 2’x3’ piece of wood, covered in black fabric and a sheet of glass. For lighting I have one LumoPro LP160 attached to a LP621 mini-boom arm, fired into a silver umbrella. I angled the umbrella slightly and placed it just behind the sunglasses, to keep the light from spilling onto the black board. The great thing about shooting with you products elevated is that you now have the option of placing a reflector or strobe underneath, to further sculpt the light.
I have used this lighting arrangement several different ways. This one-flash method is great, but often I will need to add a second or third light, depending on the color, size and shape of the product I am shooting. Below are several examples of how I have used this setup, as well as a lighting diagram.
And now comes the fun part. I want you guys to try out this method and show me the results. Just post a link in this thread with your image and I will post my three favorites with links to your site in the next lighting post. Happy shooting!
Lessons like this one as well as 25 other lighting diagrams are available in my new e-book, RGLR, The Run & Gun Lighting Resource for $10.


58 Comments
Oh, kermudgenny. I have a perfectly lovely piece of glass, 1/4" thick (the thinnest the glass shop sells), that gives an absolutely awful double reflection. Is there any way to deal with that, or do I now own a perflectly lovely piece of useless glass?
Tried this technique today, and I am loving it! thank you for sharing.. here's my result:
http://www.flickr.com/photos/petitefafi/8495994760/in/photostream
Tried this technique today, and I am loving it! thank you for sharing.. here's my result: http://www.flickr.com/photos/petitefafi/8495994760/in/photostream
One light behind. [url=http://www.flickr.com/photos/7photo/8596584848/]
Love this article. So insightful!
Just tried it.
I loved this article and It made my product pictures come out beautiful. Thanks so much for the help and the comments below. I am now registered and will be reading more of this site. Thanks everybody. take a look at the final picture. Feedback would be great. http://www.remodelcabinetdoors.com/ikea-custom-door-styles.html
Can this same setup be used to get white also
nice post I tried it but I have one issue. How to I prevent a double reflection I seem to get a double reflection from the glass.