
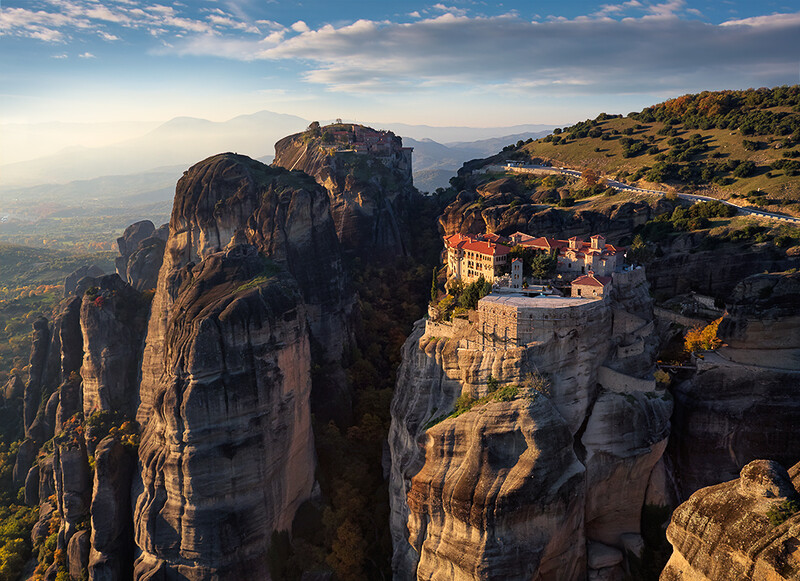
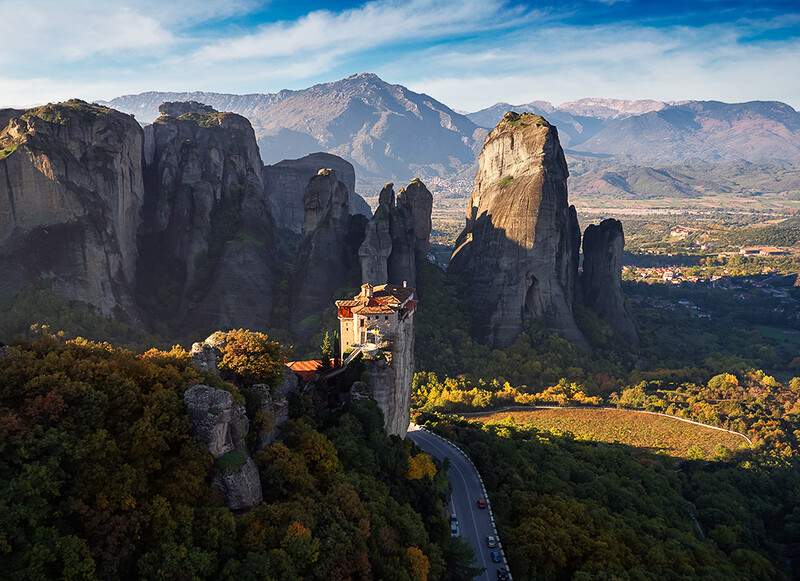
I recently had the pleasure of picking up one of the first final production models of the Inspire Pro and X5 Micro 4/3 Camera, and immediately took it to one of the most beautiful photography destinations in the world to test it out: Meteora Greece. I spent the better part of a week there getting the hang of flying and capturing both photos and videos and I was able to come away with some stunning results. This review is meant to showcase what I was able to capture and give you an idea about the capability of the new X5 Camera and the key differences between the Inspire and Phantom series drones.
I’ve also already written a detailed Phantom 3 Professional Review. Feel free to read through that for additional information about the Phantom 3 series, tips on flying, and insight about how I initially got into drone photography and how it changed my workflow forever.
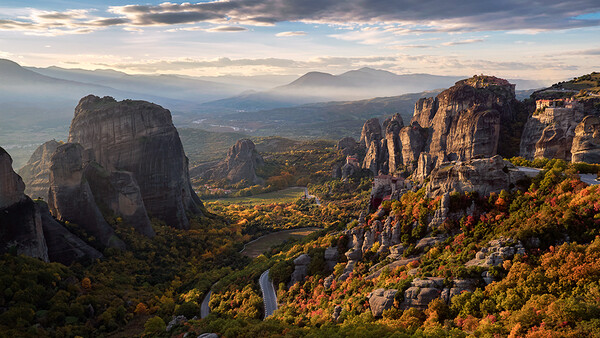
So let’s kick things off with something fun to look at. Here’s a short video I edited together that showcases not only the beauty of Meteora in the fall, but also what I was able to capture with a short amount of time using the Inspire Pro, the X5 Camera, and the kit MFT 15mm Lens.
Meteora Greece || Suspended in Air
Video Technical Details
As far as technical information goes, nearly all of the footage was shot at 4k 24fps, Aperture Priority mode at f/8, ISO 100, and auto white balance. It was edited and color graded entirely using the latest version of Adobe Premiere Pro. I also selected a very soft piece of music to help match the feel of the landscape. It was my intention to keep most of the camera moves slow and steady in order to give the viewer time to take in the vastness and beauty of this unique landscape.
Using The Best Times of Day To Your Advantage
After watching this video, keep in mind that the same lighting rules apply when shooting aerial photography as they do with standard on-the-ground work. Simply put, you wouldn’t try to shoot portfolio quality photography work at high noon, so you shouldn’t expect to get portfolio quality aerial work at high noon either.
Just like any other form of landscape photography, times of day are just as crucial in the air as they are on the ground. So with everything I shoot, regardless of altitude or camera, I always do my best to focus around the golden hours, sunrises, and sunsets - when the light is both soft and beautiful. What you’re seeing in this video is multiple days of shooting around the same times of day so the edit looks consistent throughout.
Using Parallax To Your Advantage
When shooting video, as opposed to standard images, we also have the key benefit of taking advantage of shifting parallax. Let me attempt to explain this a bit...
When looking through a camera viewfinder and changing positions, the position and/or direction of objects appear to differ when viewed from different positions. In effect, this makes up the basis of how you can place and control the positions of objects inside of a standard (still) composition.
With video, the camera is constantly moving so the parallax changes as well. Objects move at different speeds depending on both their proximity to the camera and the speed at which the camera moves. With most of the shots you’ve just seen in my Meteora video, I’ve tried to use parallax as much as possible to create reveals of certain parts of the landscape, or just the way one hill rolls past the landscape much quicker than the valley below.
This is where I find video to be the most useful. It’s those times when a static shot looks nice, but some motion would make it look incredible. Remember though, even though the camera is moving now, a strong composition is still important!
Shooting and Editing Photos in DNG Raw Format
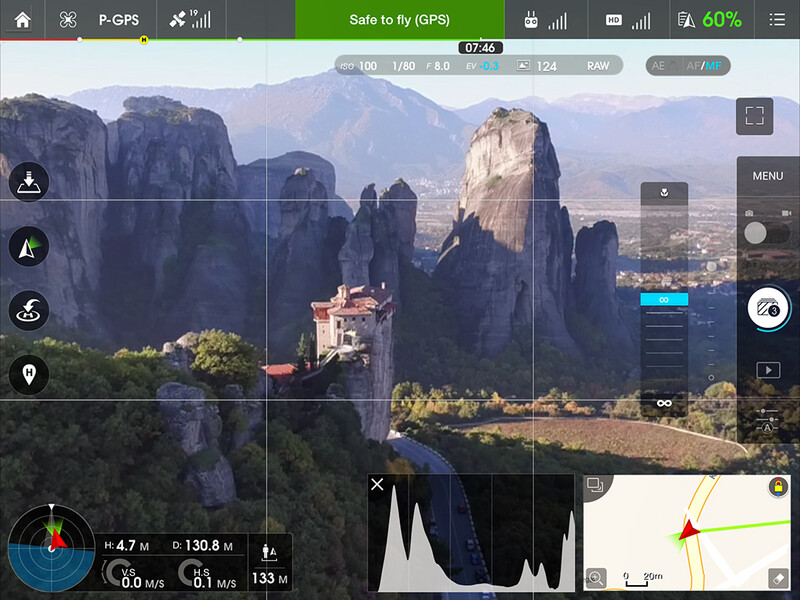
Just like with the DJI Phantom 3, you can shoot in DNG Raw format and even use Auto Exposure Bracketing. With the X5 being a Micro 4/3 camera however, you can control every aspect of the settings, including the f-stop. If you’re familiar with the Phantom 3 camera, you’ll know that it’s fixed at 2.8.

Final Edited Photo Results
Now it’s time to take a look at some fully post-processed RAW photos. The DJI X5 boasts 16mp DNG raw files that I found to be very powerful when pushing and pulling shadows and highlights in post-processing. My editing and post-processing workflow with these files is exactly the same as the workflow I teach in my Photographing The World Video Series. So if you’re interested in learning to achieve vibrant, sharp, colorful, and consistent results with your photos, check out the link to my workflow videos.
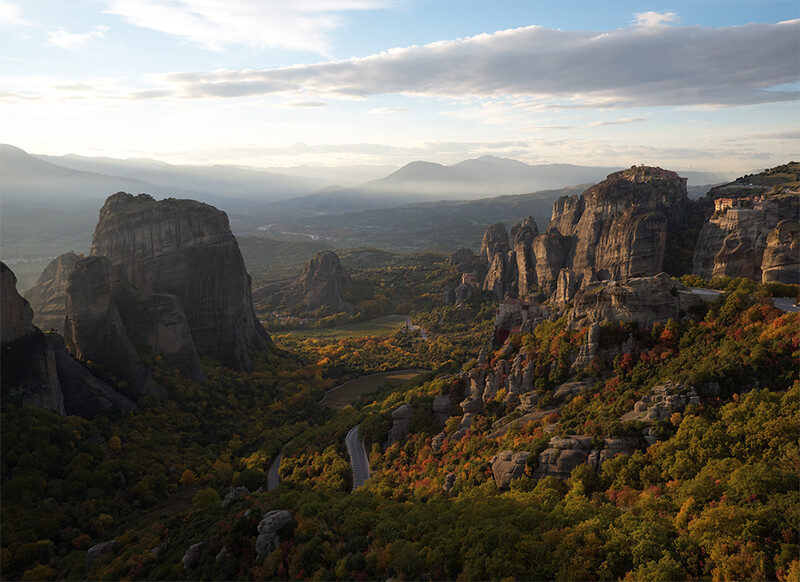
Technical Details: Single Raw, Auto White Balance, f/8, ISO 100, 1/100 - Post-Processed using Capture One and Adobe Photoshop. As you can see by the before and after, I had to do some significant recovery in the highlights. With the dynamic range of the X5 camera however, this was no problem at all.
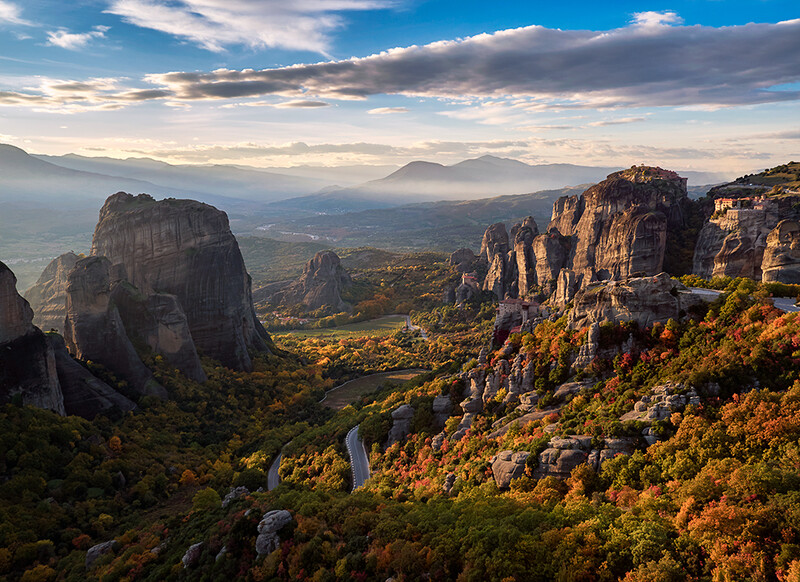
Technical Details: Single Raw, Auto White Balance, f/8, ISO 100, 1/140 - Processing using Capture One and Adobe Photoshop
Technical Details: Single Raw, Auto White Balance, f/8, ISO 100, 1/240 - Processing using Capture One and Adobe Photoshop
Download a Sample X5 DNG Raw File
Showing image examples is certainly helpful but sometimes it’s best if you see how the files fit into your specific workflow. That’s why as part of this review, I’m including a link to download one of the DJI Inspire X5 DNG RAW sample image files I captured in Meteora. Feel free to give it a test and see how far you can push things in post-processing and recover the shadows and highlights.
**Disclaimer: You may use the sample image file for personal educational use only. You may not upload RAW or PSD files produced from the RAW file in their original, or modified form to the internet, or share them with others in any way. You may not resell, print or share the image, nor can you modify it in anyway and then claim it as your own to resell / print / share / redistribute in any form or fashion.**
Key Features and Advantages of the Inspire Pro / X5 over the Phantom 3 Pro
Since I now fly both a Phantom 3 Pro as well as an Inspire Pro / X5, I thought it would be a great idea for me to highlight some of the pros and cons of working with each system. Here I’ll start by highlighting some of the features of the Inspire Pro.
-
360 Degree Camera Control with raised landing gear
Once you take off and become airborne, the landing gear and props raise well above the camera and give you the ability to fly, pan, and rotate without ever having props or prop shadows in your resulting frame. -
Ability to have two pilots
With two remotes connected, one pilot can fly the Inspire, while the other operates the camera. While this takes solid coordination between the two pilots, the resulting camera moves can be stunning. -
Toggle Follow Mode vs Free Mode
Follow Mode is your standard (camera always points forward) mode. Free Mode allows you to lock the camera to a specific orientation completely independent from its forward position. Once locked in free mode, the camera will continue to point towards its locked position independent from the direction or rotation of the Inspire itself. I found this very powerful to create partial (and 100% manual) orbit style moves. -
Future Camera Upgrades
The X5 is the upgrade to the X3 so we’ve already seen one camera upgrade to the Inspire class drone. Maybe we’ll see some more awesome upgrades in the future as well! -
Micro 4/3 Camera Control
Unlike the Phantom 3 which has a fixed f/2.8 lens, the X5 allows you to control the f-stop along with every other camera setting. -
Multiple Lens Compatibility
I shot the entire Meteora video that’s linked to this post entirely with the kit MFT 15mm f/1.7, but there are quite a few more lens options to choose from. My friend Romeo Durscher, and head of education at DJI, has put together a detailed list of lenses that are compatible along with sample shots at various settings and apertures.
Current X5 Lens Compatibility
Here’s the current (and constantly) updated list of compatible lenses for the DJI X5 courtesy of http://www.visual-aerials.com/x5.html.
- DJI MFT 15mm f/1.7
- ASPH Panasonic Lumix 15mm f/1.7
- Olympus M. ED 12mm f/2.0
- Olympus M.Zuiko 17mm f/1.8 **
- Olympus M.Zuiko ED 14-42mm f/3.5-5.6 EZ **
- Olympus M.Zuiko 25mm f1.8
- Olympus M.Zuiko 45mm f1.8
**Requires a balancing weight
Key Disadvantages of the Inspire Pro / X5 over the Phantom 3 Pro
You may see a lot of advantages up there about the Inspire Pro but don’t get me wrong, I’ll still be using my Phantom 3 just as often. In fact, I’m happy to have the option of which gear to choose before I start each project. Hopefully these bullet points help you decide which one fits your needs best as well. Remember, they both produce awesome results!
Setup Time
- Once you take it out of its hard case, it takes much more time to set up. First, you have to toggle it out of “travel mode,” then you need to attach the camera and props, after that, you can power it back up and let everything calibrate before being ready to fly.
- With the Phantom 3, you can pretty much take it out of the case and have it immediately ready to fly. Out of a backpack, you’ll just need to screw on the props.
Takeoff and Landing
- Something I love to do with my Phantom 3 Pro is hand launch and catch, meaning that I don’t need to find a level and safe surface to takeoff and land. Many times I’m on the edge of a cliff or on a very inclined and rocky surface that wouldn’t support a ground landing. This is when catching the Phantom 3 comes in very handy.
- Let’s just start by saying that it’s very difficult to catch an Inspire and I certainly wouldn’t recommend it. Second, you must takeoff and land on a fairly level surface. For takeoff, the camera will need to calibrate so the more level the better. For landing, you’re going to need relatively the same clearance as you would for takeoff.
- Another warning with the Inspire is to always make sure you lower the landing gear before you actually land. If not, you’ll land directly on the camera! This means you may want to give yourself a little extra battery time when thinking about returning to the landing area.
Intimidation Factor
- While the Phantom 3 Pro is a high performance professional video and photography tool, it looks small, light, and relatively harmless so most people don’t pay it any mind. It makes it very easy to fly under the radar (so to speak) and not attract the attention of the authorities.
- The Inspire on the other hand looks pretty bad ass but it’s also much more intimidating and will draw a much larger crowd while you takeoff and land. That larger size and intense look will also alert more authorities to believe you are doing some sort of professional work rather than recreational. Be prepared to get shut down more often using an Inspire than a Phantom.
- Another issue is that you have to travel with the Inspire in a hard case or pelican case. While backpacks rarely raise suspicions in airports and countries that have some drone restrictions, a giant pelican case is hard to disguise. Usually security will pay more attention to pelican cases through x-ray scanners than backpacks. This isn’t always the case, but it happens once and awhile and it’s good to be aware of.
The Size
- Let’s face it, the size of the Inspire makes It much more difficult to travel with since it does not fit into a backpack that can be carried onto an airplane, especially when traveling in Europe and Asia with their very stringent size and weight restrictions.
- Basically, the Phantom 3 is what I consider to have ultimate portability since it fits into a backpack that can easily be carried onto nearly every type of airplane.
Traveling with both the Inspire Pro and the Phantom 3
Since I ended that last section talking specifically about portability issues, let’s take a look at some options when traveling with either the Phantom 3 Pro or the Inspire 1 Pro / X5. I travel to around 25 countries per year so this is a topic that is very important to me and something I’m always trying to master.
The first thing you must understand is that you CANNOT check Lithium Polymer batteries and they must be placed in your carry on luggage. So even if you own a pelican or hard case, you’ll still need to remove not only the batteries, but the remote as well.
Traveling with the Phantom 3 Pro
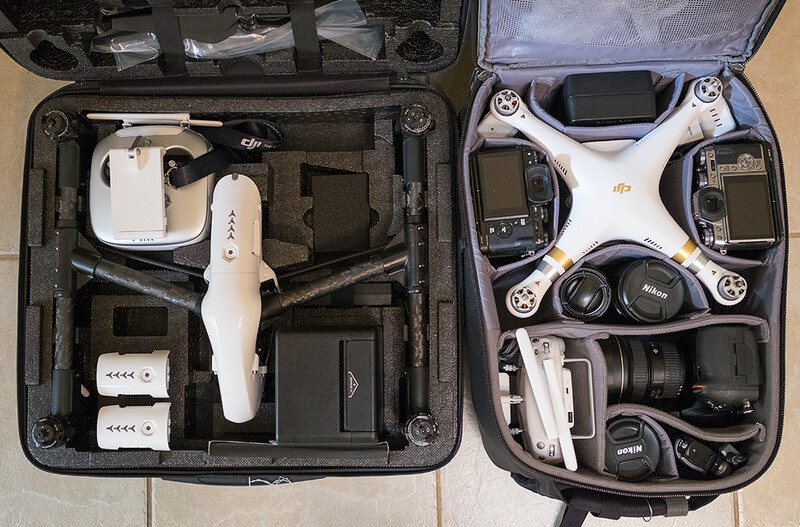
First, here’s my configuration for traveling with a Phantom 3 Professional, along with all of my other camera gear. It’s super simple because Think Tank Photo makes a bag called the Airport Helipak, and that’s what you see pictured here below. Take special notice that the spare batteries are underneath the corners of the Phantom itself. You can stash multiple batteries or lenses there without worrying about damaging the Phantom 3. Trust me, I’ve tried it. I’ve also put the bag next to the DJI Hard Case that comes with the Inspire Pro so you can see the size comparison in scale. As you can see, I have a ton of gear that takes up less space in the Airport Helipak than the few items that fit inside the DJI Inspire Pro Case.
Traveling with the Inspire Pro / X5
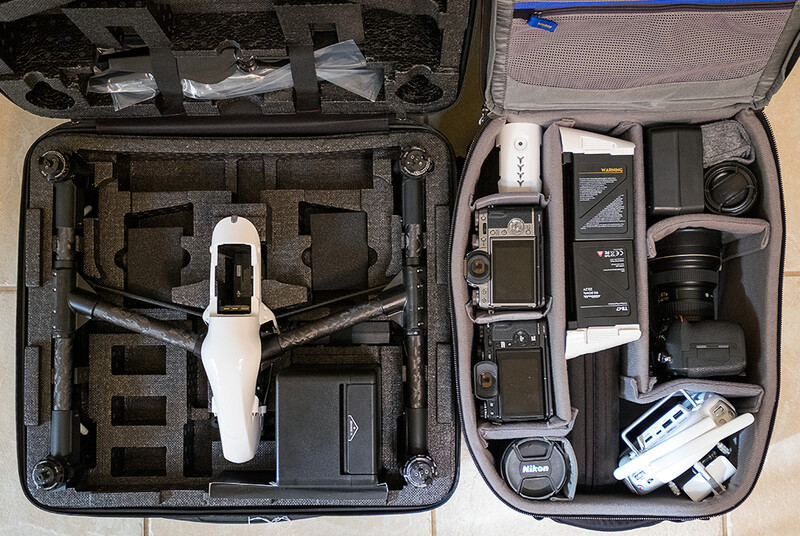
Here’s my newest configuration for traveling with the Inspire Pro / X5, along with all of my camera gear, and an Edelkrone Medium Slider and Motion Control System. As you can see, I’ve removed all the batteries and remote from the Inspire case and put them into my backpack. The specific backpack I’m using here is also made by Think Tank Photo and it’s called the Airport Accelerator. Essentially it’s nearly the same size as the Helipak but just a few inches shallower since it doesn’t need to accommodate the height of the Phantom 3. With this configuration, the hard case with the Inspire Pro gets checked without the batteries and remote, and the backpack get carried onto the airplane with me.
My future working with aerial photography and videography
Most who know me, know that I’m a location independent professional travel photographer and I spend my life seeking out and capturing still images of some of the most beautiful places in the world. So that begs the question:
Why am I incorporating more video work along with my photography
Many people don’t know that before I got into photography, my background was in Motion Design, Visual Effects, Television, and Video, so years ago, I used to be very proficient with Adobe After Effect, Adobe Premiere, and Final Cut Pro.
Video and Visual Effects was my passion for many years before I became completely burnt out with the industry, left my career, and made a series of life choices that would eventually lead me into photography and the location independent life I lead today.
Read How I Became A Location Independent Photographer
Once I picked up a DJI Phantom 2 while I was working on creating Photographing The World in Iceland with Lee Morris and Patrick Hall of Fstoppers, it was like being struck by lightning. I immediately recognized the potential with this new technology and knew without a doubt that I wanted to be a part of its evolution. With my background already strong in video and post-production, I also had a near zero learning curve to be able to produce content right out of the gate. I obviously knew this would be an advantage turning this into a business opportunity moving forward. Not only that, for the first time in years, I was excited to shoot video again! DJI single-handedly reinvigorated my love for video production.
All that being said, it’s not a difficult thing to learn how to fly, and in my last review of the Phantom 3 Professional, I gave some quick and easy tips on how you can get started flying drones and capturing images and videos yourself. All the same tips apply to flying an Inspire Pro. You just gain a bit more power and performance over the images and video. Flying on the other hand, is pretty much exactly the same. Above all, just don’t be intimidated to pick one up and give it a try. Just be warned, flying can become very addictive. :)
Shooting Aerial Photography vs Videography
Getting used to when to shoot still images over video is something I’m still getting the hang of to be honest. Often, scenes look amazing in motion but once you start to line things up for a static shot, they just don’t look as interesting.
As a solution, what I’m now tending to do quite often is designating time for video first, getting some really nice camera moves, and all the while scouting the location thoroughly in order to identify the great single vantage points. Then, on a second battery, I’ll focus just on capturing still images based on what I’ve already learned about the area while flying for video.
Keep in mind that this is just my simple technique, and with some practice, you’ll become an aerial pro in no time as well. Just make sure to arrive a bit early on location so that you can seek out all the best vantage points before the nice lighting periods begin. Remember, golden light only lasts for a few brief moments and unlike traditional photography, aerial drone photography takes more time to both setup, and obviously to fly to your aerial vantage point and prepare to film.
Above all though, have fun with it. This is some of the coolest technology that’s in existence right now. My advice is to take full advantage of it while we still have the ability to create truly unique content that no one has yet seen before. With more and more restrictions coming seemingly by the day, the sooner you get started, the greater your opportunity will be to create portfolio level work!


Join the Fstoppers community for free
-
Post comments and join in the discussions
-
Browse the site ad-free
-
Share your work and get featured in the community
-
Compete in the photo contests for fun and prizes
38 Comments
Great Information here, Thanks. I am just thinking about getting into a drone system. Actually just bought a little drone to practice with for x-mas. Thanks for the information.
No worries. I would recommend getting a DJI Phantom 3 series drone. Those little off brands are really hard to control.
I got a little toy drone just to play around with. I am sure the phantom is a hole other level..
Thanks.
I agree with Elia; get a Phantom 3, but not the "Standard", which has an older-generation camera.
And don't bother practicing; whatever skills you develop on the toys are useless with the Phantom 3. And the Phantom series is so easy to fly that it is a bit disconcerting.
Thanks for the RAW. Gave myself 2 minutes in Lightroom. Lots to play with. Not perfect by any means but lots of potential. How do you do that before and after slide like above....
As you can see, you can recover quite a bit in both the shadows and highlights. It's pretty impressive.
Thanks for a great article. As always look forward to your insights...
Thanks for your nice review Elia! The sample DNG file shows good latitude in editing with Lightroom. I'd be interested to see a higher ISO sample. Keep up the good work!
Lee Morris did some high ISO test shots from NYC. https://fstoppers.com/aerial/dji-zenmuse-x5-makes-inspire-1-worth-buyin…
Elia, I had no idea you came from a background in video! Thank you for the very accurate and honest product review. Yes, indeed I fly my DJI Phantom 3 more than my Inspire 1 as well, and each product has its place. Soon you will make room for the OSMO hand held gimbal in that camera pack. The OSMO will help to tie us any loose ends in your video story. I look forward to seeing you soon!
Thanks Randy. I always just try to be honest by showing the results I can achieve with the technology. In this case, the tech is also extremely fun to use! :)
I think this is an AWESOME write-up. The X5 is definitely on the radar, along with an Osmo handle. I think the P3P and the Inspire 1 Pro with X5 are perfect companions. Dense urban/tight indoor? P3P. Long distance interchangeable lenses? And I couldn't help but notice the pair of X-T1's in your think tank ;) Cheers!
Right, Right, and Right - there are dual X-T1s in that bag. ;)
I tried to grab my Inspire one while the propellors were spinning. Sliced 3 of my fingers so bad I had to immediately stop my shoot and drive myself to an ER with my hand wrapped in a sweatshirt with the drawstring as a tourniquet. 100% DO NOT EVER touch an Inspire one while in flight or operate even remotely close to a human.
Yeah, that's rough! That's why I put it in the review. It's much more dangerous.
For photo maybe but for video, the 60mbps limit makes the sensor and optic upgrade pretty useless. The P3 and I1 already suffer compression issues due to this low bitrate in 4K mode (eg; weird patch when filming dense sceneary such as forest, sky, etc.). For video, I would go for the X5R or stay with the X3 or P3. The regular X5 is crippled by the low 60mbps bitrate.
The 60 megabits/second rate is a common complaint on the X5. I wish it had 100 and 200 megabits/second options, but it doesn't.
But as you can see from Elia's video, the 60 megabits/second rate does not prevent you from getting stunning footage; much better than what you can get with the X3.
And the X5R, which does raw video, will cost and *additional* $3,500, for a total cost of $8,000. And for that money, you buy yourself the headache of 1.7 gigabits/second raw footage.
Don't get me wrong. Elia's video is great and he got a very nice article but the 60mbps is indeed a problem when the X3 has issue to deal with dense footage.
Adding a better sensor and sharper optic is a bit of a waste. It's like shooting with a 5DS with let's say, a 10MB max file size limit. What's the point ?
Of course the X5R is plenty of money, but for professional, it s well worth it. For video work, I don't really understand the value of the X5, it's still an additional $2000 over the the X3 that already suffers from the 60mpbs in 4K. There will be a slight improvement in term of sensitivity, the narrower focal range and the focusing maybe (well, in drone and wide angle you must be in infinity anyway).
Hopefully, DJI will upgrade the firmware and get something like 100mbps (similar to the GH4).
The shots are nice. It's great to see almost no rolling shutter. One question though - there seems to be a lot of noise happening and it mostly looks like color key noise, but I want to make sure. Did you do a fairly heavy selective color key on the foliage in each shot, or is that dancing noise just some of the compression artifacts of the camera system?
It's hard to tell since I had to compress it down first to be able to upload it with a slow connection in Cambodia, and second, the YouTube compression. There is almost no noise at all during playback at 4k.
Awesome, thanks for the response.
respect! that's a lot of helpful information, thanks for sharing! If you guys ever stop again nearby Croatia or Croatia, i would love to show you around! P.s. Croatian food is better then Italian :)
I'll be sure and take you up on that! I don't know about the food though. Just saying. ;)
I'm having fun with your morning coffee....thanks ;)
What lens did you use?
Quote from article:
...{"nearly all of the footage was shot at 4k 24fps, Aperture Priority mode at f/8, ISO 100, and auto white balance"...}
Aperture Priority in video mode? Why? No Manual? Auto white balance? These are not video friendly settings.
Yet the video is all consistent. That's why "no manual." In the case of showcasing the results, isn't that a good thing? ;)
Really lovely video, you're talented Elia.
I went into the DJI website. They have the "Spreading Wings" system, a big quadcopter which you can add a cage for a BMPCC. I'm thinking this would make more sense since if there's a new camera, you would keep the quadcopter and just change the cage. It's priced at $3400 for the BMPCC kit (without the remote). What do you think?
Oh definitely. The SW systems are top notch. The only thing is that it's much more difficult to travel with. But yeah, you can support some serious cameras on them.
The main advantage of the Inspire family is that you have complete control over the camera while it is in the air; you can change exposure, switch between stills and video, etc. You can't do this with the current S900 and S1000 copters.
I believe that DJI is going to bring the Inspire 1 remote/video/camera-control systems to the larger copters at some point. I think it boils down to some coding to the USB API provided by each camera manufacturer.
Elia, can you tell us how you managed focus in the Meteora video? Did you have it in auto-focus mode, or did you manually focus?
And if manual, how did you set the focus? Did you set it to infinity, or touch-to-focus on a distant object?
Thanks!
To Infinity. Just as I would if I was shooting a distant landscape.
Thanks!
Nice article.
I've taken the Inspire Pro hiking, walked up 1000m with a pack, its definitely heavier than a phantom but the set up is not that different. The only extra steps are to take the camera out of the box and to mount it. (the other adjustments about aperture etc, you have to make on the P3 as well if you want good shots but you have more range of control with the inspire for sure). I have a photo of the set up for those interested at http://forum.dji.com/thread-37462-1-1.html
It was a little scary thinking that I could damage a rather expensive piece of equipment but its cross streams and tolerated some rain now, so....
Regarding the X5R, the price has gone down (announced Dec 23rd) from ~USD 4.7K to around USD 3.2K (camera sans lens)- preorder with delivery in March.
Good writeup...I bought the same aircraft last month for a trip to BVI. Both times I forgot to take the batteries and remote out of the case when checking it. Oddly they let it through both times and on two different airlines. There was a note indicating that they opened the case on one occasion though...gotta love Delta!
hey it is very cool info here/. I have few doubts actually.. they are ..
1. is it possible to update inspire 1 pro to raw in future?and how?
2. that raw image is from X5R right? not X5
3. How flexible it is for a first time user(don't discourage :()
I'm only looking for still photography purposes. I have used the phantom 3 pro and while I got some cool shots I wasn't impressed with the picture quality. Now I have a couple weddings coming up that I would like to rent one for. Is it worth paying $300 to rent the inspire 1 pro for stills or stick with the Phantom for $50 rental fee? I know the picture quality is better but how much? Would you happen to have any pictures to compare both?
There seems to be about a 2 mile limit to drone control. What is you max altitude you have achieved? Can you fly up to 2 miles up to 1200-1500 feet? Really stunning photography you have created. You are right it is all about the subject and light. That is the point of drones -- great aerial photography.