
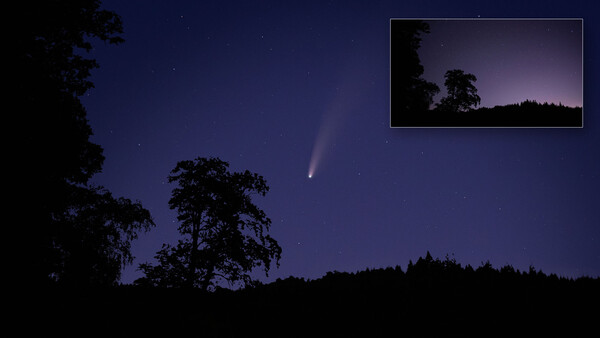
Anyone who's shot Comet NEOWISE has noticed one thing: it looks a bit small in the frame when shooting on wider lenses. That's why with the help of some image editing, creating a composite where we replace the sky may be the best way to produce a stunning comet composite.
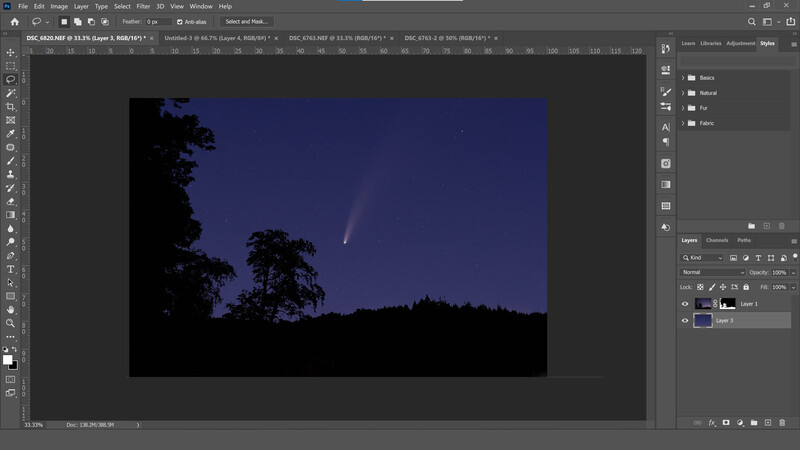
The scene in front of you is impressive, but wide, and the only way to fit it all in is to use a mid to wide-angle lens, but Comet NEOWISE now looks comparatively tiny in the frame. Or perhaps you've got a great night-time landscape shot, but no comet because of cloud cover. The easiest way to get Comet NEOWISE looking big and impressive, whilst retaining all that glorious vista, is to make a composite image.
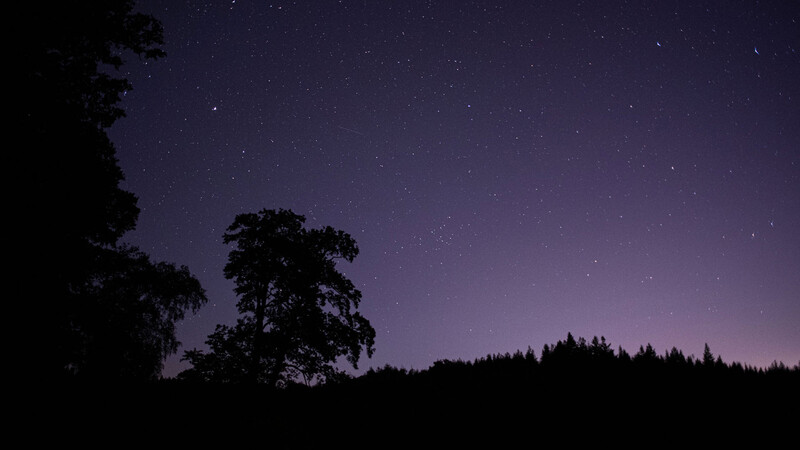
By taking two shots: one using a long focal length lens to zoom in on the comet and capture it filling the frame; and then another shot capturing the landscape on a wider lens, we're going to overlay the close-up comet photo into the landscape scene by replacing the sky.
I'll be doing this in Photoshop CC, but other image editing software such as Affinity Photo, or Photoshop Elements, work similarly.
Load Files Into a Stack

Open your images into one Photoshop document by heading to File>Scripts>Load Files into Stack and select your two photos then click Open. Place the comet layer at the bottom of the layers palette, with the landscape layer on top.
Separate the Sky from the Land
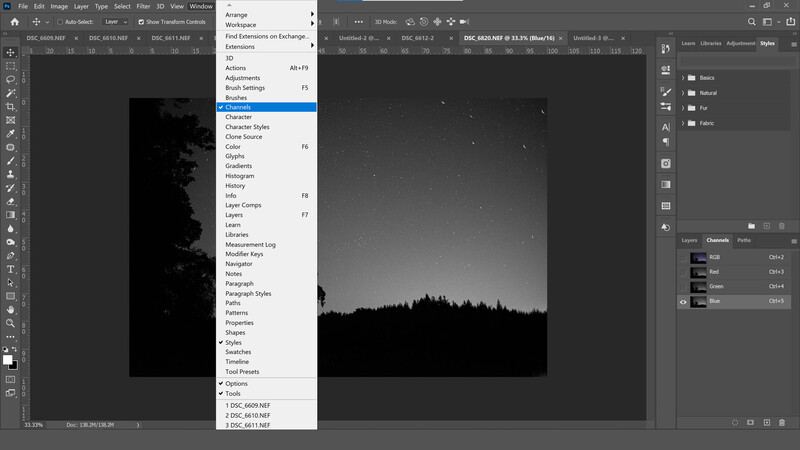
Open up the Channels window next to the Layers palette (or go to Window>Channels) and select the Blue color channel. This channel has most data for the blueish night sky and it's where we'll be making our selection of the sky, in order to remove it. But first we need to make the scene as contrasted as possible so the sky is bright white, and the landscape is dark black.
Prepare the Sky
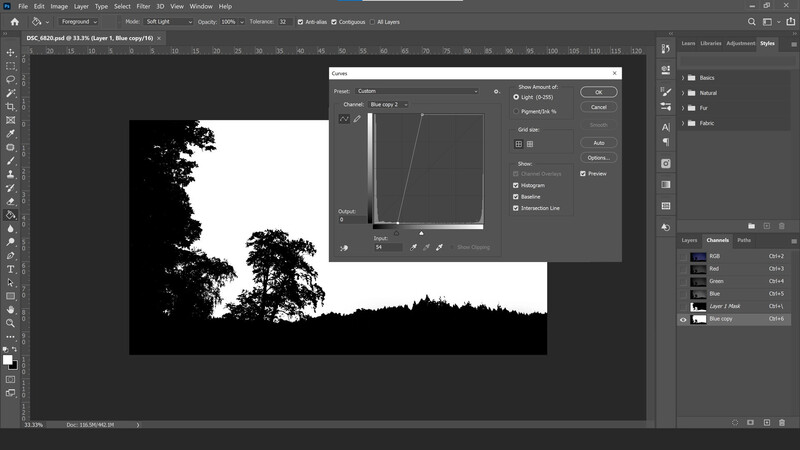
Right-click on the Blue channel and click Duplicate. Hide the original Blue channel layer by ticking the eye icon, and reveal the new Blue copy layer beneath by clicking the same button. With the Blue copy channel layer selected open Curves (Image>Adjustments>Curves) and drag the top anchor handle across from top-right to top-left, and the bottom anchor handle towards the bottom-right until the scene looks like this.
Refine the Sky Selection
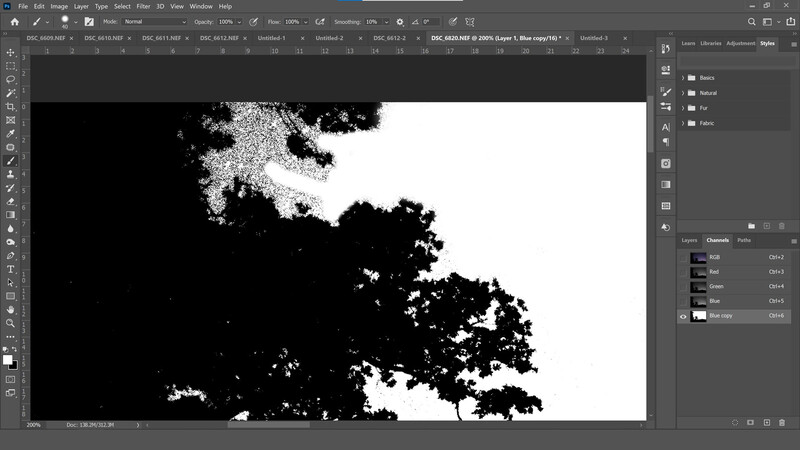
If there are any spots left in the black landscape, or white sky simply use the Brush tool (B) to paint black, or white respectively over the areas until there are no longer any spots. Press D on the keyboard to revert your foreground and background colors to black, and white, then press X to swap the colors over while painting.
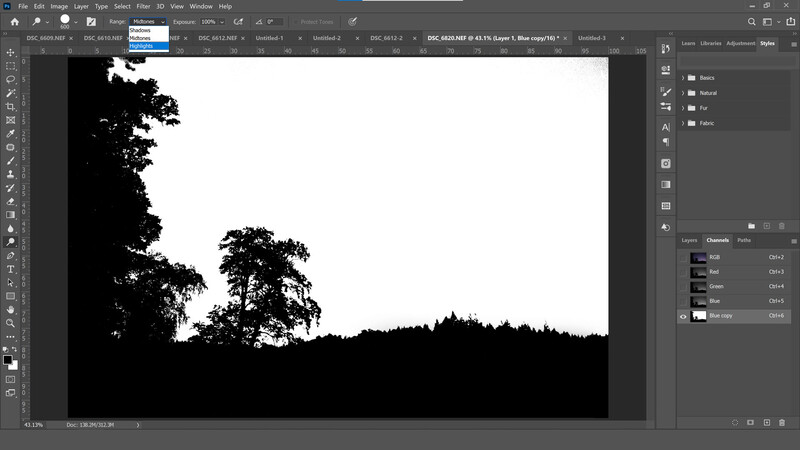
For those in between patches of complex sky-land areas, (think between leaves on trees etc) use the Dodge and Burn tools to increase contrast. Set the Dodge tool to Highlights from the Range drop-down menu at the top of the window, and select Shadows for the Burn tool. Make sure Exposure is set to around 65%.
Make the Selection
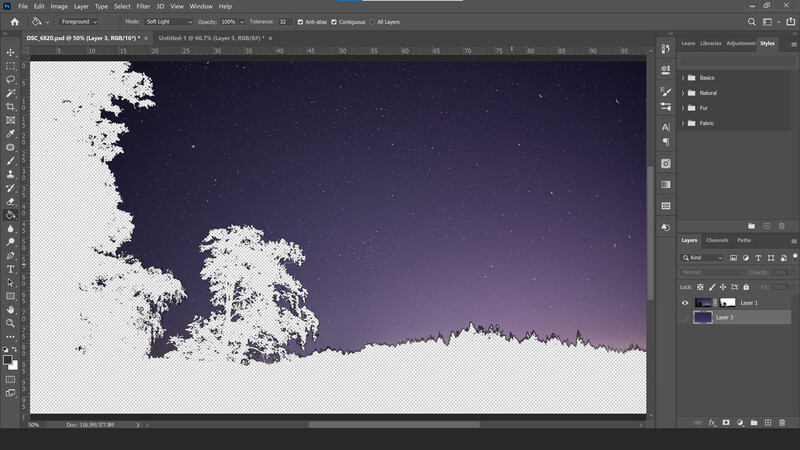
Now, with the Blue copy channel still selected, hold Ctrl (CMD for Mac users) and left-click on the layer to select the sky you've just edited. Select the RGB Channel layer again to reveal all the colors, and head back to the Layers palette then click the Add Vector Mask button at the bottom of the Layers palette. Then you'll need to invert the selection by pressing Ctrl + I (CMD + I on a Mac).
Reposition the Background
Now move the comet photo layer to the bottom of the layers palette (if it isn't already) and reposition it so the comet is clearly visible and not hidden by foreground. You can scale up this layer so that the comet appears larger or smaller against the foreground by using the Move tool (V) and adjusting the anchor points around the edge of the photo.
Add Final Tweaks
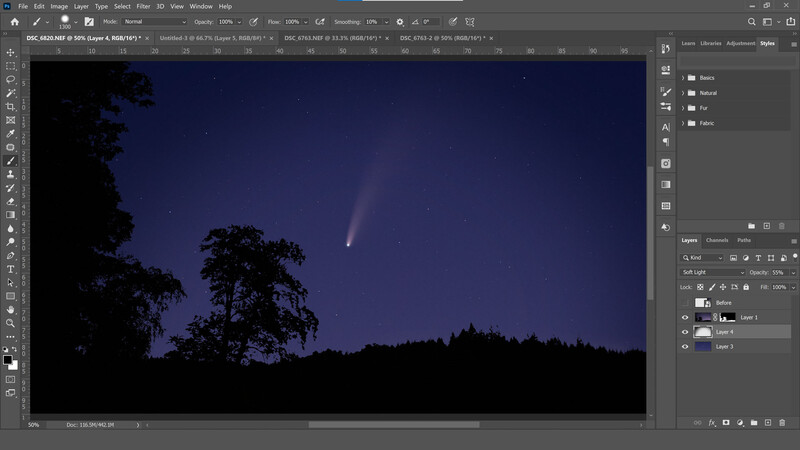
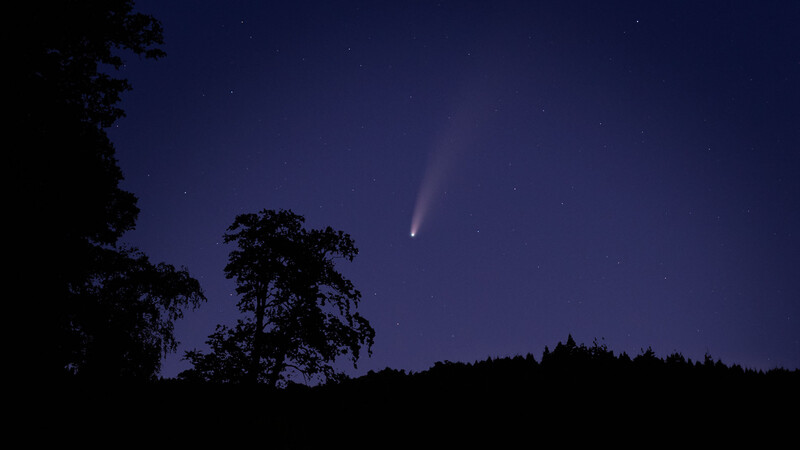
Finally, you can make any other adjustments you want, like adding a vignette or adding sharpening to the comet layer to make it pop. Here I've added a black vignette around the edges of the frame, and inserted the layer in between the comet photo and the foreground photo to mimic the glow you'd get from nearby towns or a recent sunset.
And you're done. The sky is replaced and the comet now appears huge in the sky behind your foreground. I've made quite a quick selection here for demonstration purposes, but even so it's still much more accurate than it would have been painting a mask over the original photo, and almost impossible to get in between all those tiny gaps between the leaves. Spend a bit more time on it and it'll be absolutely perfect.
This is an artistic way to combine two separate shots, one of your notable foreground and the other of the comet itself. I'm sure a few will think of this as "cheating," but it really isn't. Photography is as much an artistic process as it is a scientific one, so who cares whether you're dropping a sky in, what matters is the end result and whether you're happy with it or not.
Hopefully that helps some out there that just haven't had the opportunity to place a good foreground in front of Comet NEOWISE, and judging by its trajectory it's soon to be gone for 6800 years, so I think this composite technique is extremely helpful for those that want to use their close-up comet shots to the fullest.


Join the Fstoppers community for free
-
Post comments and join in the discussions
-
Browse the site ad-free
-
Share your work and get featured in the community
-
Compete in the photo contests for fun and prizes
14 Comments
How to replace the sky in a photo of the sky.
Thinking I should shoot animals in the zoo... and replace the background with a forest. Because, you know, I just didn't have the opportunity...
Why would you do this?
The irony
People spend hours deliberating on the specs of cameras, which lens is sharpest, which sensor has most MP or dynamic range, and when they go shoot, they then fake everything in post
I think the negative comments would be understandable if I claimed it was taken in one shot, as that would be misleading, but since I'm not I don't see the problem. It's a creative, artistic endeavour, I'm not trying to trick anyone - simply demonstrating a fun way to make astro composites.
Maybe we're just giving you a hard time. Van Gogh's "Starry Night" is one of the most loved images on the world. But it's obvious at first glance that it's not reality.
So what is photography, exactly? I no longer know.
Which brings up the point: Why not just paint or airbrush a comet into the frame?
Because, after all, viewers are expected to look for the disclaimer stating how the image was created (or faked). May I suggest adding a subtle asterisk near the comet, and adding a disclaimer along the bottom of the image.
Here's a "problem" with photography: Viewers are viewing the image. They aren't covering their eyes waiting for you to claim it wasn't taken in one shot -- and then the big reveal. "Prima facie" is the governing principle here.
Perhaps painting would be a better way for you to create images of notable astronomical events? Or stepping up to the challenge of capturing the event with a single camera and a single lens?
I take your point about faking, but that's exactly the opposite of what I'm doing here. Even the title says it's a composite. I'm being upfront about the fact that we're editing two images together here, so there's no big reveal, it's right up top.
One very simple question: Does the image stand alone without title or explanation?
It's a tutorial, so I don't think it has to. But also, yes, because there's a before photo inside the main image.
yes, in this case, on this website, within this tutorial. you show the before/after and explanation.
But as Larry said "does the image stand alone" so, posting it on Instagram for example, no text, no before pics, no explanation, just the image and nothing else.. That's what "stand alone" means.
Will the average people go;
- "oh what a pretty picture of Neowise, wow it looks huge!!!, how did you capture that in a picture!!??!"
or will they go
- "what a pretty artistic artwork composition of Neowise! I imagine it's an artistic expression and composition as the comet seems slightly larger then usual"
I'm going to guess most will comment the first of those two answers. as it's probably too close to looking real and people really won't know it's a composition unless they're being told.
I don't think the negative comments are directed at you specifically, but more the general use of composition to make something unrealistically bigger, better, stronger, without going far enough in the composition where it's clearly the case that it's intended as art. (and in many occasions, being presented as real, again.. you're not doing that in this scenario, but it certainly does happen)
The whole mindset of within this tutorial is "the comet is too small, let's make it look bigger". with the intention of this composite to purposely use different focal lengths to create a grander reality. Which, with such a unique and scientific event, might not be the right mind set to have.
it goes towards the (often mentioned on Fstoppers) Peter Lik moon image. Creating a grander reality by a composite of a large moon.
LOL
"I'm sure a few will think of this as "cheating," "
oh really?? I wonder why.... ?? (end of sarcasm)
compositing a well known, well documented, well photographed and a "once in a life time" scientific event.. to make it look bigger than it is.. is just... silly.. the whole challenge of such an event is to capture how it actually is, in the best possible way.
I'm not saying that it all has to be a one shot thing. If you are at the location where you want to shoot, you've set up your tripod and camera, maybe you're focus-stacking the foreground.. maybe you're light painting the foreground.. or loads of other artistic ways to capture this real life event in your own way.
BUT... I do draw a line at using different focal lengths in order to unrealistically make something bigger than it is. I'm not going to shoot my car at 200mm, myself at 35mm combine them together and go "wow look how big my car is" (I was going to use a d*ck pic analogy here..but... let's keep it civilised)
it might work for some things and photographs, but I don't think it works for such a unique scientific event, as far too many times "art work" like this is being played off and presented as "real"
besides that, the comet is actually pretty huge if shot right. Using a mount that tracks stars, longer exposures and astrophotography stacking, you'll really start seeing how big the dust trail and the ion tail actually are and you don't have to fake it..
At 200mm the comet+trail fills up most of my frame if shot right, at 50mm about a third.
After seeing the comments and thinking about this for a while... maybe the problem with images like this is that they can fall into what the robotics people call the "uncanny valley."