Night photography can be technically daunting. Even with modern cameras, it's not easy to capture high-quality night photos. While photographing the stars already requires high ISOs combined with wide apertures, capturing details in the landscape is even more difficult in the dark. In this article, I walk you through my night photography workflow, which combines image averaging with time blending and focus stacking to achieve high-quality results.
I've always been fascinated by the night photos of other landscape photographers, yet I waited many years before I got into astrophotography myself. I dabbled in it over the years but was never satisfied with the results. When I visited the Erg Chigaga in Morocco in 2019, I decided to give it a more serious effort.

Image Averaging
For a long time, I thought the only way to get noise-free photos of the night sky was to use a star tracker. Although those devices have gotten smaller and lighter over the years, I could never justify bringing one onto my photography travels for the few night photos I take.
Here's the good thing: it's possible to achieve results that rival the image quality of the photos captured using such a device with a technique called image averaging. Instead of having a star tracker follow the movement of the stars to keep them from trailing during a long exposure at low ISO, you can take multiple medium exposures at high ISO and use software to align and blend the images based on the stars later. The resulting image will have a blurry foreground, but the stars will be sharp without much noise in the sky.

You can get such a result by applying the following settings:
-
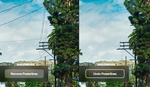
Calculate the maximum exposure time you can use to get stars without trailing with the so-called NPF formula. If you want to print your night photos, forget the often-mentioned 500 rule. You'll not be happy with the results unless you view your images from a distance. You can use PhotoPills to find the correct exposure times for different focal lengths. For example, abiding by the NPF rule gives me a maximum exposure time of 7.3 seconds at 15mm.
-
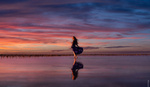
Such relatively short exposure times compared to the 500 rule require as wide of an aperture as possible to let enough light onto the sensor. My RF lens is limited to f/2.8, which is good but not ideal. If you want to get serious about night photography, consider purchasing a fixed lens with a wider aperture. But as you can see in the desert photo above, even with f/4, you can get great results if you use image averaging.
-
If you use a f/2.8 lens as I do and your calculated exposure times are in the realm of 10 seconds or less, you'll have to use ISOs between 3,200 and 6,400 to capture good detail in the night sky.
-
Even modern cameras will give you a noisy image at such ISOs. To solve this problem, take between 20 and 40 photos with the same settings. Use a cable release and the burst mode of your camera for this. With the cable release, you can lock in the shutter button, and the camera will take photos until you release it.
-
For this to work, you have to deactivate long exposure noise reduction. It would create too large of a gap between the individual exposures. To still get its benefits, end the sequence by capturing a dark frame with the lens cap attached. You can apply this dark frame to all images to remove hot pixels, as I show in the video below.
Now, you might be wondering what to do with all those photos? On Windows, the free software Sequator can handle the image averaging and even consider the dark frame. For the Mac, I couldn't find a free software solution, but based on the reviews, a good option seems to be Starry Landscape Stacker. I haven't tested it myself, so if you know a better alternative, feel free to share it in the comments.
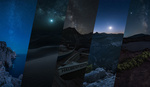
To give you an idea of what such software can do, I now show you a 100% crop of the photo above. You can see what averaging 40 images taken at ISO 6,400 looks like.

Time Blending
Although it would be much more realistic to keep the foreground black in a night photo, I like to show at least subtle details. To achieve this, I could use image averaging again, this time for the foreground. An alternative is exposures of many minutes, taken at medium ISOs. In the example above, I had a rising moon in the east, which lit up the foreground. But often, I capture my night photos when there's no moon in the sky to get even more stars to show in the final image. Then, even taking exposures of 10 minutes or more will not give me the detail I want.
That's why I recommend the following workflow whenever the constellations allow it:
-
Capture the star photos during astronomical twilight in the morning or in the evening. It's dark enough for many stars to be visible.
-
Take the foreground photos during blue hour.
-
Between the two sets, keep the camera in place. I use this time either for a quick nap or to listen to a podcast.
-
Combine the blue hour photos with those of the night sky in Photoshop. Depending on the scene, it can be challenging, but with some practice, it's possible to constantly achieve great results.

Here's one tip for the processing: don't go overboard with the blend. It's good practice to darken the foreground photos significantly before the blending to create an image that still feels like night. Similar restraint should be applied while working on the star images to allow for a natural blend.
Focus Stacking
Most of the time, focus stacking is also part of my night photography workflow. When you capture the foreground photos during blue hour, it's easy to take multiple images focused on different points between near foreground and infinity. The exposure times usually don't exceed 30 seconds, and capturing all the required photos takes a fraction of the time of a single photo taken at night.

Planning and Scouting
The above workflow deals with the technicalities of the shoot. But planning and scouting are also involved. In the feature video, I show how I use the apps Planit Pro and PhotoPills for it.


Wow that's very advanced techniques. Beautiful images!
If I say it please do not get mad at me! You are using too much sugar for a dime as we said way back in another age. All those things are useable for further processing BUT the time spent on the multiple images. When I first started it was the 500 rule and others with no other settings and pros using these procedures. It is like the first real f/2.8 lens talked about in magazines of the time, the Rokinon 14mm. The pros raved about but the lens was horrible with elongated stars, coma and a mustache horizon and it took a year + for Lr to get a LC, and yes to all those pulse using a dust removal to copy stars from another place and all the while not using NR time to lower noise amount but also getting rid of Hot- Red pixels and Dead - white pixels all about remapping pixels for those long exposures of a minute +. Todays cameras remap when turning off, just listen for the delayed click. Getting rid of hot/dead pixel also just do a bracketed capture of 3 at +/- 1 EV and put in HDR SW, yes NR is off during.
I have never used a tracker, I have two, tool much trouble in the dark and too much time when running and gunning on a beach with a lot of deadwood add the fact of extra gear to keep track of not to lose a piece in the dark.
I did my first capture on a beach lit by hotel lights but dark sky over the Atlantic Ocean even foggy. I used a 16-35mm f/4 and a 30s exposure and processed in C1 ($30) not PS/Lr ($800+ each), it was July of '15 software was also bad. But no elongated stars and no comas' but great color. Come to find out after the term NPF rule for every camera model (very important part) then lens mm for my A7s and FE 16-35mm f/4 22.98s not far from a 31s 500 rule and using just a low ISO of 6400 or 3200 I got a daylight bright with stars image with a perfect yin and yang colors in Pegasus and the white of the galactic center
separated by the Way trail.
Ok, things you learn with many years of all nighters testing this and that getting good and bad. Learn your camera make and model pixel height and distance between each OR get Photopills and in Spot Stars dial in your camera model then put in lens mm and f/# look at both default and accurate SS, write both on your hand. A "MAJOR POINT" to say - no matter the camera pixel amount 12mm or 100mm for stills they all will capture the same image just at a different ISO, to point out it is the metering mode and exposure to the right while adjusting the ISO that you watch on the camera, M.M at the bottom it will be a plus or minus value and the histogram that will move to the right some that shows evenness of light in the image, I find +.7 is a perfect expose to the right. You will get a very bright foreground with a baby blue sky and pinpoint stars IF you focused on them at the start.
Some physics' facts to know about the wider the lens f/1.4 vs f/4 the faster the SS! Got your attention?
We all want the widest of wide like a 12mm vs 24mm both have again different SS the 12 being faster also. The 14mm f/1.8 vs f/4 will be different but the 20mm f/1.8 will be slower SS. Pack that in your hat!
Now a 14mm will get that great wide image but say you have 24 f/1.4 you can get something everyone tries to get and that is the arc of the MW that a single mm lens will never, all that is needed is a panorama rig that is level from right to left at 200 degrees. Put the camera in portrait view and to far left or right. Setting the stepper to 15 degrees, it will click/stop at every 15 degrees that is when you do the next capture after the capture and with NR on you go to the next stop then when the screen comes back on you capture again. Another point as the year goes on the MW gets higher when looking east say in June of July vs March. So when higher you may need to do two rows but you may have a 14mm this will capture that over your head highness and do it faster, say 90s vs 2+ min. doing a 200 degree. This where a stepper comes in super handy for all the internet say to look on the LCD for the next spot and stop there a stepper get you there and stopped while enjoying the view. If you have Bright Monitoring you can check beforehand to see if you have the hight covered. Now both lens and and f/# are very fast and if on a beach the surf will blend and insync with each image.
Another kick in the shins/brain each image will be very sharp and full of detail, But say you are in a lit place but with a dark sky above, instead of all the metering/SS's/ISO's did you know you can use Aperture mode or even Auto night mode when everyone says use Manual and dail things in. They come with the camera and you paid for it and not cheating per say!
Now for the biggest unknown is that the Sony Mod 1's and 2's have on camera apps that cost just pennies compared to filters and holders you would carry in the dark and for a long long walk in rattlesnake areas, https://www.playmemoriescameraapps.com/portal/
you will find the handiest app for night photography "Digital Filter" it take two images one for sky and one for foreground using any and all camera settings you can think of including WB. Processed in camera together with output adjustable before sending to the SD card and in RAW or Jpeg or both. I think the filter industry asked Sony to not have on future models! The last image was used with it.
I use the A7s/ii or the A7rii using this app to get and image of the MW over a lit city/town, Everyone is afraid of the light and going to deserts with snakes or high mountain with big cats and bears- for the cats put on some big eyes looking backward and bear spray for bears and alligators-mating in early MW months you will hear them chopping in the swamp behind you. And if you hear something behind like pulling grass have your stand by camera ready for deer that walk by the first will scare the hair off you. What I am trying to point out the dark has critters be ready!
Lastly for those morning critters that buzz around and have big teeth a couple of drops in water Skin so Soft oil, I have no idea what it has in it but you will never be bothered at sunrise/set.
Sorry for rambling just so many years a lot learned saving you sometime!
Forgot this also unknown/said at night the widest/fastest of the wide/fast lenses when wide open will be super sharp from the sand on the beach to the lit city or boat on the horizon where in daytime you get narrow depth of field ah! the mysteries of physics!!!! Just for info the Sigma 14mm f/1.8 was not sharp up close, as seen in a Milky Way Mike video.