
Today, we're going to discuss how dodging and burning can improve your photos and show you how easy it is in Capture One 20.
What Is ‘Dodging & Burning’?
If you’re familiar with this, then feel free to skip ahead. This is a primer for those reading who might be unfamiliar with what dodging and burning is. It’s simply a process/technique used during image development to adjust the exposure of specific areas of an image. It is a useful carry-over from print, and in digital, it has much more flexibility and, frankly, power. To "dodge" means to lighten and to "burn" refers to darkening.
As it is a phrase that comes from the printing process and not the point of capture, the terms often seem reversed. To dodge means to decrease exposure of an area to light, and that means it "develops" less and the paper it’s being printed on stays whiter. Burning means exposing the paper more, thus darkening the area on that print. This is different from how we think about exposure at the point of capture, where typically, increasing exposure means making the image brighter and decreasing makes it darker. But simply keep in mind that in post-processing, whether print or digital, "dodging" refers to lightening and "burning" refers to darkening.
Benefits of Dodging and Burning in Capture One
Dodging and burning is most commonly associated with Photoshop, as Photoshop had the most robust brush options and layer functionality (still does), but it’s possible to do dodging and burning in other applications, like Capture One and to some degree, Lightroom, for example.
A major benefit of using Capture One is that unlike Photoshop, it’s a raw processor, so with it, you’re working on a raw file. This means you’re working with the most information possible, whereas with Photoshop, you are working on a lossy file that degrades as you work it. In addition, Photoshop manipulation of those files tends to introduce strange Gamma adjustments.
Also worth noting is that while Lightroom can do local dodging and burning in a manner of speaking, it’s not quite the same as Lightroom doesn’t operate with actual layers. Capture One’s layer functionality is high, especially with 20, and the confluence of the layers, luminosity masking on those layers, and the flexibility of brushes makes Capture One a truly powerful platform for dodging and burning. It’s also nice that you have to do less round-tripping from raw processor to Photoshop, as you can do much more in Capture One.
*If you don’t have Capture One, this is the perfect time to try it, and you can click here for a 30-day full trial of Capture One Pro so you can follow along.
How to Do Dodging and Burning in Capture One
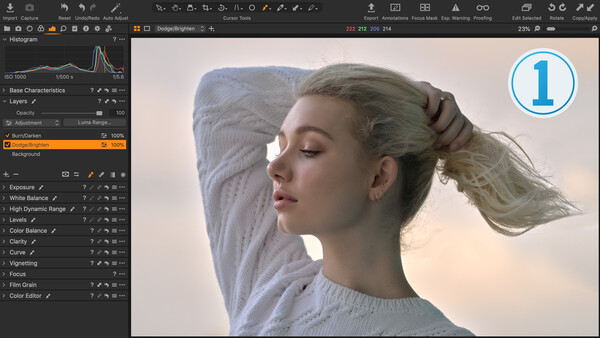
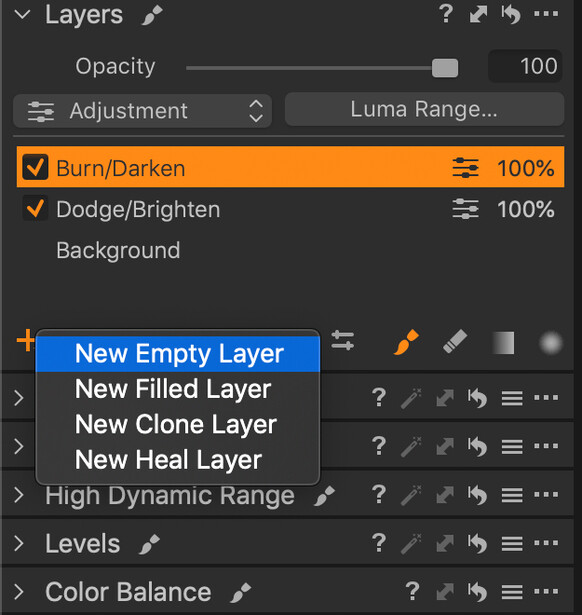
- Click the ‘+’ sign in the layers dialogue box to create a New Empty Layer and name it Dodge/Brighten, and then add another new empty layer and name it Burn/Darken.
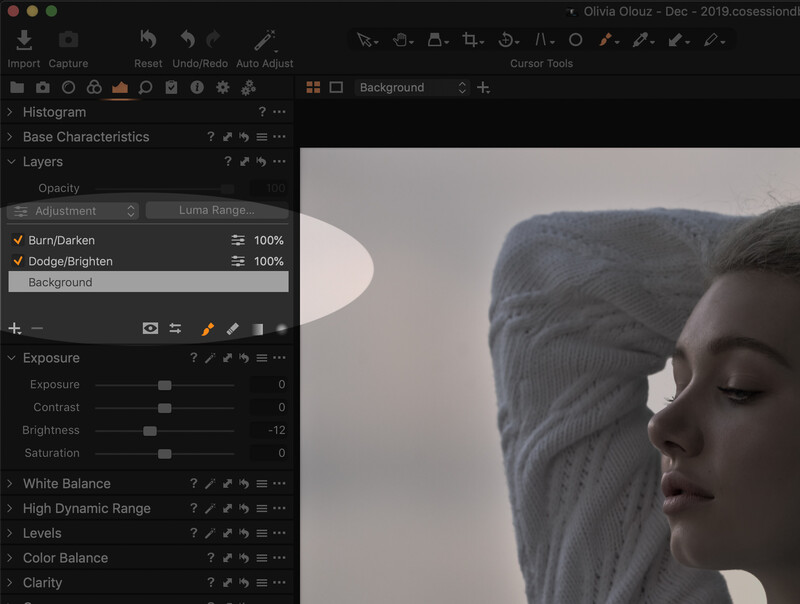
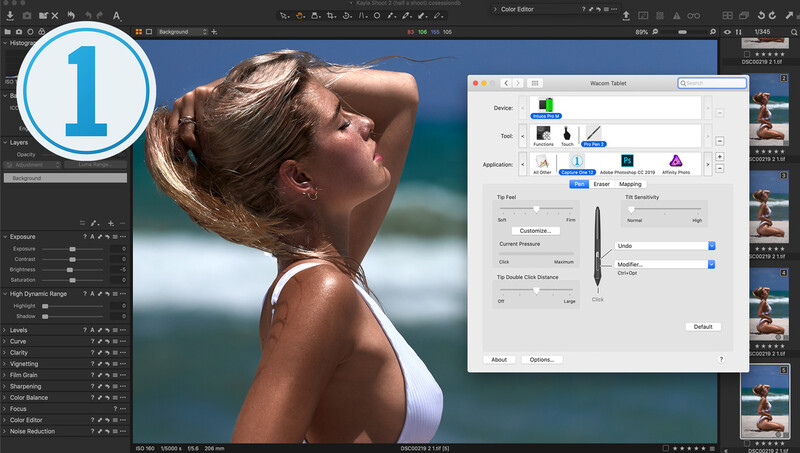
- Next, select either of the newly created layers and make the appropriate exposure adjustments for the corresponding layer with any of the tools you like, and then do the same for the other layer. Done this way, you will not be able to see the changes until you brush them in. So, select your Brush tool by either hitting the Brush icon in the layers tab, or hitting B. You can right-click to bring up the brush setting dialogue box and change size, hardness, opacity, and flow. You can also select masking and pen behavior functions here, particularly useful if using a Wacom tablet. (Click here to see how to set up your Wacom for Capture One). The Wacom tablet I use is the Wacom Intuos Pro Med, but honestly, most people don't need it for photo use, and to test the waters and in general, the Wacom Intuos Creative Pen Tablet for $69 is great.
- From here, you simply brush in the adjustment to a point you like best. You can always view your brush strokes/mask by toggling M on your keypad so you can see precisely what you’re doing.
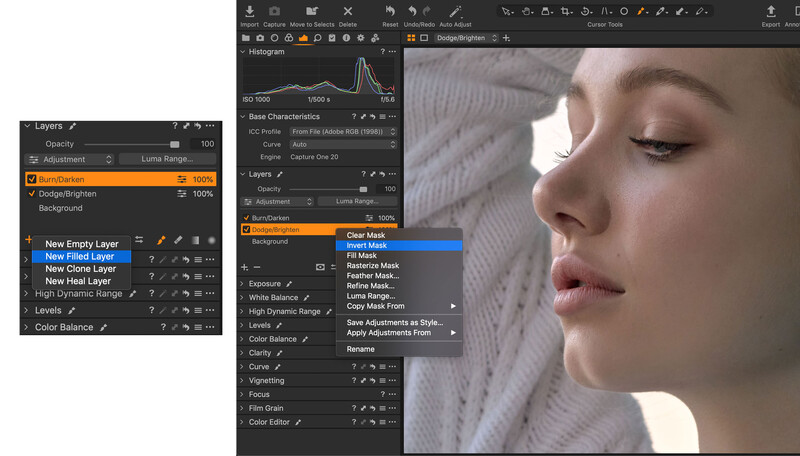
Alternatively, you can click and hold the + icon from above and choose to create New Filled Layers instead of Empty Layers, make the exposure adjustments, and you’ll see the changes as you move the Exposure slider so you know just how much of a change you are making. Then, you can right-click the layer, select Invert Mask so it appears normal, and then brush in the changes.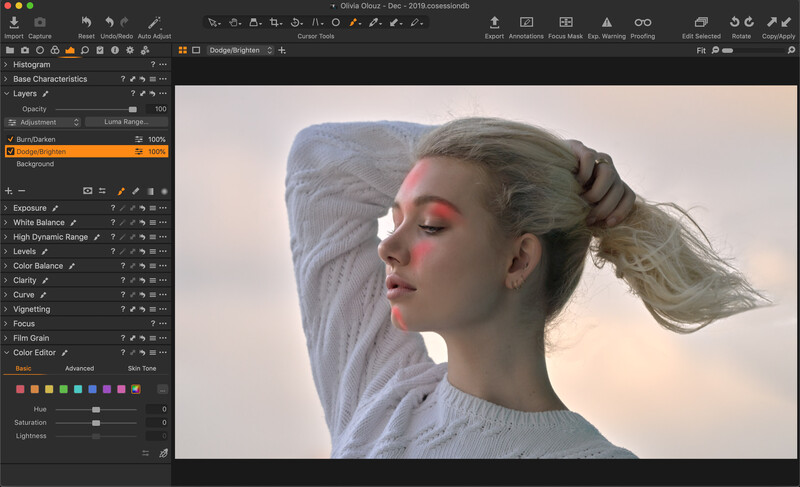
When dodging and burning, you’ll develop a method of practice you like with your own favorite settings, but for those starting with little to no experience, I suggest using a soft brush, 100% opacity, and a low flow rate around 2-5%, so you can gradually build up your adjustment and be more accurate and nuanced.
Keep in mind you can always go back in and change the level of adjustment made on a layer, and you have added control via the Opacity slider that allows you to quickly and easily adjust the visual strength of a particular layer. And you can also use other tools to adjust the masked areas, whether those are Curve, Levels, or even color alterations.
Check out the video below to see this in action:
Conclusion
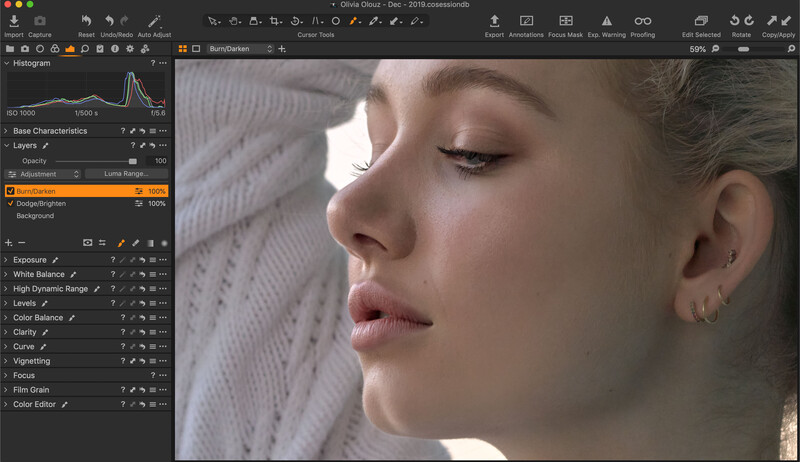
Dodging and burning is one of the best ways to really mold your image into what you want it to be, and becoming more familiar with it will serve you well regardless of what you shoot, but it’s particularly well suited to anything with fine detail and gradients, such as portraits, where you can use it to really carve out features and highlights.
If you don’t have Capture One, this is the perfect time to try it, and you can click here for a 30-day full trial of Capture One Pro.
If you're looking for a quick and effective way to learn Capture One, check out The Complete Capture One Editing Guide.


Join the Fstoppers community for free
-
Post comments and join in the discussions
-
Browse the site ad-free
-
Share your work and get featured in the community
-
Compete in the photo contests for fun and prizes
32 Comments
I do this on pretty much every shot these days, softish brush, 5% flow, 1 stop lower or higher exposure and a touch of contrast usually.
Hi Kishore...
Thanks for this tutorial, It quickly presents the basics in an easily understood manner.
Also, I really appreciate a thorough written explanation in addition to the video. So many articles like this present only a brief written introduction to the video. It is much easier (for me at least) to print a full written explanation with screen shots so that I can follow along with the printed material later on my own files instead of playing/stopping a video in a separate screen.
Tom
You are most welcome Tom. If you have any further questions about this, or indeed anything else, please don't hesitate to get in touch. Cheers
I just recently started playing with Capture One, as an alternative to LR and it's been great so far. I'll give this ol dodge and burn a go. Thanks Kishore!
Nick, glad to have you on board! Let me know what you want to learn or see - or shoot any questions over. Happy to help. Cheers
"whereas with Photoshop, you are working on a lossy file that degrades as you work it"
What? Photoshop will open a RAW file using Adobe RAW and give you pixel information after demosaicing, the same as capture one. There is no lossy compression opening a RAW in photoshop.
Agreed. Author seems a bit clueless. This article is a joke.
Hi Jay and Hugh, I appreciate how the nuance here might be cause for discrepancy as it's a common misunderstanding I've encountered in my years teaching both Photoshop and Lightroom, but to be clear, Photoshop is not a raw editor. When opening a raw file in Photoshop, as you noted Jay, it opens Camera Raw. Photoshop and Camera Raw are not one and the same, but PS is an application that supports Camera Raw.
When using it you are using a different tool, and only in Camera Raw are you processing the raw file. When you are finished in camera raw, and it prompts you to open as normal or a smart object in PS, you are no longer using Camera Raw and no longer editing a raw file. Lightroom uses the same raw processing engine as Camera Raw (in essence it is Camera Raw built into it), which is why LR is a raw processor - but Photoshop is not. Hence when I speak in the article about dodging and burning being lossy in Photoshop, that is the case, because you are not editing a raw file. And Camera raw does not have proper layer functionality as Photoshop does to work with layers at the raw processing stage as you can with Capture One (granted to a lesser degree than Photoshop as stated).
I hope this helps you guys, and you can reference more here: https://helpx.adobe.com/camera-raw/using/supported-cameras.html
Cheers
You still don't get it. When you open a file in Capture one, it is run through an algorithm called demosaicing that takes all the red, green and blue pixels and mashes them together to make a a full 20 or 24 or whatever megapixel block of uncompressed pixels, in which you then edit.
The same happens in LR, photoshop, or any other RAW editor.
There is no "editing a RAW file". ANY Raw has to be demosaiced into a group of true pixels. No camera except a Foveron sensor will give you a true 1-1 RGB value. That is the nature of the Bayer or XTrans sensor color grid. Of a 24mp camera, 8 mp are red, 8mp are blue, 16mp are green. All of these have to be mashed together by a computer first before they represent any kind of image, hence no pure RAW editing.
You are exactly right and this person shouldn't be making 'articles" with such terrible misinformation. Makes this looks like a bad infomercial trying to sell Capture One by lying about issues that do not exist.
As long as you are opening the raw file and not working on a lossy file like jpg, there is NO difference between the two.
Shame on this terrible article from fstoppers! I expected more.
The difference here is that Photoshop will open the RAW file, but then save as a PSD. Capture One will open the RAW file and keep an adjustments file separate, so that any changes applied are effectively layers on top of the RAW. It is only when the file is "processed" that the adjustments set. You can go back to the C1 file over and over again without ever having to use the re-saved file, always making adjustments to the RAW at processing.
Mark Harris, you are assuming that you always open the RAW file in Photoshop, which you won't if you go back to continue your work.
Kish is correct, when you're working in Photoshop you aren't working with the raw file, so you have less latitude for highlight and shadow recovery. Staying in Capture One gives you access to all of the raw file's highlight and shadow data for dodging and burning.
Quite a bit of my editing is dodge & burn. So for that, I've setup my keyboard shortcuts so the main common actions are clustered together. At least for me, makes the process much more efficient.
-- G key instead of the left bracket for decreasing the brush size.
-- H key instead of the right bracket for increasing the brush size.
-- J key to draw the mask.
-- U key to erase the mask.
This is great
Capture one is only good for tethered capture. It’s useless as a library or as an editor. This functionality is pointless. No serious editor is going to do a load of adjustments in capture one then export to another format degrading image quality and start again.
This article is really misleading and does a disservice to people who are looking for proper editing solutions.
Stick to photoshop.
What an ignorant and baseless comment. It's not uncommon to use one software then, continue editing on another. The fact you said, "and start again" suggests you don't know what you're talking about.
Your troll rant is misleading and does a disservice to people by making them think Photoshop is the only way. It's not.
And then there's me, using Capture One as a library and an editor with no issue for the last two years. And what you described, doing a load of adjustments in C1 to export to Photoshop and refine, is the exact process a ton of professionals use. So I have to ask, what data are you sourcing your conclusion from?
I’ve never met a professional who would do that. Non destructive editing is crucial to workflow especially if you have a client who might want a revised edit. If you’ve already dialed in some settings in capture one and gone on to edit in PS and consequently the client doesn’t like it you’re screwed and have to start the edit from scratch.
Okay, maybe I should explain it a bit further.
Making base, exposure balancing, and color correction adjustments and then exporting to Photoshop for cleaning and retouching is a very common practice. You can then make color grading adjustments in photoshop or capture one.
While it's less common, you can color grade before retouching if color revisions are decided on ahead of time or for less particular client processes, like model portfolio work, portrait session, etc.
But yeah, if you really think pros are really only editing ENTIRELY non-destructively, I'm afraid that's simply not true.
Ugh, moron alert
Nothing to add? Attack the person. If you’ve any intelligence you can debate my ideas. I guess not.
To be more precise in dodgung burning use two separate layers and add a luma range to your (brushed) mask. Then, only the light or dark areas are affected.
Agree this is great if you're only looking to affect luminosity values, and is how I tend to operate. It is a bit more sophisticated than described but a good way. Cheers
There is no quality loss in Photoshop if loading a raw file or even sending a lossless file from Capture One or Lightroom to it. This "article" needs to be removed for spreading such completely wrong information.
FStoppers..do you want to become the next Verge???
I made the switch from Lightroom to CaptureOne because the Adobe subscription model is not for me. This after using LR for years. 'Nuf sed on that issue. All the discussion about technical nits misses the crux of this "how-to" article about CaptureOne. If Adobe products work for you, great. Stick with them. If CaptureOne works for you, here's a how-to article. Did you get a decent photo with your Nikon-Canon camera? Great. Were you able to produce photo art with your Lightroom-CaptureOne software? Great. There are good/bad points about cameras/software. Pick one. Perfect your art. The art of Debate? There are forums for that too.
If you want to invest a load of time learning how to edit in a software that’s designed for capture go ahead and waste your time. If you want to advance to the next level then there’s no real way about it. You’re going to have to become proficient at PS and all that time spent wasted learning editing in C1.
Interesting article.
While I agree it's nice to be able to dodge and burn on a RAW file, the killer difference doing it in PS is the History Palette.
A history palette in C1 would render PS almost redundant for me.
I guess with low settings and some practice you can avoid having to repeat yourself when dodging and burning in C1, but a HP would make life easier for a lot of editing in C1.
Many thanks.
D.
interesting article!
Even at 0% hardness, brushes borders are too hard for any soft retouching.
It seems every article I see on Capture One is usually only portrait photography and all about skin tones.
That's great, but would love to see something where it's used for Astro photography or more Landscape photos.
Since Sony had this as a free version (essentials) for use with their cameras,
awhile back I paid to upgrade to the Sony Pro version 11 , and then later upgraded to version 12.
Today I log on to see what's new and find that to upgrade to version 20, I have to pay ~$200 AU.
Forget it. I think it's overpriced for the average amateur/hobbyist.
(I'm hoping it's just the current exchange rate?)
I guess I'll stick to something else for editing and leave this for the Pros who can afford it.
At least the Adobe bundle can do all kinds of stacking (focus), pano stitching, HDR etc as well as editing and library management.
Forgive me if I'm wrong but I've yet to see a demo video of Capture One doing anything other than retouching skin tones or shooting tethered. So I guess it's a product ideally suited for portrait photography?
Hi... There are so many articles about the tools in C1 but I found nobody telling us one very import thing: Batch editing in C1. Everyone tells it when doing 1 image but in practise I edit 100's. My final step is doing the dodging and burning. In LR I just pick my brush and set it up for dodging (or just pick the preset I use). And then dodge. When done I go to the next photo and I don't have to change a thing. I can just brush in the parts of the photo I want to lighten up. So every photo doesn't take more then 3-6 seconds. When I am in C1 and pick my brush and do the dodging and then go to the next photo, I still have the brush selected but I can't start dodging right away. This alone is a reason to stick to LR. Maybe I am just doing it all wrong :)