
How do you spot a good retoucher from a novice? It's in the skin. Sure, that’s an oversimplification, but one thing that separates the best from the lesser is how they treat skin.
While it is the prerogative of each person to adjust to taste, and "rules" should not impede on creative license, skin tones that match throughout the body without affecting texture is a hallmark of someone who knows what they’re doing, and being able to fix skin tone is essential for professional images whether you shoot portraits, headshots, weddings, swimwear, dancers, or anything else.
Historically, however, achieving even skin tones and retaining texture has been a complicated and involved process, typically requiring specialized knowledge in Photoshop and accessories like a Wacom pen tablet. Capture One removes that barrier from your path and makes achieving perfect skin easy for anyone.
Here’s how, using the dedicated Skin Tone Tool.
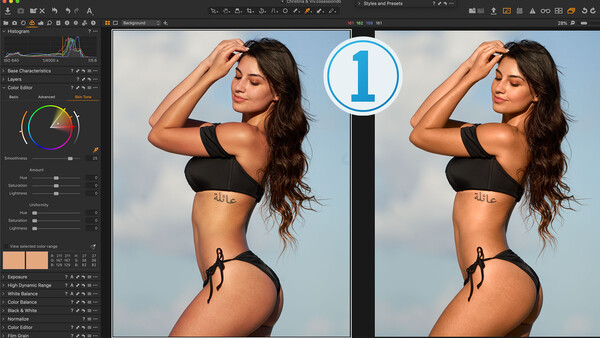
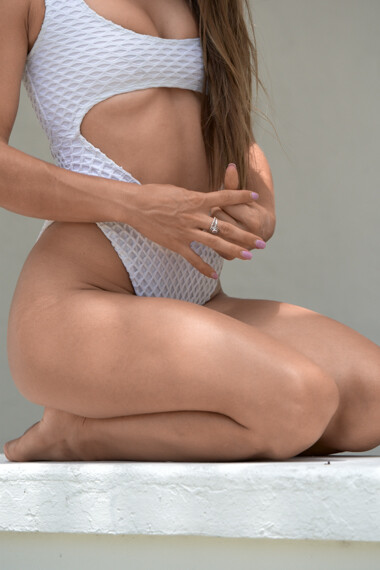
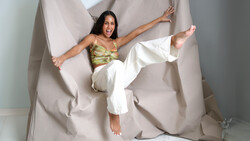
Base Image
This base image was shot in harsh, direct light, which is typically unforgiving, as it’s contrasty, which affects saturation, and of course, it highlights texture.
Even without makeup, our model, Christina, already has favorable skin by any standard, but we can see noticeable color shifts between different parts of her body, like higher green values in the torso and more reds in the arms. (You can see the exact values of any location in the image by moving the eyedropper from the White Balance tab around the image, and it’ll show in the bar above)
What we want to do is harmonize all the skin to be more even, but not exactly the same. Obviously, we’ll want to keep areas like the lips and palms of the hands differentiated; frankly, the whole body should have slight variances, and fortunately, Capture One’s layer opacity control and local adjustment masking makes this nuance not only possible but simple.
Step 1
Create a New Filled Layer. Doing so will lay a mask over the entire image, and you can toggle that mask on and off at any time by hitting the "M" key.
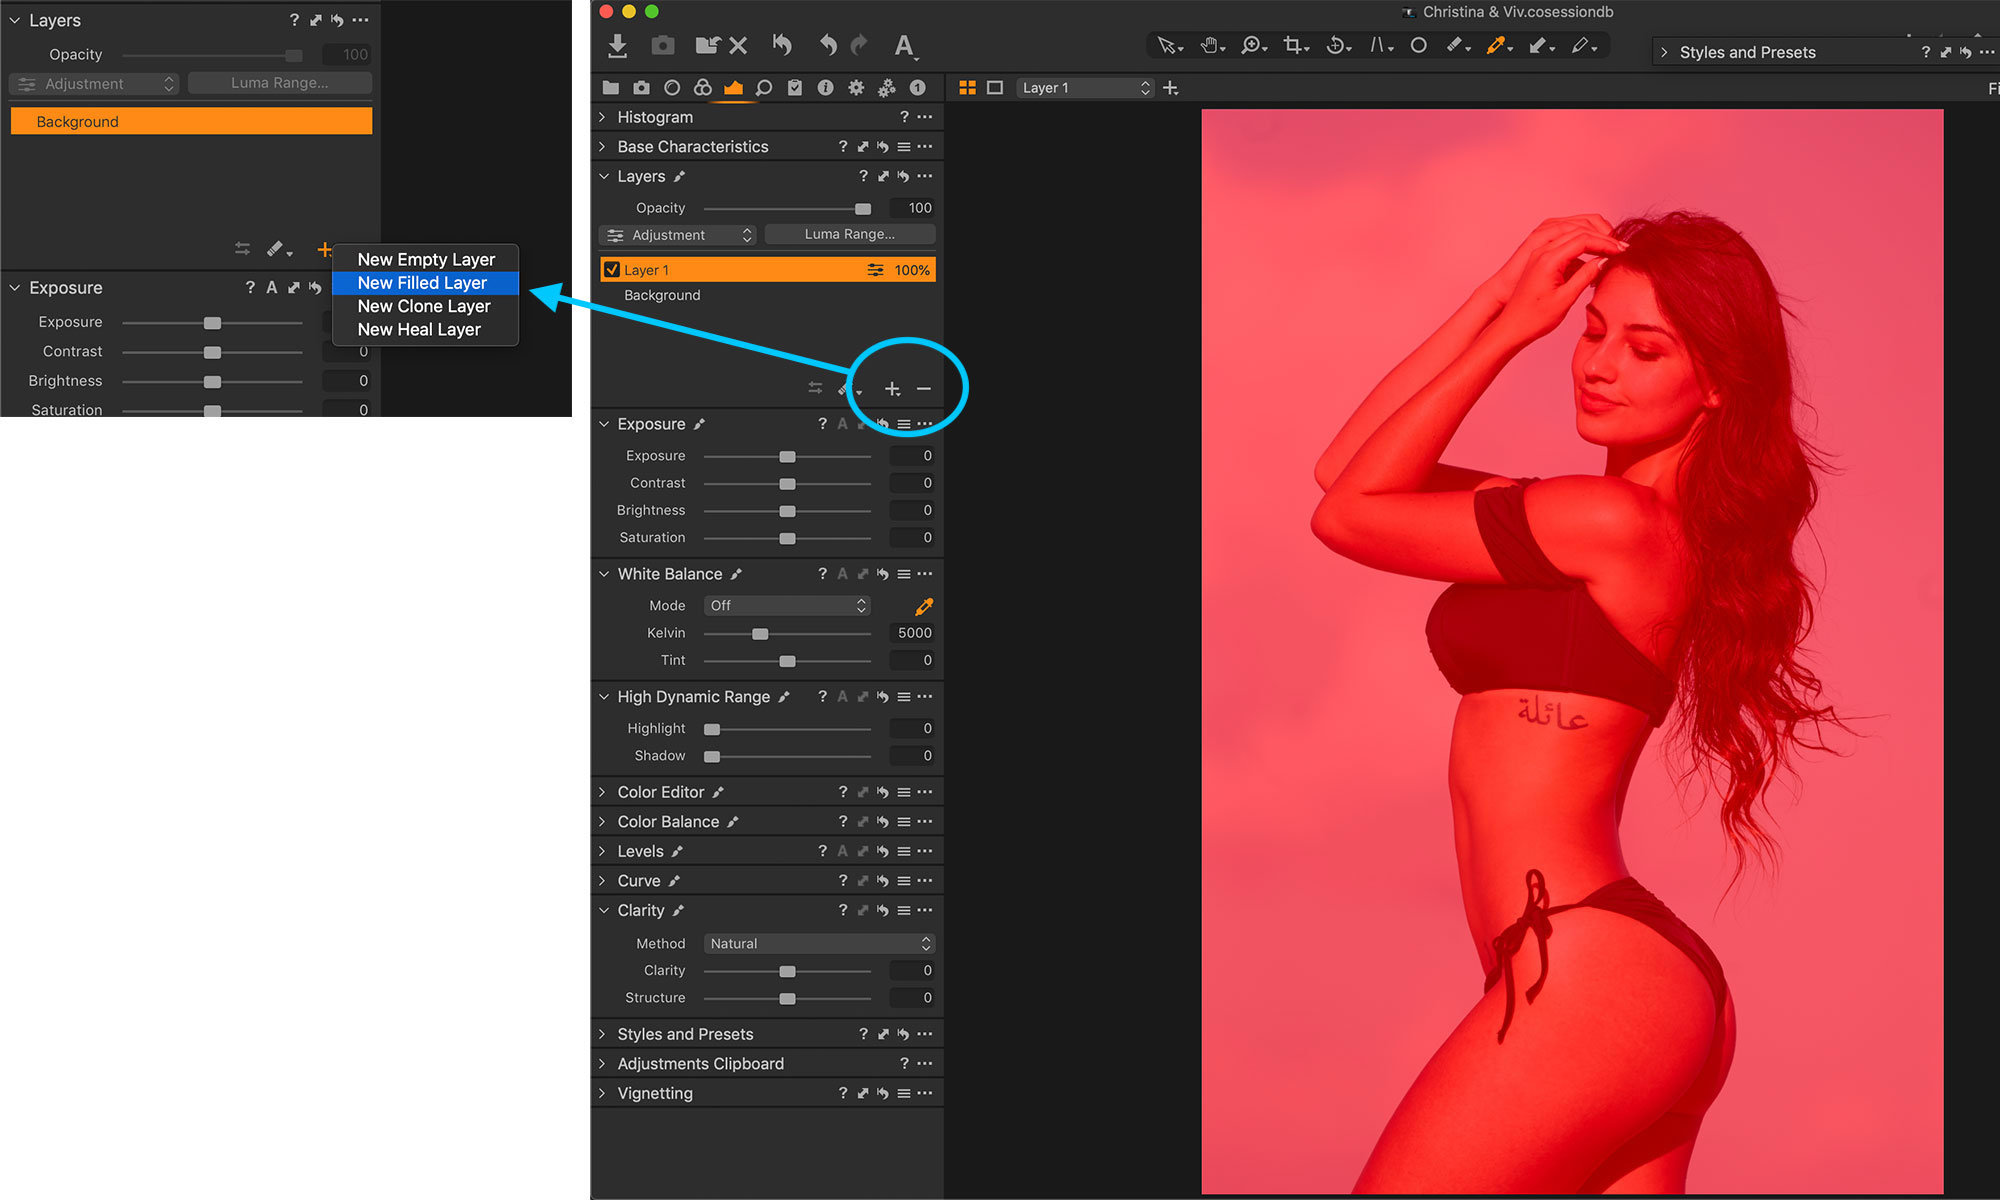
We create a mask over the whole image so we can easily see what’s being affected as we make adjustments, then we can go in and apply the mask only to the areas we like after.
Step 2
Click on the Color Editor tool and select the tab labeled "Skin Tone." This tool is easy to use and works by having you pick a "reference skin tone," and then, it equalizes everything else to that using sliders. It’s that simple.
Using the eye-dropper, select a tone on the image you want to be your reference tone. Once you do, the color wheel will show a range of colors in which will be the tone you picked.
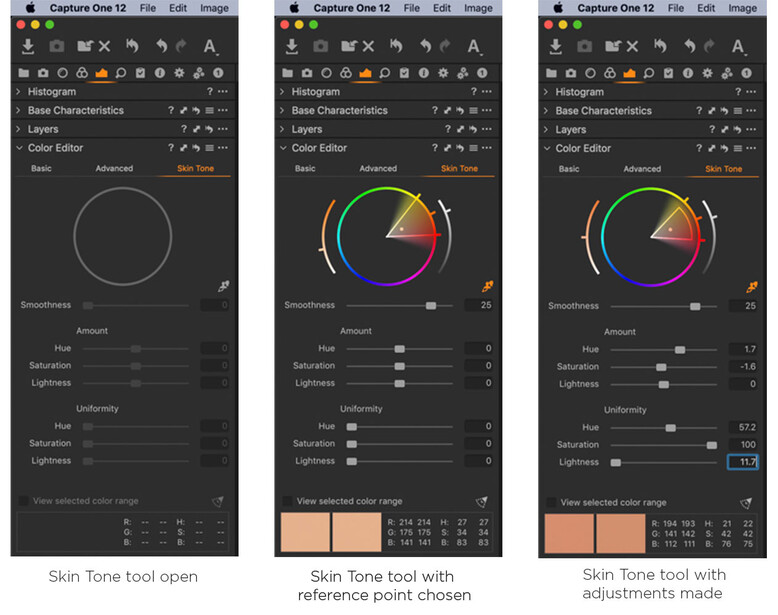
The dot in the center of the color wheel is the tone you’ve picked, and the wedge that surrounds it is all the colors that will be affected by the slider movements you’ll do next. You can drag the parameters of that wedge around to expand or decrease the colors to your liking.
Step 3
Move the Uniformity and Amount sliders around until you have an overall result you like. Be delicate with the "Lightness" slider, as while it’s useful and powerful, it can also flatten how the image looks if pushed a lot. You can see the settings for this image below.
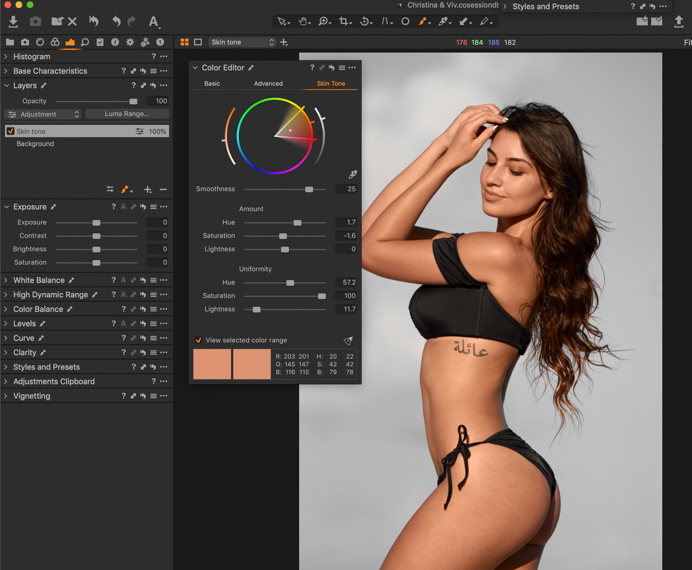
Once you are satisfied with the selection, you can toggle "View Selected Color Range" on and off to see all the parts of the image your adjustments will affect. In the image above, it is selected, which is why the blue sky is grayed out.
At this point, you're almost done.
Step 4
You’ll notice that since the mask is over the entire image, parts of the image you don’t want to match the skin (hair, lips, eyes, etc.) may also be affected. As you’re working on a masked layer, you can deal with this in two ways: erase all the areas of the mask you don’t want, or invert the mask and paint the mask in the areas you do with the Brush tool.
Given the uncomplicated nature of the background and swimsuit in this image, simply erasing the parts around the skin would be quickest. Also, keep in mind that you don’t need to be perfect with the mask, as you can use the "Refine Mask" feature to clean it up for you until the mask looks something like the screenshot below. Let Capture One do the heavy lifting for you.
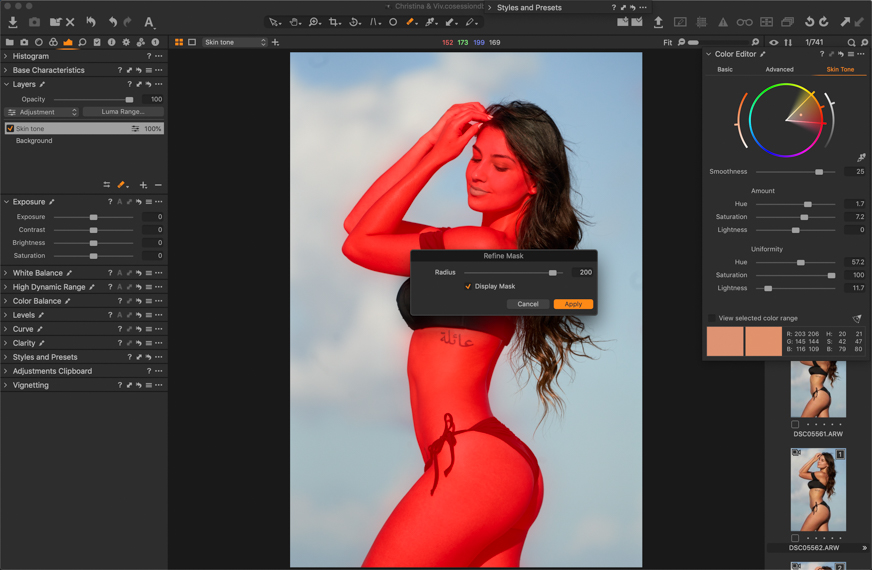
You can get creative with the Brush and Eraser tools by changing their flow and opacity and applying the mask at varying levels throughout if you wish, making for a more nuanced edit.
Step 5
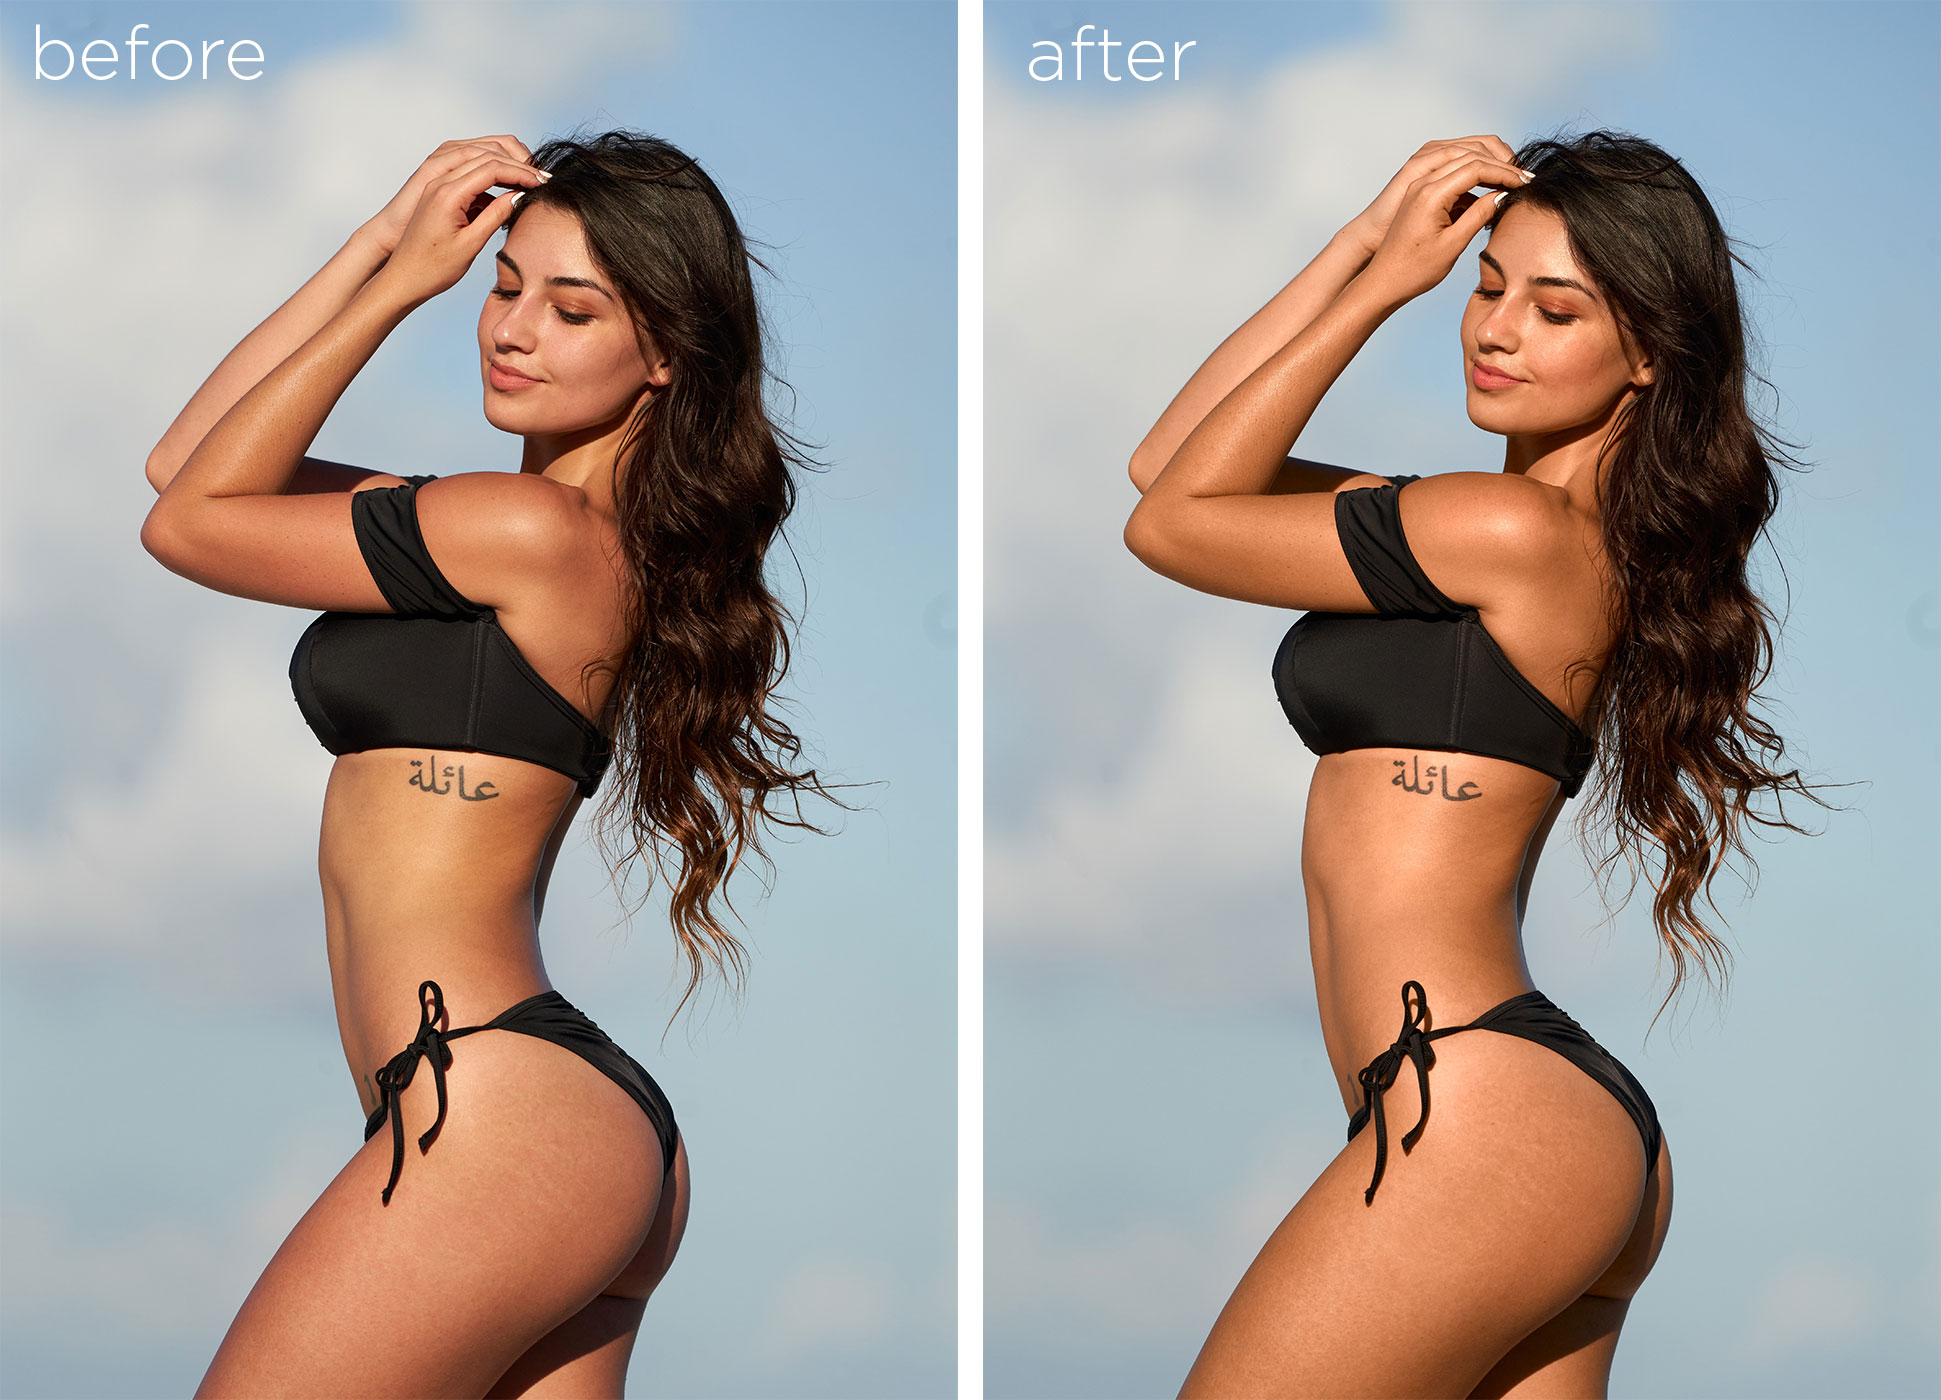
Hit the "M" key to hide the mask and reveal the final image. That’s it. (See more before/after examples below)
As you’re working on the raw file, you have a lot of latitude to go in and revise anything you’ve done and change it as you like. But now you’ve got a gorgeous raw file with beautiful skin tone without having to dive deep into Photoshop, and the process takes only a few minutes in Capture One. Once you've gone through the process once, it will take you no more than about 5 minutes to achieve this result.
More
Check out this video and let David Grover of Capture One show you the process above on headshot, and if you'd like to see more tips and tutorials about Capture One, over the next few weeks, we are going to teach you how to use Capture One from the ground up, right to the edge of the envelope, so check back often.
And if you want to jump-start and learn immediately, there is already a bevy of tutorials in the Capture One Learning Hub, and you can download Capture One here with a 30-day free trial.
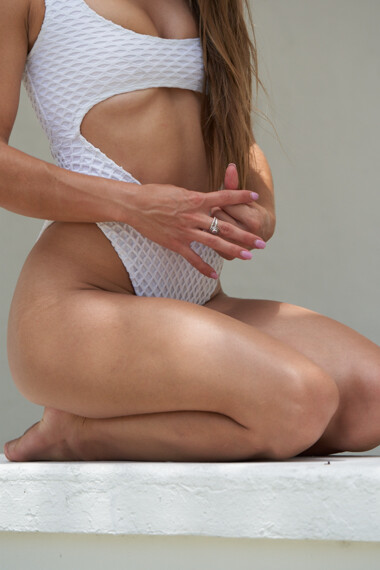
Additional Before & After Samples
If you're looking for a fast and effective way to learn Capture One, check out The Complete Capture One Editing Guide. a five hour video tutorial taught by Fstoppers' own Quentin Decaillet.

Join the Fstoppers community for free
-
Post comments and join in the discussions
-
Browse the site ad-free
-
Share your work and get featured in the community
-
Compete in the photo contests for fun and prizes
26 Comments
I must say that I don't see a lot of difference between before and after (maybe the rgb profile, the compression, my monitor?). But, for me, "before" (except the more yellowish part on the body) is a lot better, more natural, more volume…
Hey LC. I wouldn’t want to jump and suggest there’s something wrong with your monitor or settings - it’s probably fine. The changes here are certainly more on the refined/subtle end of the spectrum rather than drastic and overdone – which is what we see a lot of because it’s simpler. That said, they are significant.
I’d encourage you to click on the before/after image to to open the image larger in lightbox or download for a closer look.
The torso is the most obvious as it had the highest green values, but the neck, face, fingers, shoulders have all been evened out. As I mention in the post, it’s all to taste. I’ve done this in a way that’s how I’d deliver it and what agencies often look for, and if you wanted to go heavier you could absolutely do that. Happy to answer any questions you've got. Cheers
I use Capture One almost exclusively, and only break out Photoshop for heroics to save an image. Most of my adjustments are subtle, and can only be noticed if I turn on and off the layer. However, I agree with Mr. Cow and I think the author could have used a more dramatic example of correction. Such as some unwanted color cast, or rosacea. Most people or clients just don't see the difference on something like this.
Hi Brian and Deleted User , appreciate the input, and as such have added two more before and after samples that I believe will more obviously show the tool's performance. Anything else I can help with just holler.
--"Most people or clients just don't see the difference on something like this."
I think that's the point. I'm just speculating, but, had the author were more heavy-handed for the sake of example, then, no doubt, people would have commented, "omg, that looks terrible." A more realistic result, such as current examples, is more appropriate.
To me, the before and after changes are pretty evident.
Yes Deleted User that was absolutely a significant part of the thinking on this. Different photography realms, levels, and genres will also perceive these things differently. To you and I these are significant differences, but the scale of subtlety is different to those with different exposure I guess. Cheers
I love your cheese.
that is the point. to not see a big difference..
Can anyone recommend good Capture One tutorial resources to go "from zero to hero" please..
https://learn.captureone.com/
Try capture one buy capture one to end up admitting you probably prefer lightroom....
The skin color tool is the reason #1 that I use Capture One. When doing headshots, it's saves me a lot of time evening out redness on the skin. This tool is a game changer for me.
A lot of the commenters must not shoot women or portraits with skin editing/tone being a large part of their workflow.
I can understand and appreciate the tutorial you offered. I don’t use C1 and use LR/PS instead but hopefully some will get their heads out of their asses to value this.
I have edited color skins for decades using Photoshop, and cmyk… I am still waiting to find a better way to do that
Do not fix which does not need to be fixed :) Bad example to start with since original is already deliverable without any questioning it :) Happy shooting guys.
I'll have to respectfully disagree with you here Jozef. Deliverable without questioning would certainly depend on who you're delivering to, and the original here would not be something I'd deliver (or accepted) to a number of individuals and agencies I have and do work with. It's certainly a matter of perspective. Cheers
Yes and No.
Yes = Don't fix if doesn't need fixing. Hell, I hate editing. I don't do it unless I have to.
No = The original did need fixing.
Shortcut to the madness.
If color is an absolute in your workflow -- use a color checker by Xrite and the job is done. 1 click profiles inside Lr (for those lame enough to use it) and your worries are over. But the all white, 50% gray, and others are all supported in RAW handlers and Ps
This is completely untrue. White balance has very little to do with having skin tones correct and can also throw off your skin tones by using a global white balance/toning. Skin has to be edited separate.
I do use C1 for a while now and I love it, but Skin Tone section of colour tab usually doesn't do what I want. Problem is that on a pixel level skin is not just "orange" or just "red" - it's a mixture of different colours put next to each other. Uniforming hue does what it says - uniforms hues from pixels around them into one hue value which leads to not that natural effects. This is why I prefer to do this on Hue/Saturation layer in photoshop. Yeah it's bit slower, but results are a little more natural. On a quickfix level thou it's cool feature, I've already tried few times get to point where I don't have to run Photoshop at all and I think with C1 I'm getting real close to that :)
What you’ve said is true- if you push everything to the max. But instead of that you can pull the values a little more toward the same value with the sliders, which will look much more natural. Or you can paint in the mask in varying amounts just where you want it with flow and opacity settings for the brush. Then you can also adjust the opacity of the layer. To say that it makes the hue completely uniform is really missing what this can do. You can also target only specific tones within the skin to adjust toward a target tone by adjusting the color selection wheel. You have loads of control if you don’t just use it like a slap-on filter.
I have tried this tool in C1 in the past, but do not use it much in my actual workflow. It looks to me like it is giving all the skin the same hue, which looks fake very often. In my opinion skin should have a bit different hue in shadows, highlights and midtones to look real. Using gradient map in Photoshop looks like better solution to me.
Just like everything else with a slider, you can just adjust to taste.
I see differences clearly in this example. I started using C1 a few months ago; and integrated it to my workflow. it’s powerful and takes some getting used to after using PS and LR for several years. I do like the results, but like anything else it takes some getting used to. I find the UI difficult but for color correcting skin easy. And once you get used to it, makes batch processing these corrections a snap.
It’s not discussed here, but for shooting tethered, its superb .
Why wasn't the skin tone on Model #1's right arm adjusted to match the color of the left arm? Right arm looks very odd.
Inner arms are different in color, much lighter skin. If they matched it would look really weird. But the color was adjusted to match the rest of the skin tone adjustments.