Bird photos that look fake, plastic, or AI-generated usually aren't a shooting problem. They're an editing problem, and the fix starts with recognizing exactly where things go wrong.
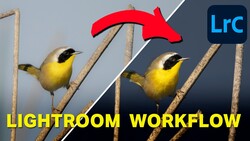
Coming to you from Chiara Talia - Wildlife Photography, this sharp and practical video breaks down five editing mistakes that turn natural-looking bird photos into overdone, artificial-looking images. Talia starts with over-cropping, which she calls the most common mistake she sees. Every time you crop, you lose pixels, and past a certain point, no amount of sharpening recovers the detail. The rule of thumb she offers is simple: a bird that's slightly smaller in the frame will always look better than one that's been cropped into softness. From there, she moves into over-sharpening, where the obsession with crisp feather detail leads to that crunchy, halo-edged look that reads as heavily processed the moment you see it. She's clear that sharpness is a legitimate technical goal, but the Lightroom sharpness slider, texture, and clarity all interact, and pushing them too hard creates artifacts, not detail.
The masking section is where things get particularly interesting. Talia describes two distinct ways masking goes wrong: selecting areas you didn't intend to adjust, like background gaps between feathers, and applying adjustments so aggressively that the boundary between subject and background becomes visually incoherent. She has a name for one common version of this, the "holy light effect," where a radial gradient brightens the top of the frame until the bird looks like it's being lit from above for dramatic effect. The fourth mistake pairs naturally with over-sharpening: dragging clarity way down on the background to fake a smooth, blurred look. Talia is direct about this one. The soft, glowing effect that heavy negative clarity creates simply doesn't exist in nature, and it makes wildlife images look like portrait edits.
The fifth mistake covers color, and Talia splits it into two categories. The obvious one is over-saturation, where colors go so intense they read as cartoonish. The subtler one is applying warm, golden-hour tones to a photo that was shot on a flat, overcast day. The light, shadows, and color temperature stop making sense together, and even viewers who can't identify why something looks off will feel it. Her framing here is useful: the problem isn't pushing color creatively. The problem is doing it without intention, where the result doesn't match any deliberate choice. She makes a point of saying that faithful color, mood-driven color, and fully artistic color grading are all valid directions, but you need to know which one you're going for before you move a slider. Check out the video above for the full breakdown from Talia.
Join the Fstoppers community for free
-
Post comments and join in the discussions
-
Browse the site ad-free
-
Share your work and get featured in the community
-
Compete in the photo contests for fun and prizes
1 Comment
Cropping is what all those big MP cameras everyone says you can do. Well yes you lose Pixels but what about all editors that have upsizing getting more pixels back to the size of the original image? Yes all things are to be posted next to the editing place!!!
For me i like to use the Color Mixer section of Lrc and say the Large Egrets and the other Snowy Egrets that both nest together in the same trees for some times the true face and beck colors to not come out bright enough and that i when I just do a brush over the area and like you state just enough for identification.
One thing I see in images of white as well all color birds is when on a sunny day expose dial is not low enough like most cameras only go to 3 mine the A7RV goes to 5 but not the point, the point is no one uses the zebra setting correctly not only for birds but also for fall colors. most just shoot early mornings or evenings with the sun behind. The goal is less brightness for more detail, a dim image can be brightened in post.
On thing with camera updates is the AWB selections of normal, amber or white! I think few know about this not only for bird colors but also for say sunsets with white boats in the foreground the white setting will keep those white vs a blue tint, you will notice many white birds with that blue tint on the white parts. Also example white on white on white subjects like a dirty polar bear on white snow with snow falling all different shades of white and getting that difference is selecting the correct AWB selection. Also as far as colors selecting white for night capture where you have white LED lights but see a blue tint below where that white or correct color of say a white car only half is white the other part shads of blue tint.
Like with fall colors are done on cloudy days as well as vegetation flowers and yes birds but very few will have sky with clouds for exposure was not reduced with a correct zebra setting to also to get the detail of them like getting the detail of feathers of all colors getting the shine off without using a CPL also even though in the end all help with a beginning image and detail that does not need be more.