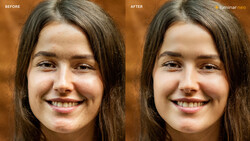
Retouched skin that looks great up close but goes flat the moment you zoom out is one of the most common problems in portrait editing. There's a technique built into Photoshop's frequency separation workflow that can fix this, and most people walk right past it.
Coming to you from PiXimperfect, this practical video from Unmesh Dinda walks through a skin texture recovery method hidden inside Photoshop's frequency separation process. The core idea is simple: once you've run frequency separation and isolated the high-frequency layer, duplicating that layer alone brings back sharpness and texture that heavy retouching tends to flatten. You don't even need to be using frequency separation for actual skin softening. You can run the process purely to get access to that high-frequency layer and use it as a sharpening tool.
The technique works by separating texture from tone and color, then stacking the texture layer to amplify what's already there. When you duplicate the high-frequency layer, the skin detail snaps back in a way that regular sharpening doesn't quite replicate. You can also mask the duplicated layer so the added texture only hits the areas you want, which creates a natural depth effect where sharp areas read as being in focus and softer areas fall back. This lets you guide the viewer's eye without it looking manipulated.
Where it gets more interesting is in controlling the intensity when the effect is too strong. Dinda shows how "Blend If" inside the layer style dialog can pull the texture out of shadow areas, which is where over-sharpening tends to create unnatural shine or harsh halos. By splitting the Blend If slider with the Alt key, you get a gradual transition instead of a hard cutoff. That small step alone makes the result look far more like real skin rather than a sharpening filter applied on top of retouching. On top of that, standard layer opacity gives you a final dial to back off the intensity if needed, and Dinda covers a keyboard shortcut for adjusting opacity quickly depending on which tool you have active. Check out the video above for the full breakdown from Dinda, including the Blend If settings and masking approach.


Join the Fstoppers community for free
-
Post comments and join in the discussions
-
Browse the site ad-free
-
Share your work and get featured in the community
-
Compete in the photo contests for fun and prizes
No comments yet