Photoshop 27.3.1 introduces three new adjustment layers: Color and Vibrance, Clarity and Dehaze, and Grain. If you rely on selective edits and non-destructive control, these additions change how quickly and cleanly you can shape an image.
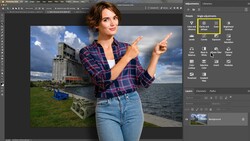
Coming to you from Aaron Nace with Phlearn, this practical video walks through the new tools in Photoshop 27.3.1 and shows how they fit into real edits. After updating to version 27.3.1, you’ll find Color and Vibrance available as its own adjustment layer rather than borrowing controls from Camera Raw. White balance now lives directly inside the layer, including temperature, tint, and an eyedropper for setting a neutral point. Click on something gray and Photoshop corrects the rest of the frame around it. Push vibrance and you’ll see colors intensify while skin tones stay controlled, unlike saturation, which boosts everything evenly and can turn faces orange fast.
That distinction changes how you handle portraits. With vibrance, you can safely move into the 60 to 80 range and still keep skin from looking artificial. Saturation demands restraint. The layer also comes with a built-in mask, so you can limit color shifts to specific areas without duplicating layers or jumping through menus. Toggle visibility on and off and you see exactly how much impact a single adjustment makes. It keeps the process contained and reversible.
Clarity and Dehaze now sit together in their own adjustment layer, giving you midtone contrast and haze reduction without opening another workspace. Add clarity to a product shot or textured surface and details snap into place. Invert the layer mask, paint in white over your subject, and you control exactly where that crispness appears. Leave faces alone and target objects, buildings, or landscapes instead. The dehaze slider cuts through low-contrast fog or atmospheric softness, deepening blacks and restoring structure. Stack one layer for global dehaze, then another for localized clarity, and you get separation without flattening the whole frame.
The Grain adjustment layer may be the quiet favorite. Before this update, adding grain meant building overlays or running filters and converting layers to smart objects. Now, it’s a slider with size and roughness controls baked in. Increase the amount to see the pattern clearly, adjust size for fine or chunky texture, and tweak roughness to change how harsh the grain feels. After dialing it in, lower the layer opacity for subtle blending. It works especially well when compositing multiple images together, helping unify tones so the final result feels cohesive rather than pieced together.
Each of these adjustment layers stays fully editable at any point. Double-click the layer icon and the controls return. Paint on the mask again. Turn visibility off. Nothing touches the original background layer. Check out the video above for the full rundown from Nace.

Join the Fstoppers community for free
-
Post comments and join in the discussions
-
Browse the site ad-free
-
Share your work and get featured in the community
-
Compete in the photo contests for fun and prizes
No comments yet