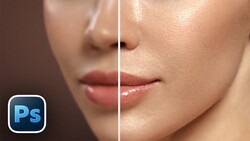
Portrait retouching is one of those skills where the gap between fast and good is enormous. Generative AI can fill in a blemish in seconds, but the moment you zoom in, the skin texture looks synthetic, the pores disappear, and the person starts to look like someone else entirely.
Coming to you from Unmesh Dinda of PiXimperfect, this detailed video walks through a three-step manual retouching framework called the BSD method, where each letter stands for a distinct phase: blemishes, softening, and tone. Dinda starts with blemish removal and makes a clear case for why the Healing Brush tool gives you something the Remove tool cannot: deliberate texture choices. When you sample a specific patch of skin and paint it over a blemish, you decide what replaces it. That distinction matters most when your image is headed for a magazine cover or a billboard, where pixel-level decisions become visible at scale. Dinda also raises something that gets overlooked in most retouching tutorials: permanent marks like birthmarks are part of a person's identity, and removing them without intention changes who appears in the photograph.
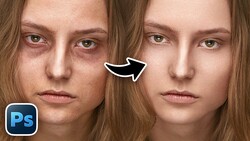
The second step uses frequency separation. The technique splits the image into two layers, one holding texture and one holding color and tone, so you can smooth uneven skin tones without destroying the surface detail underneath. A particularly useful tip here is opening a second window of the same document and arranging both views side by side, one zoomed in for precision and one at full scale to keep you from over-processing. The high-frequency layer, which holds all the skin texture, stays completely intact throughout the smoothing process, which is what makes the result look real rather than plastic.
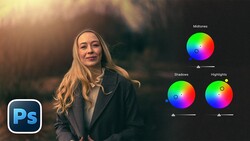
The third step, tone correction, uses a gradient map to equalize skin tones across the entire image. Dinda builds a custom gradient by sampling colors directly from areas of the skin where the tone is already correct, then uses that gradient as a reference to bring the rest of the image into alignment. It's a methodical approach that produces consistent results without guessing. The video also covers a quick hue/saturation adjustment to pull back any excess yellow in the skin, which is a common issue that's easy to miss until you know what to look for. After the BSD steps are complete, Dinda goes further with iris detail work and a finishing curves adjustment, techniques that push the image into high-end commercial territory.
Check out the video above for the full rundown from Dinda, including frequency separation, the iris brush, and the complete walkthrough of every step in the BSD method.


Join the Fstoppers community for free
-
Post comments and join in the discussions
-
Browse the site ad-free
-
Share your work and get featured in the community
-
Compete in the photo contests for fun and prizes
No comments yet