You can do all sorts of creative things to portraits, but if you don't get the skin tones right, chances are your viewer will notice something off. This great video will show you a quick and effective method for color correcting skin in Photoshop.
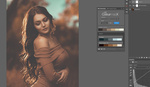
Coming to you from Aaron Nace of Phlearn, this helpful video will show you how to use a selective color adjustment layer to color correct skin using Photoshop. One thing to note is that the selective color adjustment layer is a global adjustment, meaning that when you apply it, it will affect the entire image, not just the skin tones. Thus, be sure to create a layer mask and paint the effect in using the brush tool. As Nace mentions, it's easy to go overboard in Photoshop, and I find that I tend to go particularly overboard when I'm working with color. To counteract this, it's good to dial back the opacity of the adjustment layer to 70 or 80 percent, then get up and walk away from the computer (or just mouse over to something else) for about five minutes so you can return with a fresh set of eyes. Check out the video above for the complete rundown of the technique.


This guy is a true expert: https://www.youtube.com/watch?v=Wvr8LCSuFjE
Hahaha, I was just going to ask about this! Is this pretty much the same process?
Yup, his videos are amazing.
Yes, the best photoshop "professor" on Youtube IMHO