I’m sure most people have been in this situation: You are going through some old images of you when you were a child and come along an image that you absolutely adore. Maybe you want to share it across social media, or display it on your desk at work. The problem though is that after years of sitting in a box in the attic has taken its toll on the image. You are now left with a scratched up mess of a print. Watch as Aaron Nace from Phlearn walks through the key steps to repairing your tattered image to something you are proud to show off.
Step one is removing all of the dust and scratches with a Photoshop filter called “dust and scratches”. This filter has two adjustment sliders that control the effect. The radius slider controls the amount of blur that is applied, while the threshold slider is used to preserve edge detail. Nace walks through the best way to adjust these sliders in order to maximize the effect while also preserving as much detail as possible.
The next step is to remove some lines and other artifacts from the image. To do this, Nace uses the healing brush tool on a blank layer with the content aware option turned on.
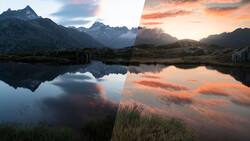
The next problem that Nace tackles is the sky. The first issue with the sky is that it is a lot darker than it should be. To fix this, Nace uses a levels layer and adjusts the midpoint until the lightness look correct. The trick to this step though is that Nace uses a black and white layer to help him better visualize the luminosity. The way this check layer works is that it allows you to only see the changes you are making to the luminosity of the image, instead of being thrown off by the effects you are causing to the color. This black and white layer is later deleted, leaving you with the correct luminosity being applied to your color image.
After the luminosity of the sky is fixed, Nace then goes to work on the color problem. In order to change the color of the sky, a hue saturation adjustment layer set to colorize is used. This allows you to add a blue color to the sky that was not originally there.
The final step is to fix the overall color of the image. This is done using the color balance adjustment layer. For this adjustment, Nace walks through how he makes corrections to the shadows, midtones, and highlights.
[via Phlearn]


No comments yet