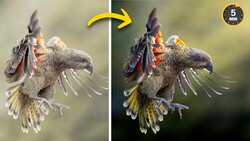
A dark, high-ISO frame with a heavy blue color cast doesn't look like much on the back of the camera. With the right sequence of adjustments, that same file can carry a warm beam of light streaming down onto the subject, and all of it happens inside Lightroom.
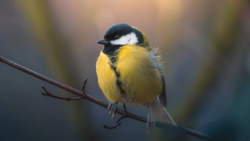
Christian Möhrle walks through the full edit on a single animal portrait. The work starts with denoise in the details panel, which cleans up the grain from the dark, high-ISO capture before anything else touches the image. From there, the profile switches to Adobe Landscape for a stronger color base, and the exposure, shadows, blacks, highlights, and whites all come up to pull detail out of the murk. The white balance gets a serious correction too, warming the temperature to kill the blue cast in the fur and nudging the tint toward green to clear a lingering purple. By the end of the basic panel, clarity and dehaze both drop hard for a dreamy, soft feel.
The backlight itself is built entirely from masks. Möhrle starts with an inverted radial gradient to darken the outer edges, then lays down a thinner radial gradient with its center placed outside the frame so the widest part of the light sits at the top. He subtracts a subject mask so the glow stays in the background, then stacks several more light masks on top for a natural result, each one warmed with temperature and softened with dehaze. Linear gradients darken both sides of the frame, with the far right pushed nearly black, so the viewer's eye is pulled straight to the center. Throughout, he keeps one eye on the histogram to avoid clipping the highlights as the whites climb.
The smartest part of the process is how he handles light landing on the subject. A pure light source overhead would naturally catch the top of the animal's fur, so he creates a subject mask, then intersects it with a brush set to full feather and paints only along the back where the light hits. That intersect step is a technique worth stealing for any portrait or wildlife edit. It lets you confine an adjustment to the overlap of two selections, so the brightening reads as physically correct rather than pasted on. A rectangular object selection around the eye clears the last of the blue cast, and small color grading and sharpening moves finish the file.
This kind of edit reflects how far Lightroom's masking has come. AI subject and object selection, the intersect and subtract options, and the built-in denoise all arrived in relatively recent updates, and together they close much of the gap that used to send people into Photoshop for exactly this sort of composite lighting work. The principle underneath it applies whether you shoot landscapes, portraits, or animals: light shapes attention, and darkening the edges while lifting a single warm path through the frame is one of the oldest ways to control where a viewer looks. Painters called it chiaroscuro long before anyone had a develop module. Building it in post gives you that control even when the conditions on location never delivered it, which makes the approach especially useful for anyone shooting in flat light or at the wrong time of day.
The edit fits best when your original frame has a plausible reason for a light source, a bright sky, an opening in trees, a gap the sun could pass through, since the effect leans on believability more than intensity. The restrained hand on exposure, the careful attention to clipping, and the layering of multiple soft masks over one heavy one are what keep it from tipping into the obviously fake.
Watch the full breakdown in the video above to see every mask placement and slider move in real time.
Join the Fstoppers community for free
-
Post comments and join in the discussions
-
Browse the site ad-free
-
Share your work and get featured in the community
-
Compete in the photo contests for fun and prizes
No comments yet