Learning to find the perfect light is something that takes time and experience. But what do you do when the perfect light isn't there? Shooting in hard sunlight isn't always the most flattering or ideal situation. Don't settle for less than ideal results, bad light doesn't have to mean bad images. In this tutorial you'll learn how to defeat hard light by scrimming and lighting to completely reset your lighting conditions and take control of your shoot.
This I week had a chance to take one of my photography classes out on a really beautiful and sunny February day. They are in the midst of learning how to use their 5-in-1 reflectors to modify lighting conditions, but I decided to take things one step further.
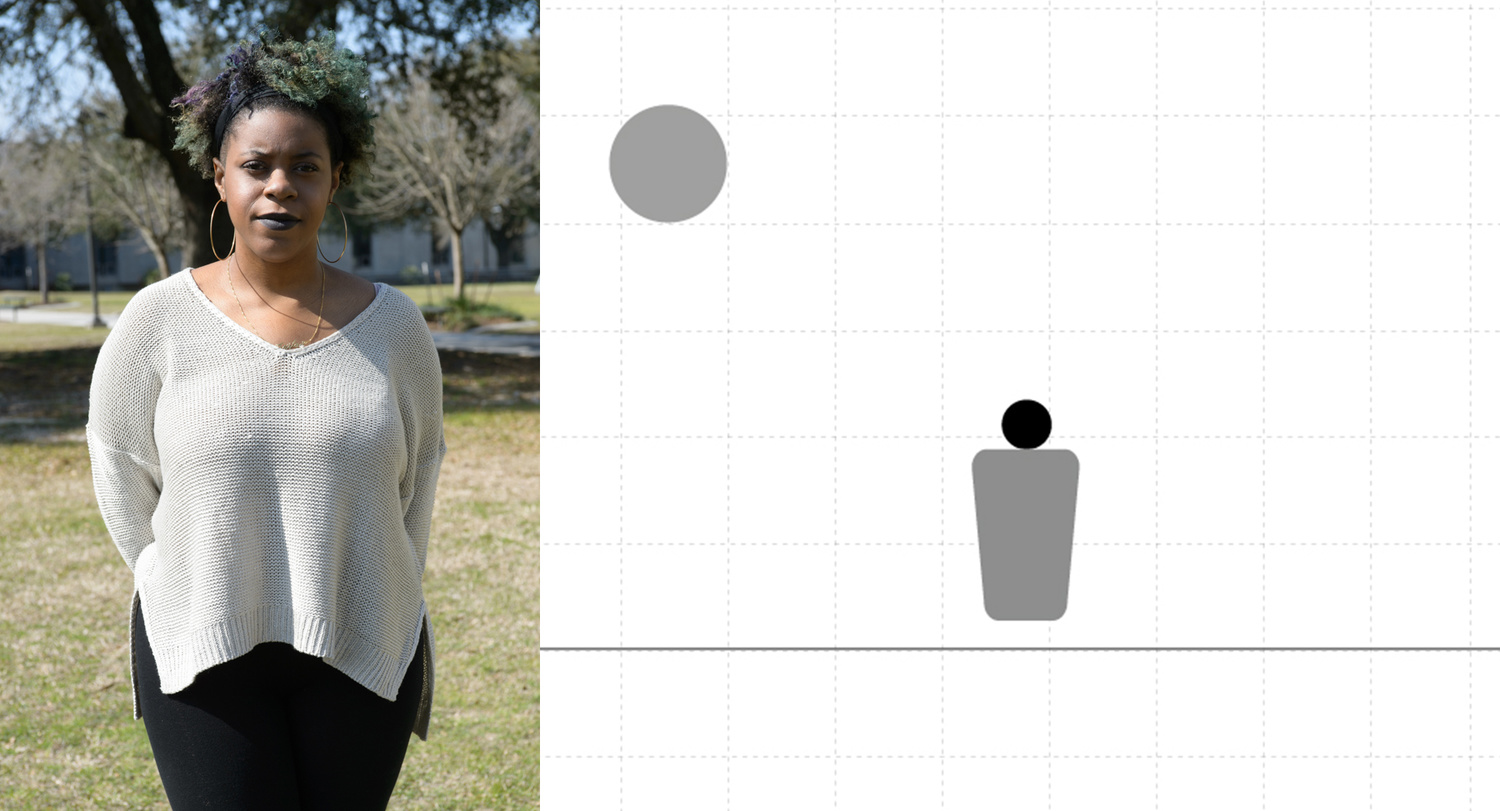
1.) First, we shoot the natural light in order to see what we are dealing with. In the image below we can see the available light. There is no modification to the light here at all. The sun is high and camera left. It was approximately 1 p.m. when this shot was taken.
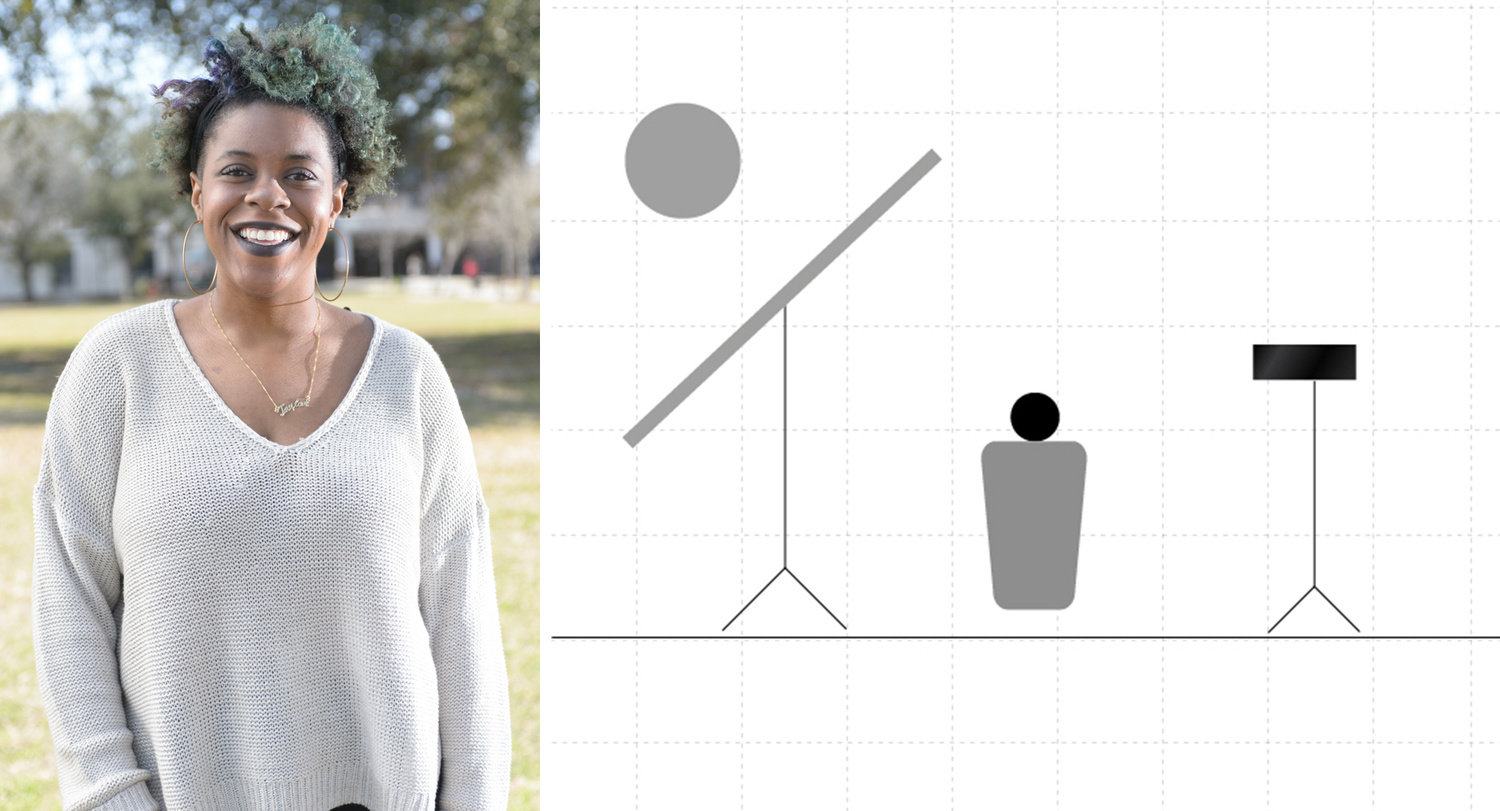
2.) Here we see the dramatic shift of simply scrimming the light. By scrimming I am referring to using a piece of diffusion material that blocks and softens the light. The quality of a light source is determined by the last thing it travels through. So even though the the actual light is coming from the sun (a hard pin-light source), it is now being modified by a large piece of diffusion material that is placed fairly close to the subject, creating a very soft light.
3.) Now we have added an artificial light source. We have pointed a Profoto D1 Head with no modifier directly onto our subject. This controlled hard light is something that can work in certain styles and genres of photography, and provides a hard, edgy look.
4.) Next we are modifying our strobe light source with a Medium Westcott Apollo softbox. By balancing the exposure, we are able to maintain a naturally lit appearance. By placing the Apollo softbox over the Profoto, the light source goes from a hard light to a soft light.
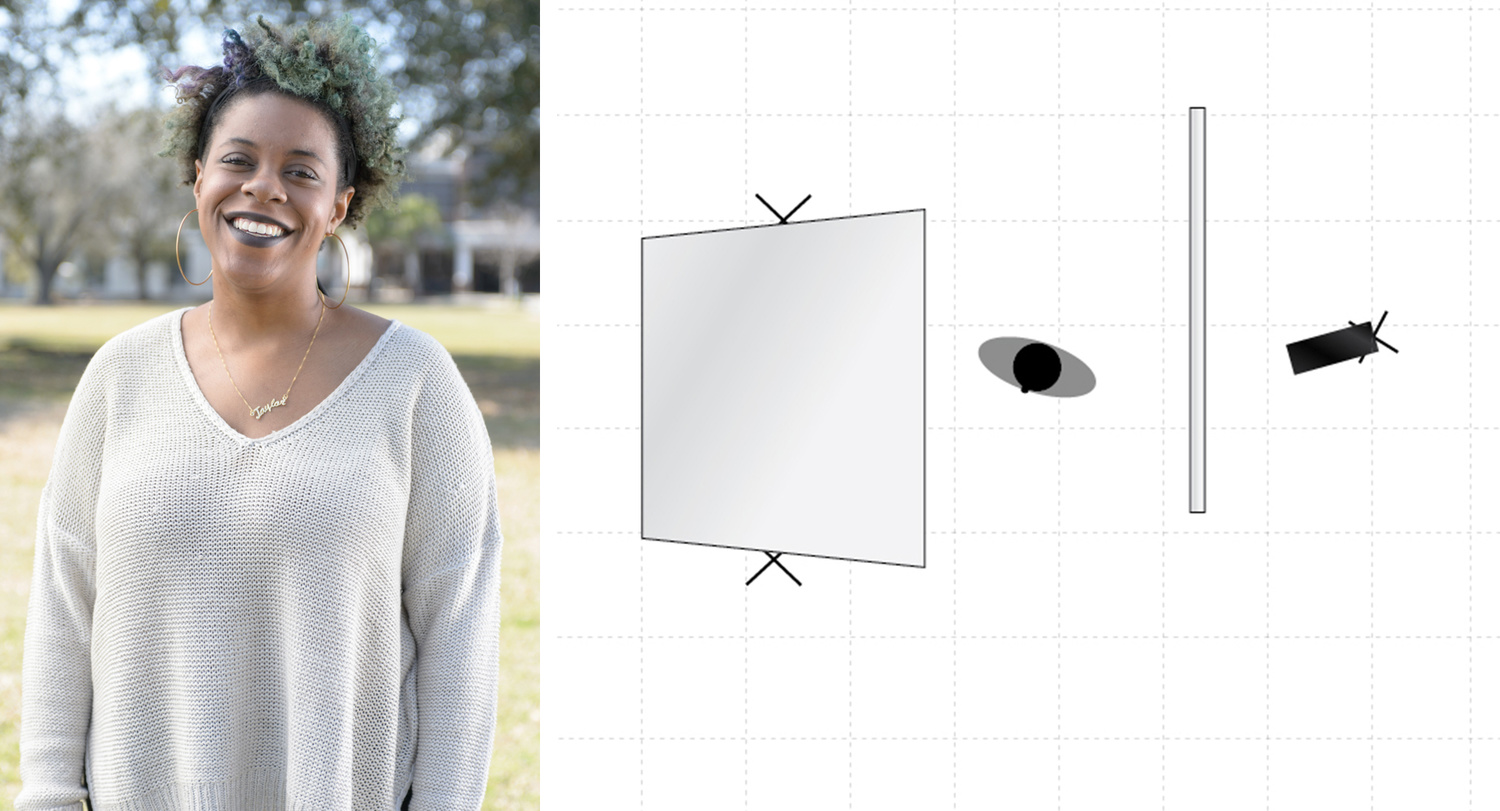
5.) Then we decided to see how things would look if we placed our strobe on the side of the subject, coming from the opposite direction of our scrimmed sunlight. For comparison sake, the strobe in the image below is unmodified.
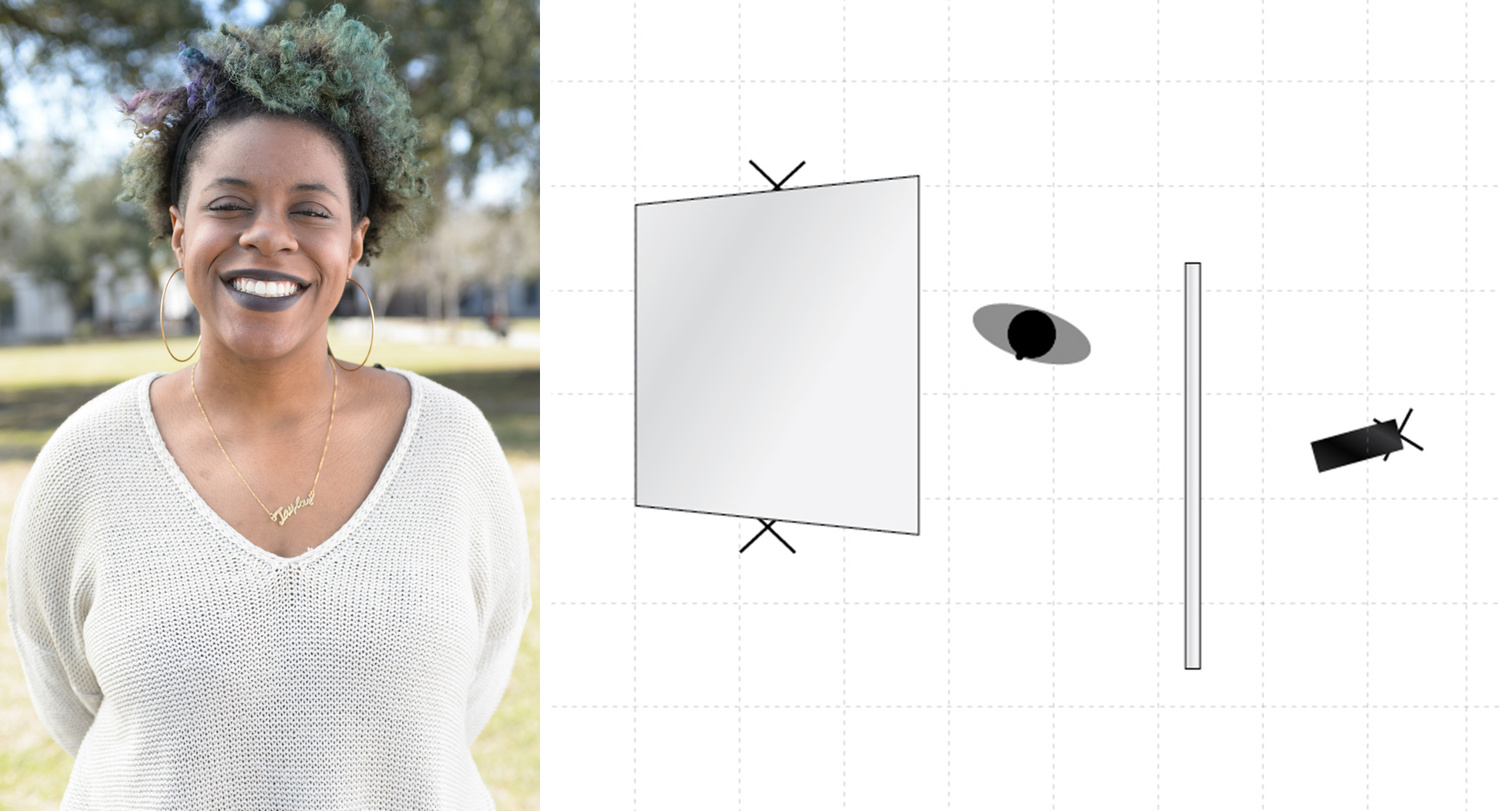
6.) Now our strobe, still placed slightly behind the subject, is being modified with another scrim identical to the one diffusing the sunlight. This demonstrates the importance of placement of the side light. Here, only the front half of the panel is actually lighting the subject. We then moved the scrim so the entirety of its surface can see and light our subject.
7.) In this image you can see the effect of bringing the panel forward so that the light can wrap around and light more of our subject, bringing more light to the front of our subject's face.
8.) Finally, we increased the power from our strobe (camera right being diffused by the second scrim). By increasing the power, we have altered the balance between natural light and strobe light, providing a slightly different look.
Sometimes that hard direct sunlight look is exactly what you're looking for, but when it's not, don't be intimidated. By using a large scrim or even a smaller diffuser, you can turn that hard sunlight into a beautiful giant softbox.


thanks for the great examples
Hey Joshua, thanks! I'm glad you liked them.
Someone else to look for with this is Clay Cook. His First Person Shooters outdoors are pretty sweet and they show some good examples as well.
Agreed. Clay's post and his First Person Shooter videos are really great!
Good article...solid examples. I always enjoy reading lighting articles like this.
Thanks Jason. I appreciate the feedback. I'm glad you enjoyed reading the article and found it helpful.
More articles like this one on fstoppers would be great! Thank you for this!
Daniel, your welcome really happy you got something out it!
Great article Lance! For me the most natural is 4. Scrim & soft box giving a believable natural look for this subject but it's great to see how some hard fill on the opposite could work in other situations. Love to see more on your lighting ideas
Hey Wee, yes I agree I think the straight scrim or scrim and softbox give the most natural look and would probably be my preference as well. Glad to see you liked the article, definitely more to come in the future!
Just yesterday I made a 3'x6' scrim! Thanks for the article!
Thats awesome Hunter, def down with DIY. Glad you enjoyed the article!
Nice article.
FYI: you can get a Fotodiox 5-in-1 48'x72' collapsible kit that includes a diffuser for fifty bucks at Amazon:
http://tinyurl.com/kblner2
Good Deal, thanks for sharing that and thanks for the feedback.
These are great tips! I just wish it wasn't so windy in my area. :)
Haha, ya Michael, we lost the diffuser a couple of times needed students to hold them so they would stay in place.
Why is it that still photographers still don't understand that Scrim =/= Diffusion? A scrim's only purposed is to change the quantity of light. It is a device that sits directly in front of the light source (and is usually a metal mesh). A Net is another device to control the quantity of light - these are larger (usually 18x24", 24x36", etc) and are placed farther away from the light so you can control all or part of the affected area - still no change in quality. Diffusion (be it a gel like tough frost, 216, opal, or a material like a silk or nylon) changes the quality of the light (while also reducing the brightness). The above example is Diffusion, not scrimming. These terms have been around for ages and are standardized for a reason.
Hey Michael, thanks for reading. Ya the diffusion material changes the quantity but also the quality of the source, just like Hans was saying. Its now a closer and larger light source so it appears as a softer light.
"So even though the the actual light is coming from the sun (a hard pin-light source), it is now being modified by a large piece of diffusion material that is placed fairly close to the subject, creating a very soft light."
I really irks me that there is no mention of WHY the light get "softer".
When "scrimming" the light all you do is making the light source larger in relation to the model. When making the light source larger the edge of the shadow (from light to dark) gets wider/larger. So a small light will make the edge of the shadow sharper and a larger light source will make the edge of the shadow wider. This will be perceived as soft or hard light.
my .02
Hey Hans, your spot on! I usually call this transitional value, the value between the true tone and the shadow. But just like you said its the edge of the shadow that appears sharper or softer based on the size and distance of the light source. Thanks so much for the feedback and for reading.
Great article. Like the diagrams.
Thanks Christopher, I'm glad you thought the diagrams were helpful.
Great post, thanks!
Thanks Joshua, glad you liked it.
I've been looking for something like this for ages, thankyou! Also if you want darker shadows on the subject, you can block out the light totally with a black cloth or something like that. More Leibovitz looking.
Oh Lance, this brings up a related question you might know... if it's cloudy, is it possible still to scrim the subject in some way, or are you basically screwed because light is coming from too many directions? So a really diffused light coming from straight above for example... I'm guessing putting a scrim above the model won't do much because there's still light coming from "around" her? So scrimming is possible only in sunlight, making control of quality and direction or light harder in cloudy/even light. (Assuming you want to keep the background correct exposure). #babble
Dan, you could still scrim if you wanted to, but if its cloudy then you most likely have even light to begin with and don't need to. In an overcast situation I would skip the scrim and just light the shot if needed.