
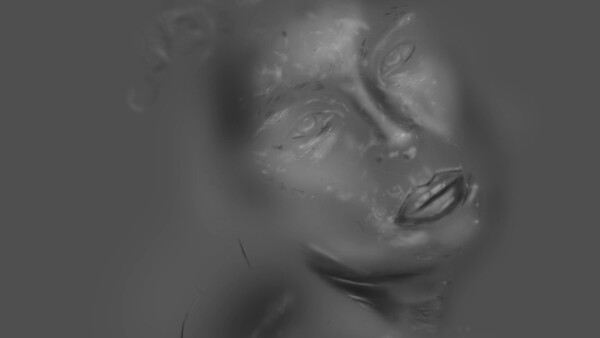
Before I learned about makeup I used to strengthen or create contouring in post the same way on every single picture. However, because everyone’s face is different, contouring should differ from person to person. Contouring not only can help create dimension it can also help alter shapes. Let see how we can make our model’s and client’s face look their best without going crazy with the liquify tool. Shadows and highlights are photographers and makeup artists best friends!
This article is not meant to teach you how to use dodge & burn tools or techniques. Julia Kuzmenko already wrote about that a little while ago. Rather I would like to show you how you can use techniques from makeup artists to get the most out of a face by contouring it according to its shape. By placing shadows and highlights on the right place you would be amazed how much you can change without having to move pixels around and distort your model's/client's face.
Contouring According to Face Shape
There are tons of different face shapes! But to keep the article simple we are going to see the 6 main shapes you may encounter when doing portraiture, fashion or beauty. Keep in mind the shapes I am going to show you are general rules, you might have people that will not fit in any of these categories or might be a mix between two or three of them.
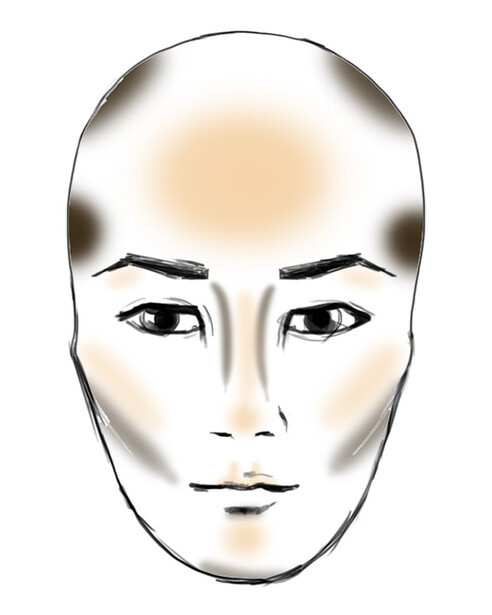
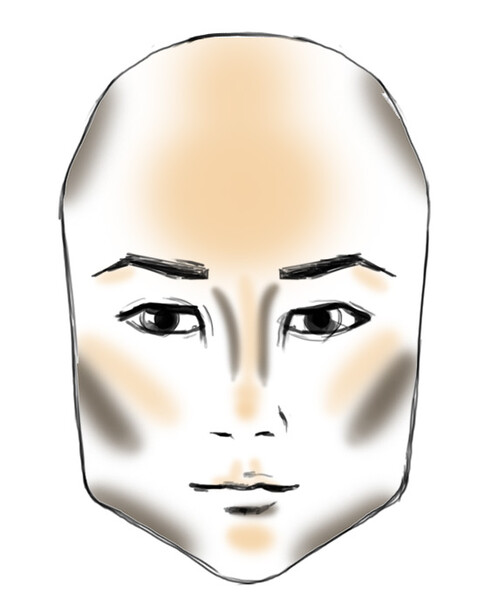
Oval
Probably on the of the most common shape we see in front of our lens! The oval face usually has great cheekbones that photographs well, a slightly wider forehead than jaw line and a face that tappers toward the chin. Not much contouring is needed to make that kind of face look better. It is more about giving dimension rather than correcting anything here. It is the first face shape we see as it is the most common and the most standard in term of contouring. If you have seen a video or read an article about contouring, chances are you have already seen which zones need highlights or shadows.
Highlights:
- Center of the forehead
- Bridge of the nose
- Cupid bow
- Very lightly above the jaw line
- On the high point of the cheekbones
- Very lightly below the outer part of the eyebrows
- Upper part of the chin
Shadows:
- Sides of the forehead
- Temples
- Below the cheekbones
- Side of the bridge of the nose
- Very lightly below the lower lip
- Very lightly on the bottom of the chin
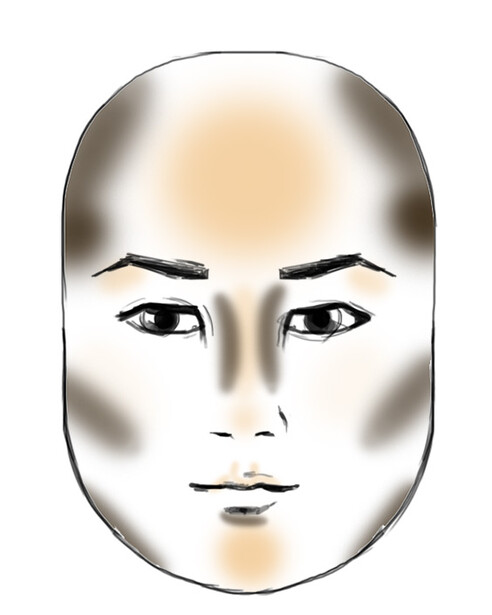
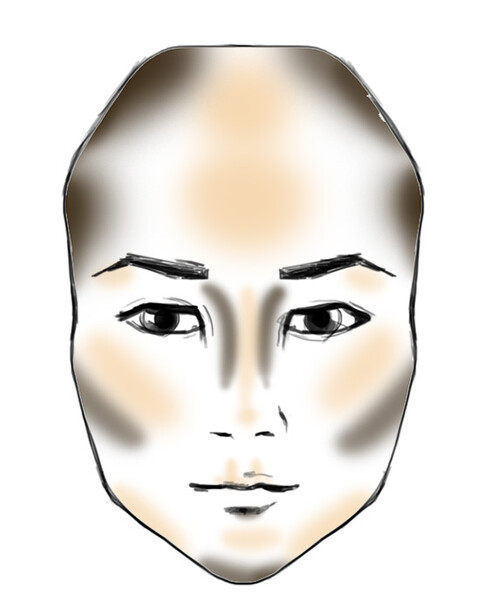
Long
Very similar to the oval face, the long face usually differs by its bigger forehead and chin. It is still a great face to photograph but there are things that will need to be corrected with the contouring to get the best out of this shape. For example, darkening the jaw line, the chin and the upper part of the forehead slightly more than on the oval face will break up the length a bit and make it look more appealing.
So for the long (also called oblong) face we will keep the same base but tweak a few things here and there.
Highlights:
- Center of the forehead
- Bridge of the nose
- Cupid bow
- Very lightly above the jaw line
- High point of the cheekbones
- Very lightly below the outer part of the eyebrows
- Sides of the forehead
Shadows:
- Upper part of the forehead
- Below the cheekbones
- Side of the bridge of the nose
- Very lightly below the lower lip
- Chin
- Along the jaw line
- Temples
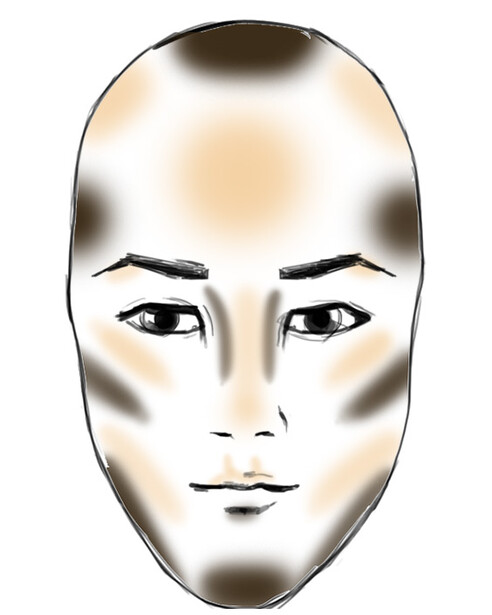
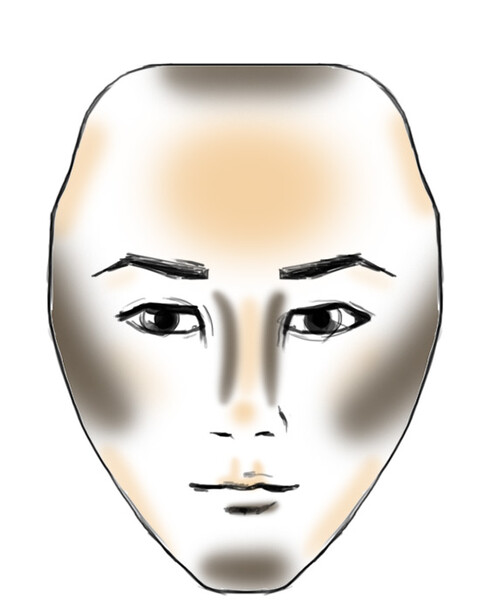
Round
A round face can be tricky to photograph. It usually does not have strong angles and even often has slightly puffy cheeks. It is easily recognizable because it is almost as high as wide with no prominent bones. Because it has so little angles, this is probably one of the shapes that needs the strongest contouring, or at least in terms of shadows. Highlights are placed mostly on the center of the face and shadows on the sides to give the impression of a longer face. Strong shadows might also be needed on the jaw line and right below the cheekbones to give more structure to this kind of face shape.
The base remains pretty much the same again, but the changes here, despite being “small” make a huge difference!
Highlights:
- Center of the forehead
- Bridge of the nose
- Cupid bow
- Lightly on the high point of the cheekbones
- Very lightly below the outer part of the eyebrows
- Chin
Shadows:
- Sides of the forehead
- Temples
- Below the cheekbones
- Side of the bridge of the nose
- Very lightly below the lower lip
- Along the jaw line
Square
Just like the round face, the square face is very symmetrical in length and width. The main difference with the round face is that the square one has way more angles. More bones will be visible. The square face actually has a strong jaw line and prominent cheekbones. The corrections we make with our contouring are very similar to the round face but the shadows created will be a bit smaller and the highlights more pronounced.
Highlights:
- Center and upper part of the forehead
- Bridge of the nose
- Cupid bow
- High point of the cheekbones
- Very lightly below the outer part of the eyebrows
- Upper part of the chin
Shadows:
- Sides of the forehead
- Below the cheekbones
- Side of the bridge of the nose
- Very lightly below the lower lip
- Along the jaw line
Heart
The heart face is almost a mix between the oval and long face in term of contouring. It differs by a prominent jaw line that tapers toward the chin quite strongly. The chin will be less wide than on an oval face and can often be pointy. It is also not rare to have long chin and forehead just like on the oval face. This kind of face photographs usually really well because of its very defined jaw line and cheekbones. Its only downfall is the pointy chin that is not always very pleasing depending on the angles photographed.
Highlights:
- Center and upper part of the forehead
- Bridge of the nose
- Cupid bow
- Above the jaw line
- High point of the cheekbones
- Very lightly below the outer part of the eyebrows
- Upper part of the chin
Shadows:
- Sides of the forehead
- Temples
- Below the cheekbones
- Side of the bridge of the nose
- Very lightly below the lower lip
- Chin
Diamond
The diamond face is less common that the others but usually is wonderful when well photographed. It has a strong structure with prominent bones and a very defined jaw line. Its widest part is the middle of the face (temples). If well contoured by your makeup artist, you will not need to do much more in post.
Highlights:
- Center of the forehead
- Sides of the forehead (only if the forehead look much higher than wide)
- Bridge of the nose
- Cupid bow
- Above the jaw line
- Very lightly on high point of the cheekbones
- Very lightly below the outer part of the eyebrows
Shadows:
- Upper part of the forehead
- Below the cheekbones
- Side of the bridge of the nose
- Very lightly below the lower lip
- Chin
What Contouring For the Other Shapes?
Now, you might have on some occasions other face shapes (triangle, pyramid, rectangle, etc.). If you look closely at what I have just laid out for you, you should be able to understand how to get the best out of the other face shapes. Because after all contouring is nothing more than correcting shapes with highlights and shadows. If you want to make something look smaller, use shadows to do so. If you want something to appear bigger, use highlights. For example a wide nose can be “corrected” with strong shadows on its sides and a very thin highlights along the bridge. Another example is the rounded shaped face where we used highlights mainly in the center part and shadows on the outer part to give the impression of a slimmer and more elongated face than it really is. By analyzing the different examples given above, you will quickly understand how to adapt to any face and create your very own morphological corrections like makeup artists do.
I would love to hear your thoughts on contouring. Do you create or strengthen it in post or do you let your makeup artist do it? Did you know different face shapes require different contouring?


Join the Fstoppers community for free
-
Post comments and join in the discussions
-
Browse the site ad-free
-
Share your work and get featured in the community
-
Compete in the photo contests for fun and prizes
6 Comments
This is awesome...thank you!
I feel like I know and understand the general concept of contouring both on the makeup side(I don't do makeup but can recognize it) and the retouching side. However, I still have trouble clearly recognizing the different face types and customizing the retouch based on that face type. The differences are still quite subtle for me at this point but I suppose the more I photograph and retouch the better I'll recognize these variances.
It is often easier to see a face shape in photoshop rather than in real life. At least I find it easier to make a clean contouring in post than when doing makeups on my models. But with times it becomes easier and easier to see where shadows and highlights need to be placed ;)
Great article
Amazing article Quentin! i'll keep it under the elbow and i'm pretty sure it'll be greatly useful in my future portrait retouching sessions! thanks a lot ;)
Great
Fantastic article!