
Getting your prints to look exactly how they should is a constant battle for many photographers. Minimize the amount of time and money wasted on reprinting by downloading these free templates and using a traditional technique borrowed from the darkroom.
Having prints made of your work can be one of the most rewarding things a photographer can do. Unfortunately, it can also be one of the most frustrating if your prints don't match up to what you have on screen. While color management and screen calibration strategies are both vital for the accuracy of your prints, there are many other variables to consider. Your printer's particular workflow, the type of material you are printing on, and the final environment the print will be in can all dramatically affect how your print will look. It's for these reasons that I always make test strips of my work before I commit to making a print.
What Is a Test Strip?

For those that are not familiar with the concept of a test strip, in a nutshell, it is the action of dividing your image up into several sections and giving each of those individual parts an incremental amount of exposure. By printing out such a strip, you will be able to see the various stages of exposure in your image varying from too dark (underexposed) all the way up to too bright (overexposed). Somewhere within these divided parts will be a sweet spot, which will be the correct exposure for the picture. This information can then be applied to the whole image, which results in an accurate print.
The concept of test strips is not a new one and has been used in traditional darkrooms since the birth of photography. By slowly moving a black piece of card over a sheet of photosensitive paper, the photographer could restrict the amount of light certain parts of the paper would receive. The resulting banded image could then be used to judge how long the picture needed to be exposed properly.
How to Make Test Strips Digitally
Thankfully, taking advantage of test strips in the digital age is much more straightforward than the days of the darkroom with the use of Photoshop.
1) Open the Image in Photoshop

Open up the image you want to work on in Photoshop.
2) Add Guide Lines
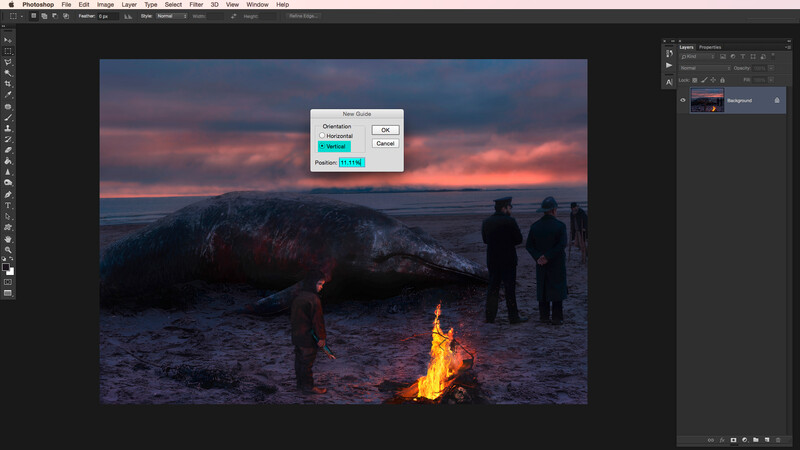
Go to "View," then "New Guide," which will bring up a dialogue box that allows you to tell Photoshop where you want your guide line to be. We want to split out image into nine even strips, so each part will be 11.11 percent each. Repeat this step nine times, adding 11.11 percent to the position of the guide each time. (11.11 percent, 22.22 percent, 33.33 percent, etc.)
3) Create Exposure Adjustment Layers
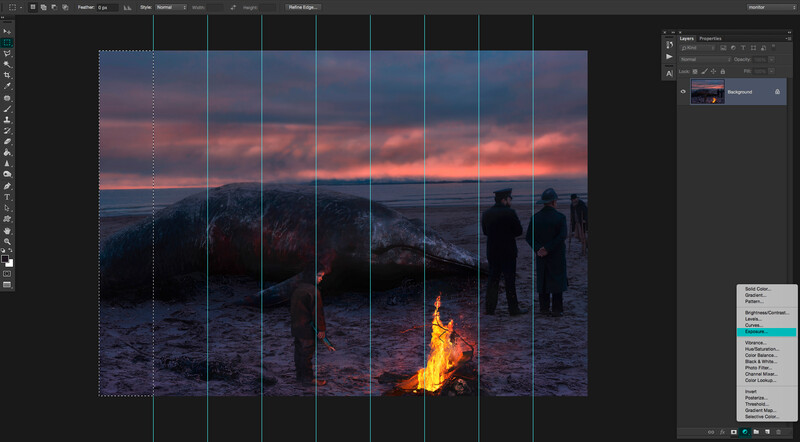
With the rectangular marquee tool, select the first strip on the left of your image. Next, click on the new adjustment layer button at the bottom of the layers palette and navigate to "Exposure". Here you will insert a value of -2 into the exposure field box. Repeat this step for all nine strips creating a new separate exposure adjustment layers for each strip you select with the rectangular marquee tool. Use the values of -2, -1.5, -1, -0.5, 0, +0.5, +1, +1.5, and +2 as you move from left to right.
4) Add Labels
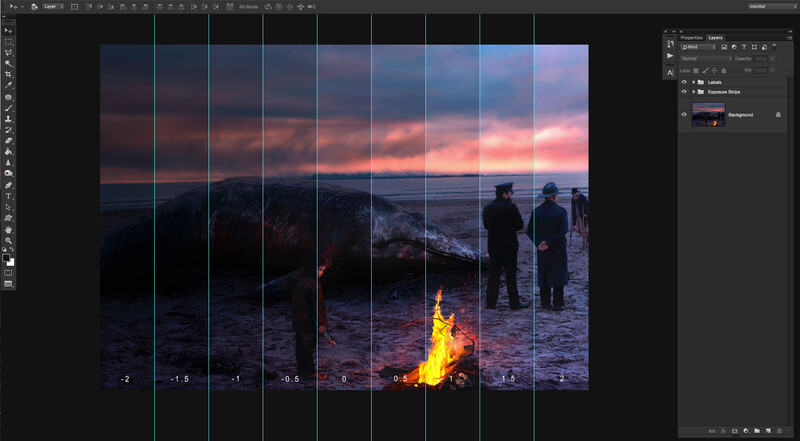
Once you have completed step three, you should have a banded image on the screen. This next step is optional, but I think it's good practice to add labels to each strip you have just made. Take the text tool and add the corresponding exposure values to each strip.
5) Print Test Strip
Congratulations, you should now have a test strip which you can use to work out how much exposure compensation should be applied to your image for printing. At this stage, I would save the file as a .PSD so the various layers remain intact. This means you can easily make further test prints of the same image if you need to or swap the image out and use for other pictures you want to print.
A similar approach can also be used to make adjustments for color-related issues you may be having with your prints. If you are getting unusual color casts or incorrect amounts of saturation, then try the steps detailed above, but instead of using exposure adjustment layers, use "Color Balance" or "Hue/Saturation."
Benefits of a Test Strip
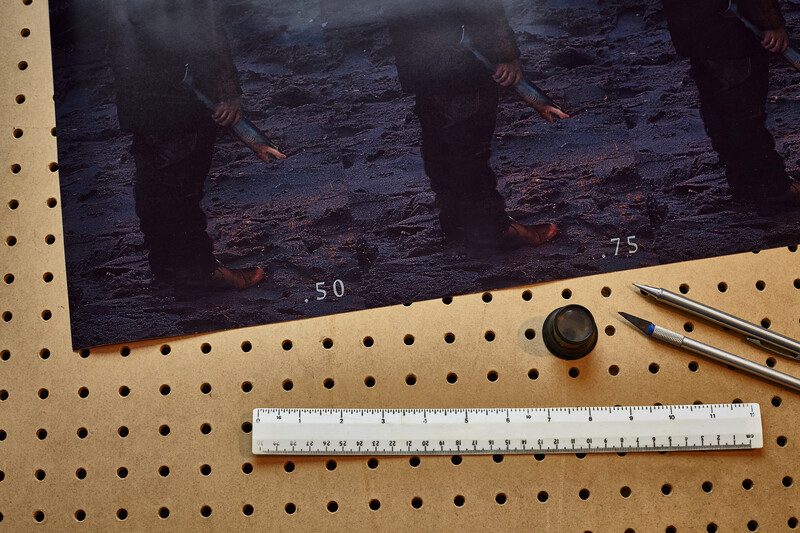
Obviously, the improved accuracy of the prints you produce is the main reason to make test strips, but there are many other advantages to start doing them. By isolating particular elements such as exposure, color temperature, saturation, or contrast in a test strip, you can easily compare their effects to see what works best for your image. This exercise is a great way to train your eyes to actually see what is going on in your pictures. For those who never plan to print their work out, I would encourage those people to try making an on-screen test strip, as it's still a great way to illustrate if you have dialed in too much or not enough of a particular adjustment. After using test strips for a while, you will find that both the amount of time adjusting your images in Photoshop and the uncertainty of whether a picture is finished or not will be noticeably reduced. You'll also save yourself a lot of time and money from not having to reprint work constantly.
If all that wasn't enough, doing things like test prints always make for interesting content on social media. Not only does it break up the flow of the regular images we all post, but it shows potential clients you are serious about the images you make.
So there you have it, how to more consistently create accurate prints and become a better photographer in the process. Just remember that whatever adjustments or compensations made to your image are only used for that particular printer. If you are calibrating your monitor and using correct color management, your original file is still the true image. To avoid any confusion in this matter, I always work on a duplicated file and include the name of the printer and the adjustment used in the filename.
While I appreciate the amount of benefit some of you will get from making test strips will vary, my main motivation for highlighting this approach was to provide you with a technique if you have been struggling to get your prints where they should be. I know many photographers who never bother to get work printed, as they are always disappointed with the results. This is a real shame, as making prints of your work can be one of the most rewarding things you can do as a photographer.
For those who would like to get started with test strips, I have made some free Photoshop templates available to be downloaded from here.
Do you already take advantage of test strips or have made your own templates for doing so? I'd love to hear from you in the comments below.


Join the Fstoppers community for free
-
Post comments and join in the discussions
-
Browse the site ad-free
-
Share your work and get featured in the community
-
Compete in the photo contests for fun and prizes
29 Comments
I get it with analog process as you can't foresee the output with an enlarger, but with digital and a calibrated workflow , chances to screw a print is minimal don't you think?
A good Printer should tell what to do with your files before he starts printing your work, and above all helps you choose you paper to fit your vision of the final print with...
Unless you go cheap and accept to have your work processed by a machine without any control...but the added value is worth it IMHO
A lot of us like to print our own work to get better control of the output. There's no way to anticipate the effects of various combinations of papers and printers (and believe it or not, computers) on the final result with a print service. Profiling their printer and paper is good but still not as accurate as seeing the print with your eyes. And don't even get me started on the environment where your print will be viewed! Using test strips helps reduce the cost of the numerous prints to get the results you want.
I have no issue, with my work being printed, from very bright scene to dark ones, but It's some work before hand with the choice of paper and print operator.
As you said , I won't speak about the viewing conditions in clients's homes...
But dialing the exposure from -2 to +2 to find the good one...I think there's something wrong ;)
Beyond the basic exposure (a small part), I like to "edit to the print" to better fine tune my prints. I spend WAY too much money getting a "perfect" print. ;-)
Your "edit to the print exposure" has to be dialed on 4 full stops? Or even 1/2?
The paper you use has to be very specific, could you tell me about it?
Sorry, I wasn't very specific. Getting the general exposure isn't all that difficult. Aside from that, I will make "spot" edits, based on the print. These can be things you didn't notice on the screen, dodging and burning, adjusting colors, etc...
I do the very same! glad to have found a kindred spirit in the print world!!
You're right a good printer will do a lot of the work to help you get your image looking correct. A very good printer will actually offer free test strips to help get you there. (Some at no charge too).
The various papers/materials you may print on, the types of glass in your frames, and the environment the print will be displayed in can all affect the look of the final image and it's for that reason I still like to make test strips...
Thanks for stopping by it's appreciated
A lot of my prints are night photos with a large amount of DR within the print and this is really good advice.
I wish I would have either known this when I started or understood how to make test strips like these.
Hey Eric, glad you find the article useful. Please let me know how you get on. I hope it helps you get the prints your images deserve...
If you color calibrate AND Brightness calibrate you won't even need to do test prints. Printing will be WYSIWYG whether printing yourself or sending off to a lab. Spending ~100 bucks on color Munki display color calibration tool (or other color calibrater) can save you a a lot of money on test prints or even test strips.
Umm... not really.
I hear what you are saying Jared and I do everything you say and more to make sure my screens are calibrated etc. Problem is the printers you use, the various papers/materials you may print on, the types of glass in your frames, and the environment the print will be displayed in can all affect the look of the final image.
A physical test strip will help to fine tune all those variables. Test strips always help to get me so much closer to my screen image than I ever could without...
I use a calibrated IPS display but do experience some of these issues, more with overall brightness/darkness than color. Prints are not back-lit like a monitor so they will never look exactly like the image on the screen, so these test strips should help find the optimal adjustments to the file to get a print that has the desired appearance. I will give these a shot.
You make an excellent point about back-lit screens Mark. I too only have issues with brightness rather than color. I also find the paper and even the particular printer my printer uses can affect things. Test strips always help to get me so much closer to my screen image than I ever could without...
Let me know how you get on. : )
How could this be replicated in LR? Drop a series of graduated filters, targeted adjustments with various +- exposures?
Great question Adam, I'm not a LR user but your theory sounds good. How did you get on??
Great post and reminds me of my film days. I've downloaded those strips which are great but wasn't sure if they need a blend mode in photoshop so you can automate the process of what you describe above. Didn't work as I thought it would but probably just me.
Hey Carl, basically all you need to do is place your image layer below the folders containing the adjustment layers and labels.
No blend modes or automation/actions are required. Placing any image below those folders in the template will do all the magic for you.
Please let me know how you get on. Happy to help : )
Use the histogram, Luke :)
Tell that to the printers! Even with all the Jedi mind tricks you can muster, the printers (and the various materials you may print on) still have quirks which no amount of histogram chimping can prepare for...
Test strips all the way!
Test strips or prints are needed the first few times I use a new lab.
After that the histogram and a reference image & print are sufficient.
.. I still do test strips for expensive prints, though ..
Glad to hear that Simon. I have to admit that I've gone through a fair few printers in my time so maybe I need to use them more than most. When you find a lab you get great prints from its so good!
My gripe with this method of test strips is that it's pretty common for an image to have varying amounts of exposure throughout it, where as for example the left side may appear darker than the right. If you really wanted the best exposure you should take a strip of the photo where the subject is and replicate that strip at varying exposures. This would give you a more accurate portrayal I feel.
Hey Robert, you're right what you say about some images varying across the scene. If you look at my test strip image below the heading "Benefits of a Test Strip" I actually use just a slither of the same image repeated over and over.
For some images, a traditional test strip will be fine while other times a slither of the same part repeated several times would be better.
Either approach is easy enough to achieve with the templates provided.
Did you use them?
Good article. Thanks for the files. How do you use the files you provided?
Also, do you know of any actions created to automate the process. I created one but it does not automatically scale as the image sizes change and I do not know how to script for Photoshop Actions.
Thanks
Hello Murat, as you are finding, an action is hard to make for every kind of image shape and size. Thats why I opted for templates instead.
To use the templates provided just drop your file into one of the open template files and place your layer below everything else. Does that help?
Hope this helps too