

You can read every photography tutorial ever written, watch hundreds of hours of YouTube videos, and memorize the exposure triangle until you dream about it. But nothing will teach you to see like a photographer faster than putting different glass on your camera and forcing yourself to work within its constraints. The problem is that most beginners approach lens buying all wrong. They ask “what lens should I buy?” when they should be asking “what lens will teach me something I don’t know yet?”
This article isn’t about building the perfect kit or covering every possible shooting scenario. It’s about deliberate exploration. Each of these five lenses will fundamentally change how you see and approach photography. Some you’ll fall in love with and never want to take off your camera. Others you’ll try for a few weeks, learn what they have to teach, and move on. Both outcomes are equally valuable because the goal isn’t to own every lens. It’s to understand what each focal length and aperture combination reveals about the craft of photography.
The beauty of this approach is that you don’t need to buy all of these. Borrow them from friends. Rent them for a weekend. Many camera stores and online rental services make it affordable to experiment. And besides, lenses hold their value, so you can always sell them after a month or two. What matters is that you actually shoot with each one long enough to move past the novelty and start internalizing the lessons they offer. Give yourself at least a week with each lens, ideally more. Shoot the same subjects you always shoot, but also push yourself into situations where the lens forces you to work differently.
The 50mm f/1.8: Learn to See Before You Shoot
The 50mm f/1.8 is called the “nifty fifty” for a reason, and it has nothing to do with nostalgia. This lens strips away every crutch that zoom lenses provide. You can’t zoom in to get closer or zoom out to capture more of the scene. You have to move your feet. You have to think about your position relative to your subject. You have to make deliberate choices about composition before you press the shutter, not after in post-processing.
What this lens teaches you most is the relationship between aperture and depth of field in a way that kit lenses simply can’t. At f/1.8, your depth of field becomes razor-thin. Focus on someone’s eye, and their ear might already be falling out of focus. This isn’t a technical limitation; it’s a creative tool that forces you to be intentional about what you want sharp and what you want soft. You start thinking in layers: foreground, subject, background. You begin to see how shallow depth of field can isolate your subject from distracting backgrounds or how stopping down to f/8 can bring an entire scene into focus.
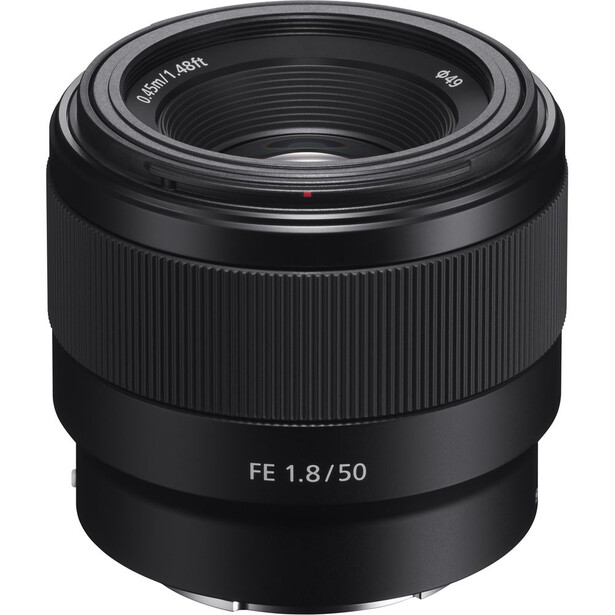
The 50mm on a full frame camera (or 35mm on APS-C, which gives a similar field of view) also happens to approximate human vision, which makes it feel natural and unobtrusive. You’re not compressing space with a telephoto or exaggerating perspective with a wide angle. You’re seeing something close to what you’d see with your own eyes, which means the creative emphasis shifts from the technical characteristics of the lens to the moment you’re capturing. It’s you, your subject, and nothing in between.
Beyond the technical lessons, there’s something about the simplicity of a 50mm f/1.8 that makes you a better photographer. It’s light, it’s typically inexpensive, and it forces creative problem-solving. Can’t get the shot you want from where you’re standing? You have to move, change your angle, or reconceive the image entirely. This constraint breeds creativity in ways that the infinite flexibility of a zoom lens never quite manages.
The 24-70mm f/2.8: Discover Your Natural Focal Length
If the 50mm teaches you to work within constraints, the 24-70mm f/2.8 does the opposite. It gives you enough range to explore and discover which focal lengths speak to you. Some photographers naturally gravitate toward the wide end, loving the environmental context and exaggerated perspective of 24mm. Others find themselves living at 70mm, drawn to the slight compression and tighter framing. Most discover they have a “home” focal length somewhere in the middle where they feel most comfortable and creative.
The real education here isn’t about the zoom range itself. It’s about paying attention to where the zoom ring naturally settles when you’re shooting. After a few weeks with this lens, check your image metadata. You might discover that 80% of your images are shot between 35mm and 50mm, which tells you something important about how you see. Maybe you’re a 35mm photographer who should invest in a stellar 35mm prime. Or perhaps you’re always at 70mm, suggesting you’d benefit from an 85mm for portraits. The 24-70mm becomes a diagnostic tool that helps you understand your own visual preferences.

This lens also teaches versatility in real-world shooting scenarios. At a wedding, you can capture wide environmental shots of the venue at 24mm, switch to 50mm for candid moments, and zoom to 70mm for tighter portraits—all without changing lenses. That seamless transition between perspectives teaches you to think more fluidly about composition. You start seeing multiple potential images in a single scene rather than committing to one approach and moving on.
The weight and size of a 24-70mm f/2.8 teach another valuable lesson: gear compromises. It’s heavier than a 50mm prime, bulkier than a kit lens, and costs significantly more. But it offers capabilities that neither of those can match. Understanding when that trade-off makes sense and when it doesn’t is part of maturing as a photographer. Sometimes the best lens is the one you’ll actually carry. Other times, you need the tool that can handle anything you might encounter.
The 70-200mm f/4: Understand Compression and Distance
Pick up a 70-200mm f/4 for the first time, and your immediate instinct will be to photograph things far away. That’s natural, but it’s also the least interesting thing this lens teaches. The real lesson is about compression: how telephoto focal lengths change the spatial relationship between elements in your frame.
Compression is one of those concepts that doesn’t make intuitive sense until you experience it firsthand. When you shoot a portrait at 200mm, the background appears much closer to your subject than it actually is. Distant mountains look like they’re just behind your subject’s head. Trees hundreds of feet away become soft, colorful bokeh. This compression effect creates a sense of intimacy and isolation that wider lenses simply cannot achieve. You’re not just getting “closer” to distant subjects; you’re fundamentally changing how depth is rendered in your images.
This lens forces you to think about working distance in new ways. To get a head-and-shoulders portrait at 200mm, you need to stand much farther from your subject than you would with a 50mm. That distance changes the dynamic of the shoot. Your subject can’t hear your detailed directions without you shouting. They can’t see your facial expressions as clearly. For some subjects, this creates a more relaxed, candid feeling because they’re less aware of the camera. For others, it feels disconnected. Learning to navigate these dynamics is part of understanding how focal length affects not just images but the entire shooting experience.
For sports and wildlife photography, even at a beginner level, this focal length range provides a glimpse into those specialized worlds. You can photograph youth soccer games from the sidelines, capture birds at a reasonable distance, or shoot candid street photography from across the plaza. These experiences help you understand whether you want to pursue those genres more seriously, and if so, what gear investments make sense. Maybe you discover you love the challenge of wildlife photography and need to start saving for a 150-600mm. Or perhaps you realize that sports photography doesn’t excite you the way you thought it would, saving you from expensive mistakes.
The f/4 maximum aperture is actually ideal for this learning exercise, even though professional sports and wildlife photographers often choose f/2.8. The reason is simple: you’re not trying to shoot in a dimly lit gymnasium or capture birds in flight at dawn. You’re trying to understand what a telephoto lens teaches about compression, working distance, and perspective. The f/2.8 version costs significantly more, weighs considerably more, and for the purpose of exploration, offers minimal additional educational value. You can still achieve beautiful background separation at f/4. You can still shoot in most lighting conditions, especially with modern cameras that handle higher ISOs well. What you save in cost and weight makes the lens more accessible and more likely to actually get used—which is the entire point.
The f/4 aperture also teaches you to work within limitations and find creative solutions. You learn to seek good light, to bump your ISO when necessary, and to accept that some situations require compromises. These aren’t weaknesses—they’re realities of photography. Understanding how to work effectively with an f/4 lens makes you more adaptable and resourceful, skills that matter far more than always having the fastest glass. Once you’ve mastered what a 70-200mm f/4 can teach you, if you find yourself regularly shooting in low-light situations where you’re fighting for shutter speed, then you can make an informed decision about whether the f/2.8 version is worth the investment. But for learning, the f/4 is more than sufficient.
The 16-35mm f/4: See Perspective Differently
Wide angle lenses break your brain in the best possible way. Everything you’ve internalized about composition and perspective gets challenged the moment you mount a 16-35mm. Foreground elements become dramatically larger. Background elements shrink into the distance. Straight lines near the edges of the frame start to curve. Your instinct is to think something’s wrong with the lens, but actually, something’s right. You’re seeing perspective distortion—and learning to use it creatively rather than fight it.
The first and most important lesson this lens teaches is the power of foreground interest. With a 50mm or 70-200mm, you can create compelling images by simply pointing at interesting subjects. With a wide angle, pointing isn’t enough. You need to get close to something in the foreground to anchor the composition. Landscape photographers learn this quickly: a beautiful mountain range looks boring at 16mm unless you include interesting rocks, flowers, or textures in the immediate foreground. This principle applies to every genre. Street photography becomes about layering near and far elements. Architecture photography becomes about finding the right position where foreground, building, and sky all work together.
The exaggerated perspective of wide angle lenses teaches you about visual storytelling in environmental contexts. When you photograph a person at 16mm from relatively close, they become part of a larger scene rather than isolated from it. You see them in relationship to their environment, their workspace, their city. This environmental approach to portraiture or documentary work tells different stories than tight headshots or compressed telephoto perspectives. Understanding when to use each approach is part of developing your voice as a photographer.
Working with wide angles also reveals something crucial about lens distortion and how to manage it. Shoot a portrait at 16mm from close up, and your subject’s features will distort in unflattering ways. Noses look too big, faces look stretched. But photograph the same person at 16mm from farther away, including their environment, and suddenly the perspective feels dynamic rather than distorted. You learn that every lens has a “right” working distance for different subjects, and that technical characteristics that seem like flaws can become creative tools in the right context.
The 100mm f/2.8 Macro: Train Your Eye for Details
Macro photography seems like a specialized niche, something you’d only pursue if you’re really into photographing flowers and insects. But spending time with a 100mm macro lens teaches fundamental lessons about photography that apply far beyond tiny subjects. This lens is essentially a masterclass in seeing, focusing, and patience.
The most immediate lesson is about noticing details that you normally walk past without a second glance. Once you start shooting macro, you begin seeing the world differently. The texture of tree bark becomes fascinating. Water droplets on leaves reveal tiny reflected worlds. The pattern on a butterfly’s wing becomes an abstract composition. This heightened awareness of detail doesn’t go away when you take the macro lens off. You start bringing that observational intensity to all your photography, noticing subtle textures, small moments, and overlooked beauty in everyday subjects.
Macro photography also teaches precision in focusing with unforgiving clarity. At 1:1 magnification, your depth of field might be measured in millimeters. Focus on the front of a bee’s eye, and the back of its head is already blurred. This razor-thin focus plane forces you to be absolutely intentional about your focus point. You can’t be approximate or casual. You must decide exactly what deserves to be sharp and accept that everything else will fall away. This discipline carries over to all focal lengths, making you more thoughtful about focus even when you have more depth of field to work with.

What many beginners don’t realize is that macro lenses make exceptional portrait lenses, often rivaling or exceeding dedicated portrait glass. A 100mm focal length sits in the sweet spot for headshots and upper-body portraits. It provides flattering compression that renders facial features naturally without the distortion of wider lenses. The working distance of about six to eight feet feels comfortable for both photographer and subject—close enough to communicate easily but far enough to avoid making your subject self-conscious.
The f/2.8 aperture creates beautiful background separation for portraits, throwing backgrounds into soft, creamy bokeh while keeping your subject’s face tack sharp. The optical quality of macro lenses is typically exceptional across the entire frame because they’re engineered to resolve the tiniest details at close focusing distances. That same resolving power that captures individual grains of pollen renders skin texture, eye detail, and hair with remarkable clarity. Many portrait photographers actually prefer macro lenses over traditional portrait primes because of this optical excellence.
So while you’re spending time photographing flowers and insects to understand macro technique, you’re simultaneously gaining experience with a very capable portrait lens. You can switch from photographing a butterfly in the morning to shooting headshots in the afternoon with the same piece of glass. This versatility makes the macro lens one of the most practical learning tools in this entire list. You’re not just learning one specialized skill—you’re developing expertise with a focal length and aperture combination that applies to multiple genres.
The creative constraint of working at macro distances forces you to slow down and really see your subject. You can’t shoot quickly or casually. You must think about light direction, how it reveals or hides texture, how shadows fall across tiny surfaces. You become aware of backgrounds in new ways because at macro distances, anything behind your subject can become soft color or distracting detail depending on your position and aperture choice. All of these considerations make you a more thoughtful photographer regardless of what you’re shooting.
The Education, Not the Collection
The point of trying these five lenses isn’t to convince you to own them all. Many photographers find they only truly connect with two or three focal lengths and spend their entire careers working primarily within that range. The point is to give yourself enough experience to make informed decisions about what serves your vision and what doesn’t.
Some photographers try a 70-200mm and realize they love the compression and working distance. They invest in faster telephoto primes and explore sports or wildlife photography seriously. Others discover that wide angles completely change how they see, and they build their entire approach around environmental storytelling at 16mm or 24mm. Still others find that they’re 50mm photographers at heart, and they eventually own several different 50mm primes, each with slightly different characteristics for different purposes.
The diversity of experience matters because it prevents expensive mistakes. If you’ve only ever shot with kit lenses and you decide to invest in an expensive 85mm f/1.4 for portraits without ever trying that focal length, you’re gambling. Maybe you’ll love it. Or maybe you’ll discover that you actually prefer the working distance and perspective of a 50mm or 35mm for portraits. Trying before buying, even if it means renting or borrowing, ensures your investments align with your actual needs and preferences.
Variety also makes you more adaptable and creative. When you understand what different focal lengths do and how various apertures affect your images, you can make better decisions in the field. You know that a wide angle will exaggerate the foreground, so you choose it when that serves your vision. You know that a telephoto will compress space and isolate subjects, so you reach for it when that’s the effect you want. This knowledge comes from experience, not theory.
Perhaps most importantly, exploring different lenses helps you develop your photographic voice. Your natural gravitational pull toward certain focal lengths, your preference for shallow or deep depth of field, your comfort with close or distant working relationships with subjects: all of these preferences combine to form your style. You can’t discover your voice by reading about photography or watching others work. You have to shoot, experiment, and pay attention to what resonates with you.
The five lenses outlined here represent a broad education in photographic seeing. The 50mm teaches compositional discipline and aperture control. The 24-70mm helps you discover your natural focal length preferences. The 70-200mm reveals compression and the creative possibilities of distance. The wide angle challenges your understanding of perspective and space. The macro lens trains your eye for detail and precision. Together, they provide a foundation that will inform every gear decision you make and every image you create going forward.
Start with whichever lens intrigues you most or feels most different from what you currently shoot. Give it real time. Shoot through the initial awkwardness until the focal length starts to feel natural. Pay attention to what you learn, what frustrates you, and what excites you. Then move on to the next one. By the time you’ve worked through all five, you’ll stop seeing lenses as equipment and start seeing them as ways of understanding light, distance, and yourself.


Join the Fstoppers community for free
-
Post comments and join in the discussions
-
Browse the site ad-free
-
Share your work and get featured in the community
-
Compete in the photo contests for fun and prizes
7 Comments
Such a good article. I’ve been photographing for a long time and am fortunate to own a couple of these lenses, some second hand. Forcing yourself to take only a single lens out for the day is such a refreshing and educational experience.
A well thought out article, but you're asking beginners to "try" thousands of dollars worth of lenses.
The cheapest one is the 50mm f/1.8. But IMO, there's nothing magical about the 50mm focal length. That was just the inexpensive, mass-produced "kit" lens during the 35mm film era. These days, any prime lens is a specialty lens.
My eyes roll every time I see a "beginners should..." post online by an experienced photographer with a bag full of professional gear. When I started in photography (early 1980s), the advice from the old-timers was "beginners should only shoot B&W". Then it became "beginners should only use manual focus and manual exposure", followed by "beginners should only shoot film" (developing and printing it yourself was optional). All of these have the same common thread, which is, "beginners should only use what I had available when I was a beginner." And you walked five miles to school, in the snow, up hill both ways...
I think useful advice for beginners today would be: "Learn how and when to use every feature of your camera, and use the kit zoom that came with it, and see where *you* find the limits for the photographs *you* want to make. Maybe you need that constant aperture zoom or fast prime, or maybe it doesn't matter. Maybe you need shorter focal lengths, or longer. Maybe you need 40 FPS and eye-detect AF, or maybe not. Stop focusing on what the gearheads online are saying and get out there and take pictures!"
"The beauty of this approach is that you don’t need to buy all of these. Borrow them from friends. Rent them for a weekend. Many camera stores and online rental services make it affordable to experiment."
There's a common misconception in this post. Contrary to what is stated, telephoto lenses don't alter the spatial relationship between objects in a photograph — perspective (being closer or farther) does. What you call "compression" is simply perspective + crop. Surely, telephoto lenses invite you to shoot things that are distant. However, there's nothing in their optical design that inherently causes "the compression look" as implied here. To prove this, just crop an image of distant objects taken with a wide-angle lens. You'll get the very same "compressed" look as a telephoto lens picture taken from the same spot.
I really like this article. I look in my cabinet and I have a fast 50, a 105 macro (and 55 and 200), a 24-85, and a 70-300. Each provides its own capabilities and learning opportunities. I haven't used an ultra-wide on my real camera, but I have quite come to enjoy the "0.5x" setting on my phone now and then, which is equivalent to a 14 mm lens, for that purpose. The image quality and bench test results of a better lens on a real camera aren't necessary to learn how to play with the world at this focal length.
As a beginner, I used exactly this setup with my first camera. I came to it intuitively, but it turned out to be a perfect choice. It’s truly a versatile kit for exploring different genres without compromise. I can confirm — an excellent recommendation.
I have great respect for Alex and am always interested in what he has to say, but I think I disagree on this one, at least for me personally. Maybe I don't qualify as a beginner, because while I was a newbie to the full frame world, I had experience with film cameras and later point-and-shoot digital. When I began my full frame journey, I asked myself what lenses I needed and wanted, and I acquired those. And then by experience learned the particulars of what each lens could deliver. But I don't restrict myself to just one lens at a time and try to force it to give me what I am trying to achieve. That would just be silly. Instead, I contemplate my goal and ask which lens is best suited to achieve it. And sometimes it is the weakness of certain lenses that eliminates them from consideration.