Long exposures can feel like a tug of war between time, light, and patience. If your camera can build the effect in-camera while you watch it happen, you stop guessing and start deciding.
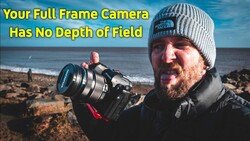
Coming to you from Chris Baitson, this hands-on video walks through live comp on the OM System OM-1 Mark II on a cold, windy stretch of the East Yorkshire coast. Baitson frames live comp as in-camera compositing that keeps stacking new highlights while leaving darker areas largely alone. That changes how you approach “too bright” parts of a scene, especially surf, spray, and moving cloud texture. You also get a practical reminder that this mode is not the same thing as a simulated ND feature, so you still reach for a real filter when the scene is bright. The setup starts simply with a three-stop ND filter to slow the shutter, then live comp does the repeating capture and build.
The useful part is not the concept, it is the on-camera routine and the small constraints that can trip you up in the field. Baitson shows that you set shutter speed inside the live comp menu rather than changing it from the main live view, which is easy to miss when your hands are cold and the light is shifting. You see the camera take a base exposure first, then the composite grows as you let it run, with updates and a histogram that helps you keep an eye on the highlights. That live feedback changes your timing, since you can stop when the movement looks right instead of committing to a single long exposure and hoping. If you have ever overcooked an exposure and only noticed once you got home, this workflow is a different mindset.
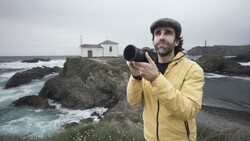
Once the basics are running, the video moves into the choices that actually shape the frame. Baitson adds a polarizing filter to cut shine off wet rocks and to manage a darker band in the water, then tweaks composition by going vertical and pushing the wall off-center. There is also a quiet point about “per-frame” blur: each individual shot in the stack still has its own shutter speed, so one second and two seconds do not feel the same in choppy water. When the light starts to change, Baitson swaps to a six-stop ND filter and plans a five-minute build, which is a very different commitment than a single five-minute exposure. You get the idea of “future-proofing” the exposure as conditions drift, without turning the whole shoot into a filter math session.
There is a sharper edge to the advice near the end, and it is worth hearing in Baitson’s own words. Live comp can look great with chaotic, random movement like surf, waterfalls, star trails, and light trails, but it can look rough with structured motion like thin, bright clouds that smear into hard streaks. That means you cannot treat it as a universal replacement for standard long exposure methods, even if the camera makes it feel effortless. The beach setting matters here: gray skies and broken wave highlights are forgiving, while clean, bright cloud bands can expose the technique. If you want the full payoff, watch how Baitson judges the build on the back screen and decides when to stop, since that decision point is where the “look” lands. Check out the video above for the full rundown from Baitson.


Join the Fstoppers community for free
-
Post comments and join in the discussions
-
Browse the site ad-free
-
Share your work and get featured in the community
-
Compete in the photo contests for fun and prizes
1 Comment
Always great to see experimentation and seeing what other cameras can do. Like when playing with bracketing back with my Canon T2i it only had 3 at +/- 2EV but I happened across a Promote Control that had a function that kept the mirror up but I could select any number of shots at any chosen number of EV's. The only problem is finding SW to edit during the days of Bracketing HDR only a couple like the free Nik HDR Efex this before merge of images in 2011. A try at getting both foreground and a sharp in focus moon vs cut and paste of a moon over a blown out moon.