
Some time ago, I wrote an article about soft proofing in Lightroom and Photoshop. It's an essential step in any professional printing workflow. Today, I show the additional steps required to create perfect prints.
1. Calibrate Your Displays
You need a calibrated monitor to perform an accurate print preparation, and you should regularly re-calibrate your displays. Even on high-quality monitors, colors and brightness change with time. That's why I aim to calibrate my displays every six to eight weeks. If, for some reason, I forget it, I will make sure to do it before I start preparing a larger batch of prints.
2. Clean Up Your Master Files
After editing my photos, I save them as master files in PSD format. While I directly prepare images for the web from those, some time usually goes by until I create prints. That's when I revisit those master files and make final adjustments. Those include removing dust spots, color fringes, and other imperfections I might have missed during the first edit. Those are usually not a problem for the web, but they become apparent in a large-format print. So don't skip this step.
Once finished, save your changes to the master file again. Then, you can skip this step the next time you prepare a print.
3. Soft Proofing
For some papers, you'll notice only minimal to no color changes during print. For those, you don't need soft proofing. But for expensive prints, you should not take chances. Soft proofing is free and doesn't require much time. In the feature video, I show my workflow in Lightroom, which includes adapting basic settings like white balance, brightness, contrast, and selective color adjustments. The goal is to transform the proofed photos to look like the originals.
Once you've done soft proofing for a new paper, save the adjustments as a preset. You can apply those whenever you prepare a photo for the same paper. Custom adjustments are still required, but those will usually be minimal.
4. Resizing for Print
For a high-quality photo print, you should resize your proofed photo to the target size with a resolution of 300 dpi. For canvas, you can use a lower resolution. There might also be use cases where you require more. If in doubt, check with your lab about what they recommend.
For enlargements of less than factor 1.5, Photoshop's algorithms do a good job. But if you need more, tools like Topaz Gigapixel AI can be of great help. If you use it, make sure to apply it selectively and take a close look at the result. There are usually areas that contain artifacts. I recommend performing the resizing in Photoshop and Topaz, then loading both results into separate layers and using masks to select the best of both worlds.
5. Print Sharpening
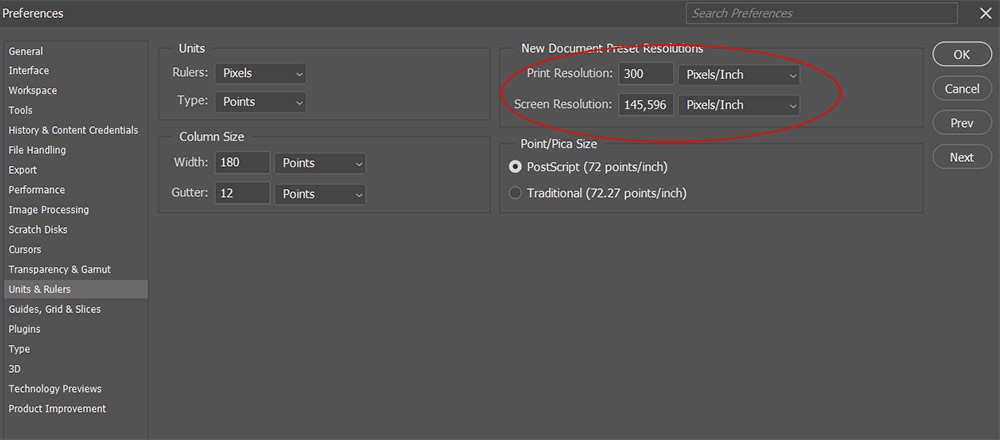
Print sharpening is usually more aggressive than sharpening for the web. Once you've resized your photo, zoom to the print size. You can do this by pressing "CTRL/CMD + Space + Right-Click" in Photoshop and selecting "Print Size". It will work if you've set up the correct screen resolution in Photoshop's settings.
Then, you can either use the various sharpening filters in Photoshop, or a special Plugin. I like to use the Nik Output Sharpener, which provides excellent results. In this article, I show how you can install the free Version 4 of this plugin for Lightroom and Photoshop CC.
But as with the resizing, you might want to apply the filters selectively. For example, create a selection for the sky and exclude it from the sharpening.
6. Test Prints
By creating prints and comparing them to the photos on your display, you'll gain confidence in your workflow. With time, the first steps will be all you need to get predictable results. But for expensive prints, you might want an additional piece of mind. Labs offer a test print option for that. For a reduced price, you can purchase prints of your photos that contain a watermark. Those are perfect for checking colors, brightness, and sharpness.
To save even more, create a collage of several photos, as I show in the feature video.
Conclusion
In this article, I gave you a brief overview of the workflow I use to create high-quality prints for myself and my customers. On average, I spent around 30 minutes on each photo preparation. It's not much, considering I can use a proofed, resized, and sharpened photo repeatedly to create prints for my shop.

Join the Fstoppers community for free
-
Post comments and join in the discussions
-
Browse the site ad-free
-
Share your work and get featured in the community
-
Compete in the photo contests for fun and prizes
4 Comments
I agree with most of the recommendations, however, I would strongly advise against Topaz software for print. It (all of the tools they sell over prized) tends to blur details that are just about "still there" in the material - or add weird distortion where it ruins a large format print.
To me, in hundreds of use cases, diffusion upscale rs have provided far superior results to Topaz - and that's for free as in "free beer". Not only for buildings, nature but also for most face enhancement jobs, a bit of juggling with the available models blows Topaz not just out of the water but tight beyond the next galaxy cluster.
I am exaggerating to make a point here. For professional use, I don't consider Topaz to be even in the tool bag, compared to (mostly free) alternatives.
I also don't use it out of the box. As I say in the video, if Topaz is used, then only selectively because of the artifacts. There are usually areas where it gives good results, so there I mask it in. Other areas I don't. I'll give diffusion upscale a try. Thanks for the tip!
if you are fine with "noodles" (node based setups), give "comfy ui" a try. Forget about all the "generative AI" bla bla, just focus on the various upscalers available - some work real magic, actually "polishing" detail.
It's not "out of the box" either, but you have WAY more freedom than with locked-in software.
As for videos, sorry, I don't watch Youtube if I can get around it. I prefer a well written article over that anytime :-)
If your monitor is profiled correctly and your printer is correctly profiled, there is absolutely no need to do any sort of soft proofing, (with the possible exception of CMYK printing for mass productions).
I do my own prints for anything up to 21" and I can get exactly the result I want and see on my screen, every time. When I send images to be printed by a trusted lab, (Graphistudio - who have some of the most accurate printing services available), I get exactly what I see on my screen. There are no surprises.
Now there can be limitations as to colour densities etc due to the physical limitations of paper (usually matte papers), but this is almost impossible to replicate by viewing a soft proof, because soft proofs only deal with the electronic conversion process ad not the physical properties - so if printing an unknown matte paper, I may get a small test print to understand the paper's physical limitations.
An ICC profile fo a printer essentially makes corrections to ensure colours and densities are replicated correctly. If the profile is made accurately, the printer will print the correct reds, greens, blues, and all the nuances and tones in between.
I'll add that the standard ICC profiles offered by paper manufacturers are at best an approximation and are sometimes awful. (Hahnemühle, you should be ashamed of your standard profiles...) It is important to get a custom printer profile made.
When doing CMYK conversions, the colourspace is "skewed" a little and so there can be subtle changes to colours to make them "fit." (We work in RGB on our screens and the RGB space we work in is a different shape than a CMYK space). So to better understand these changes, we can softproof to see what will happen.
But CMYK is mainly for large print runs and we tend not to use it for one-offs or fine art prints. We are usually staying in the RGB world for our smaller print runs. And for these, a soft proof is not needed - ONLY if our monitor is correctly calibrated for the ambient conditions and the printer is correctly profiled for the ink / paper / printer combination.
It is usually recommended to have printer profiles made every year, because printers drift in accuracy a little. (I believe Graphistudio has a system where they profile-check their printers several times a day, but their hero printer is £3000,000 so they can afford such luxuries. :) )
I think I've only soft proofed twice in my life. Both were for CMYK mass prints.
But otherwise, printing should be easy and straightforward. It isn't a black art.
(Note: Permajet do quite nice custom profiles for any paper, and they're quick and cheap. They do custom profiles for their own papers for free)